
Active Directory Basics
Introduction
Microsoft's Active Directory is the backbone of the corporate world. It simplifies the management of devices and users within a corporate environment.
In this room, we'll take a deep dive into the essential components of Active Directory and assume the role of the new IT admin at THM Inc. As our first task, we have been asked to create a new Active Directory child domain, join a server to the domain, and then review some of the existing controls and configurations in the parent domain. You will be provided with administrative credentials for all servers to perform these configuration changes and complete the tasks ahead.
Learning Objectives
In this room, we will learn about Active Directory and will become familiar with the following topics:
- What Active Directory is
- What an Active Directory Domain is
- What components go into an Active Directory Domain
- Forests and Domain Trust
Prerequisites
Before starting this room, you should be familiar with the following:
- General familiarity with Windows
- Concepts covered in Windows Fundamentals
Network Configuration
This room uses a network where you will create your very own Active Directory forest! If this is your first time using networks on TryHackMe, it is suggested that you complete the Network Room Guide first. As a recap, you can use either the AttackBox to connect to this network or download the network OVPN file from the network diagram as shown below:
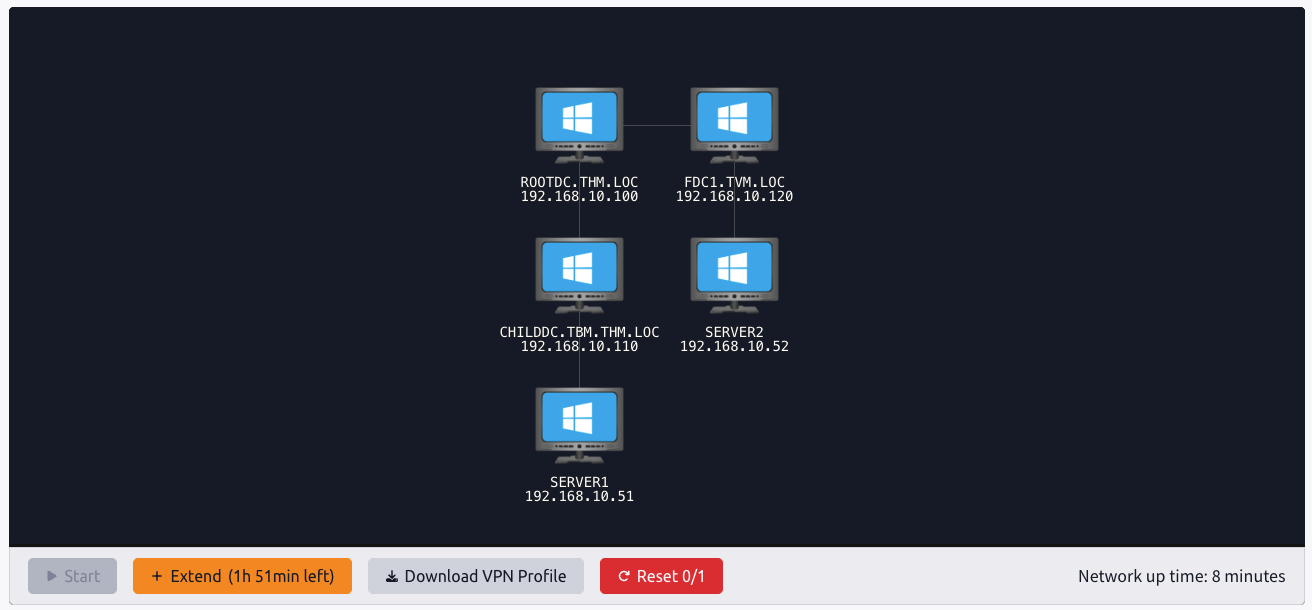
If you are experiencing issues connecting to the network, please refer back to the debugging steps provided in the Network Guide Room. Your subnet range for this network room will be 192.168.10.0/24.
?Answer the questions below
- I am ready to learn about Active Directory!
Windows Domains
Why Active Directory
Picture yourself administering a small business network with only five computers and five employees. In such a tiny network, you will probably be able to configure each computer separately without a problem. You will manually log in to each computer, create users for those who will use them, and make specific configurations for each employee's account. If a user's computer stops working, you will probably go to their location and it on-site.
While this sounds like a very relaxed lifestyle, let's suppose your business suddenly grows and now has 157 computers and 320 different users located across four different offices. Would you still be able to manage each computer as a separate entity, manually configure policies for each of the users across the network and provide on-site support for everyone? The answer is most likely no.
To overcome these limitations, we can use a Windows domain. Simply put, a Windows domain is a group of users and computers under the administration of a given business. The main idea behind a domain is to centralise the administration of common components of a Windows computer network in a single repository called Active Directory (AD). The server that runs the Active Directory services is known as a Domain Controller (DC).
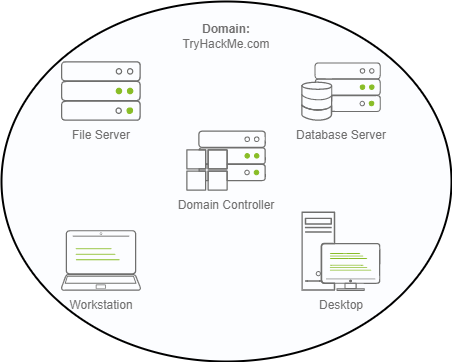
The main advantages of having a configured Windows domain are:
- Centralised identity management: All users across the network can be configured from Active Directory with minimum effort.
- Managing security policies: You can configure security policies directly in Active Directory and apply them to users and computers across the network as needed.
A Real-World Example
If this sounds a bit confusing, chances are you have already interacted with a Windows domain at some point in your school, university, or workplace.
In school/university networks, you will often be provided with a username and password that you can use on any of the computers available on campus. Your credentials are valid for all machines because whenever you enter them on a machine, the authentication process is forwarded back to Active Directory, where your credentials are checked. Thanks to Active Directory, your credentials don't need to be stored on each machine and are available across the network.
Active Directory is also the component that allows your school/university to restrict your access to the control panel on its machines. Policies will usually be deployed across the network so you don't have administrative privileges on those computers.
?Answer the questions below
- What is the name of the server that runs Active Directory services?
Active Directory
Parent Domain
We will now be working in the parent (or root) domain of our Active Directory forest. This is the TryHackMe (THM.LOC) domain. Connect to the Domain Controller (ROOTDC.THM.LOC) through RDP using the following credentials:
Credentials
Active Directory Domain Service
The core of any Windows Domain is the Active Directory Domain Service (AD DS). This service acts as a catalogue that stores information of all of the "objects" that exist on your network. Amongst the many objects supported by AD, we have users, groups, machines, printers, shares and many others. Let's look at some of them:
Users
Users are one of the most common object types in Active Directory. Users are one of the objects known as security principals, meaning they can be authenticated by the domain and assigned privileges over resources like files or printers. You could say that a security principal is an object that can act on network resources.
Users can be used to represent two types of entities:
- People: Users will generally represent individuals in your organisation who need to access the network, such as employees.
- Services: You can also define users for services such as IIS or MSSQL. Every service requires a user to run, but service users differ from regular users, as they only have the privileges needed to run their specific service.
Machines
Machines are another type of object in Active Directory; for every computer that joins the Active Directory domain, a machine object is created. Machines are also considered "security principals" and are assigned an account just as any regular user. This account has somewhat limited rights within the domain itself.
The machine accounts themselves are local administrators on the assigned computer; they are generally not supposed to be accessed by anyone except the computer itself, but as with any other account, if you have the password, you can use it to log in.
Note: Machine account passwords are automatically rotated and typically consist of 120 random characters.
Identifying machine accounts is relatively easy. They follow a specific naming scheme. The machine account name is the computer's name followed by a dollar sign. For example, a machine named ROOTDC will have a machine account called ROOTDC$.
Security Groups
If you are familiar with Windows, you probably know that you can define user groups to assign access rights to files or other resources to entire groups rather than individual users. This allows for better manageability as you can add users to an existing group, and they will automatically inherit all of the group's privileges. Security groups are also considered security principals and can therefore have privileges over network resources.
Groups can contain both users and machines as members. If needed, groups can include other groups as well.
Several groups are created by default in a domain that can be used to grant specific privileges to users. As an example, here are some of the most important groups in a domain:
| Security Group | Description |
| Domain Admins | Users of this group have administrative privileges over the entire domain. By default, they can administer any computer on the domain, including the DCs. |
| Server Operators | Users in this group can administer Domain Controllers. They cannot change any administrative group memberships. |
| Backup Operators | Users in this group are allowed to access any file, ignoring their permissions. They are used to perform backups of data on computers. |
| Account Operators | Users in this group can create or modify other accounts in the domain. |
| Domain Users | Includes all existing user accounts in the domain. |
| Domain Computers | Includes all existing computers in the domain. |
| Domain Controllers | Includes all existing DCs on the domain. |
You can obtain the complete list of default security groups from the Microsoft documentation.
Active Directory Users and Computers
To configure users, groups or machines in Active Directory, we need to log in to the Domain Controller and run "Active Directory Users and Computers" from the Start menu:
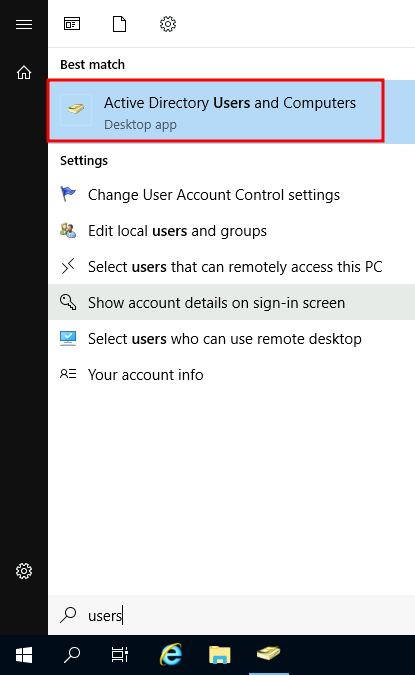
This will open up window that shows the hierarchy of users, computers, and groups in the domain. These objects are organised in Organizational Units (OUs), which are container objects that allow you to classify users and machines. OUs are mainly used to define sets of users with similar policing requirements. The people in the Sales department of your organisation are likely to have a different set of policies applied to them than those in IT, for example. Keep in mind that a user can belong to only one OU at a time.
Checking our machine, we can see that there is already an OU called THM with five child OUs for the IT, Management, Marketing, R&D, and Sales departments. It is very typical to see the OUs mimic the business's structure, as it allows for efficiently deploying baseline policies that apply to entire departments. Remember that while this would be the expected model most of the time, you can define OUs arbitrarily. Feel free to create a new OU called Students just for fun by right-clicking the THM OU and selecting New, then Organization Unit.
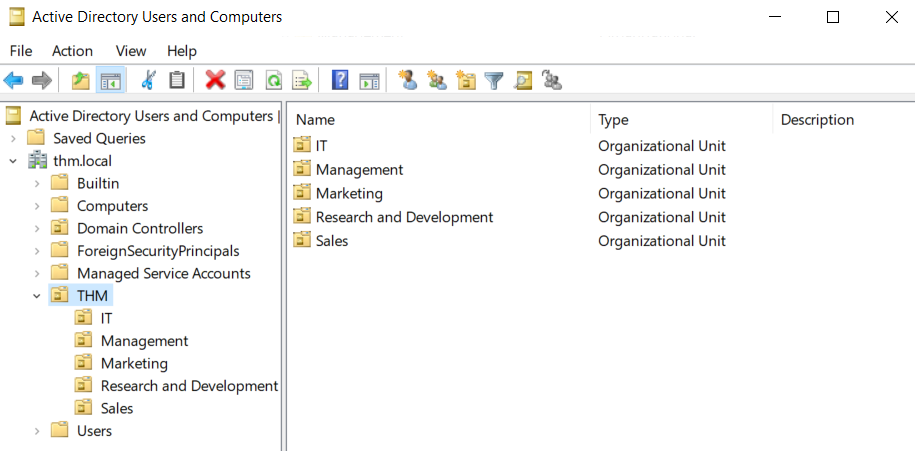
If you open any OUs, you can see the users they contain and perform simple tasks like creating, deleting, or modifying them as needed. You can also reset passwords if needed (pretty useful for the helpdesk):
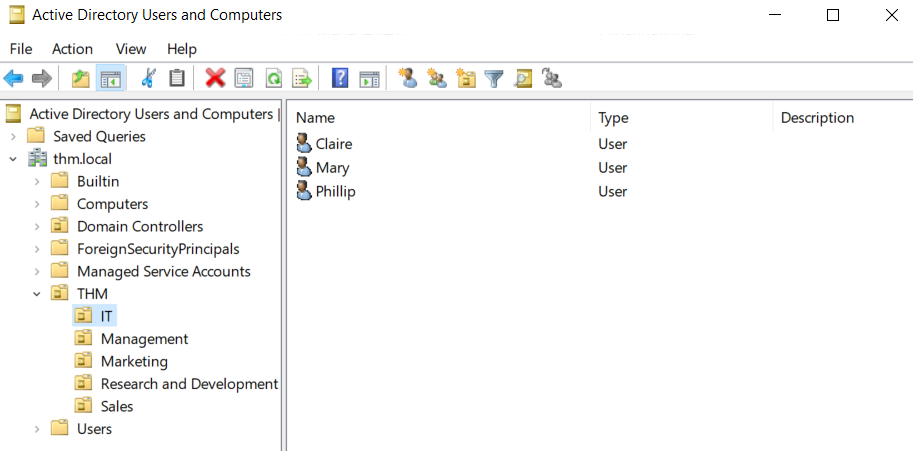
You probably noticed already that there are other default containers apart from the THM OU. These containers are created by Windows automatically and contain the following:
- Builtin: Contains default groups available to any Windows host.
- Computers: Any machine joining the network will be put here by default. You can move them if needed.
- Domain Controllers: Default OU that contains the DCs in your network.
- Users: Default users and groups that apply to a domain-wide context.
- Managed Service Accounts: Holds accounts used by services in your Windows domain.
Security Groups vs OUs
You are probably wondering why we have both groups and OUs. While both are used to classify users and computers, their purposes are entirely different:
- OUs are handy for applying policies to users and computers, including specific configurations that apply to sets of users based on their roles in the enterprise. Remember, a user can only be a member of a single OU at a time, as it wouldn't make sense to apply two different sets of policies to a single user.
- Security Groups, on the other hand, are used to grant permissions over resources. For example, you can use groups to allow some users to access a shared folder or a network printer. A user can be a part of many groups, which is needed to grant access to multiple resources.
?Answer the questions below
- Which group normally administers all computers and resources in a domain?
- What would be the name of the machine account associated with a machine named TOM-PC?
Authentication Methods
When using Windows domains, all credentials are stored in the Domain Controllers. Whenever a user tries to authenticate to a service using domain credentials, the service must ask the Domain Controller to verify that the credentials are correct. Two protocols can be used for network authentication in Windows domains:
- Kerberos: Used by any recent version of Windows. This is the default protocol in any recent domain.
- NetNTLM: Legacy authentication protocol kept for compatibility purposes.
While NetNTLM should be considered obsolete, most networks will have both protocols enabled. Let's take a deeper look at how each of these protocols works.
Kerberos Authentication
Kerberos authentication is the default authentication protocol in recent versions of Windows. Users who log into a service using Kerberos will be assigned tickets. Think of tickets as proof of a previous authentication. Users with tickets can present them to a service to demonstrate that they have already authenticated into the network and are therefore authorised to use it.
When Kerberos is used for authentication, the following process happens:
- The user sends their username and a timestamp encrypted with a key derived from their password to the Key Distribution Center (KDC), a service usually installed on the Domain Controller that issues Kerberos tickets on the network.
The KDC will create and send back a Ticket Granting Ticket (TGT), which will allow the user to request additional tickets to access specific services. The need for a ticket to get more tickets may sound weird, but it allows users to request service tickets without having to enter their credentials every time they want to connect to a service. Along with the TGT, a Session Key is provided to the user, which they will need to generate for subsequent requests.
Notice that the TGT is encrypted using the krbtgt account's password hash, so the user can't access its contents. It is essential to know that the encrypted TGT includes a copy of the Session Key as part of its contents, and the KDC does not need to store the Session Key, as it can recover a copy by decrypting the TGT if needed.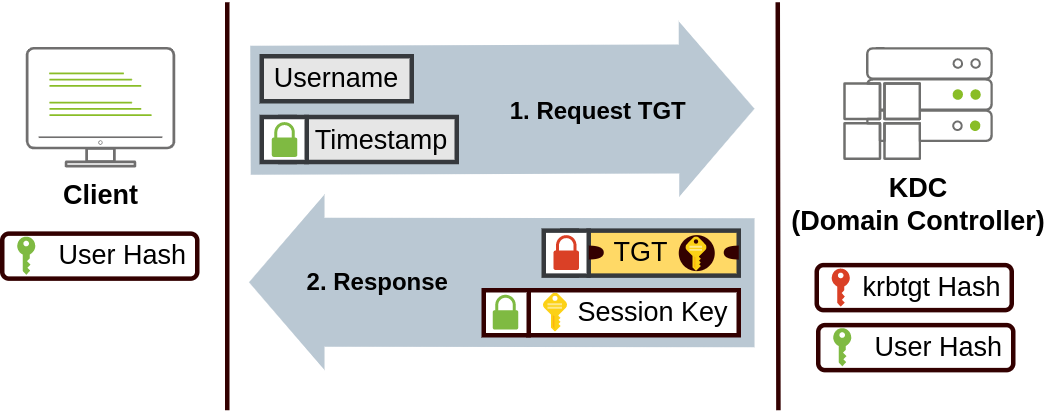
- When a user wants to connect to a service on the network, like a share, website or database, they will use their TGT to request a Ticket Granting Service (TGS) ticket from the KDC. TGS are tickets that allow connection only to the specific service they were created for. To request a TGS, the user will send their username and a timestamp, encrypted with the Session Key, along with the TGT and a Service Principal Name (SPN) indicating the service and server name we intend to access.
As a result, the KDC will send us a TGS along with a Service Session Key, which we will need to authenticate to the service we want to access. The TGS is encrypted using a key derived from the Service Owner Hash. The Service Owner is the user or machine account that the service runs under. The TGS contains a copy of the Service Session Key in its encrypted contents, so the Service Owner can access it by decrypting the TGS.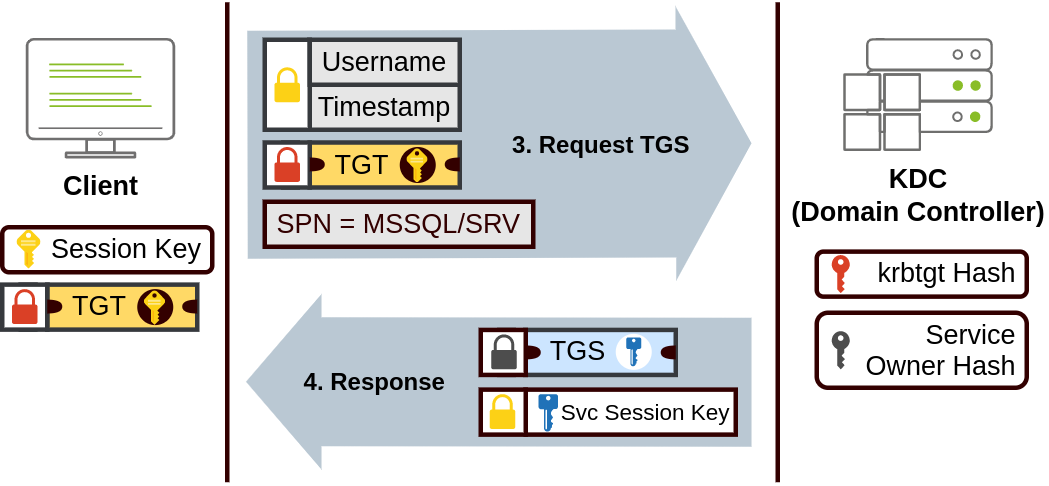
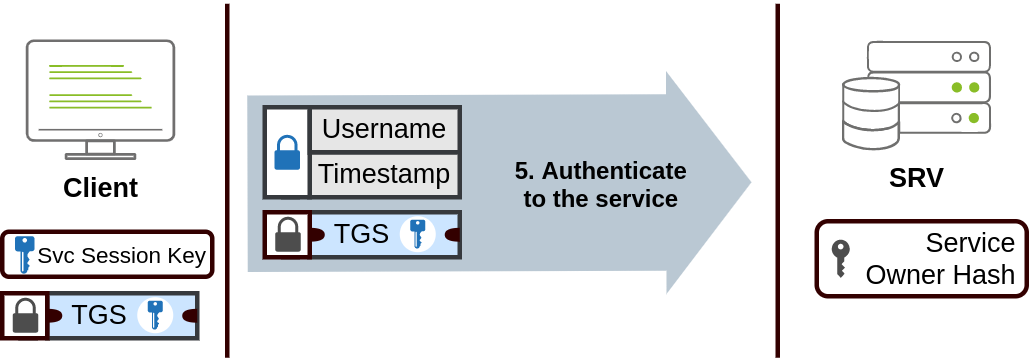
- The TGS can then be sent to the desired service to authenticate and establish a connection. The service will use its configured account's password hash to decrypt the TGS and validate the Service Session Key.
NetNTLM Authentication
NetNTLM works using a challenge-response mechanism. The entire process is as follows:
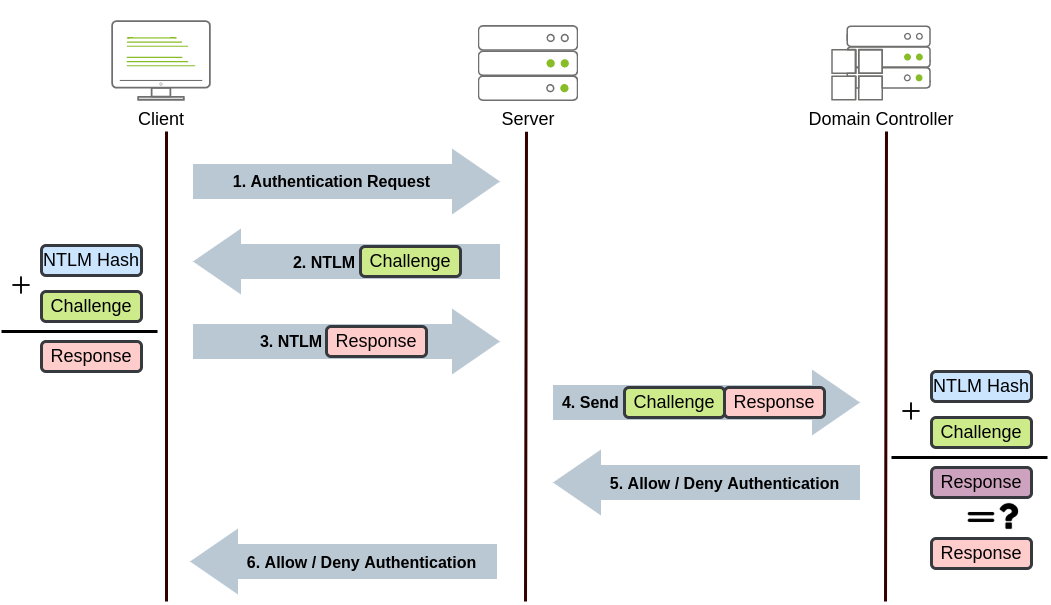
- The client sends an authentication request to the server they want to access.
- The server generates a random number and sends it as a challenge to the client.
- The client combines their NTLM password hash with the challenge (and other known data) to generate a response to the challenge and sends it back to the server for verification.
- The server forwards the challenge and the response to the Domain Controller for verification.
- The domain controller uses the challenge to recalculate the response and compares it to the original response sent by the client. If they both match, the client is authenticated; otherwise, access is denied. The authentication result is sent back to the server.
- The server forwards the authentication result to the client.
Note that the user's password (or hash) is never transmitted through the network for security.
Note: The described process applies when using a domain account. If a local account is used, the server can verify the response to the challenge itself without requiring interaction with the domain controller, since it already has the password hash stored locally in its SAM.
?Answer the questions below
- When referring to Kerberos, what type of ticket allows us to request further tickets known as TGS?
- When using NetNTLM, is a user's password transmitted over the network at any point? (yay/nay)
Trees, Forests and Trusts
So far, we have only looked at a single domain.
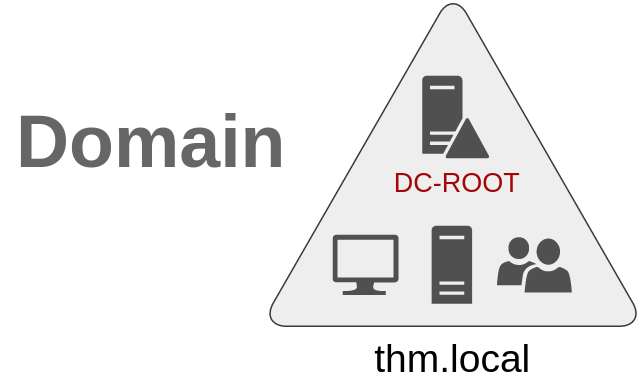
As companies grow, so do their networks. Having a single domain for a company is enough to start, but over time, additional needs might push you to have more than one.
Trees
Imagine, for example, TryHackMe decides to expand into the banking industry. Instead of just adding everything to the existing domain, it will be easier to manage a new subdomain. In this case, thm.loc will act as the parent domain, and we will create the TryBankMe (tbm.thm.loc) domain. In both the parent organisation and the banking organisation, we will have IT teams that need to manage their specific resources. Having just one massive AD structure will be hard to manage and is prone to misconfigurations and vulnerabilities.
Luckily for us, Active Directory supports integrating multiple domains, allowing you to partition your network into units that can be managed independently. If you have two domains that share the same namespace (thm.loc in our example), those domains can be joined into a Tree.
For our thm.loc domain, we want to create a new subdomain for the banking division, called tbm.thm.loc. Similarly, if we had offices in several regions, we could look to take this even further by creating us.tbm.thm.loc and uk.tbm.thm.loc, each with its AD, computers and users:
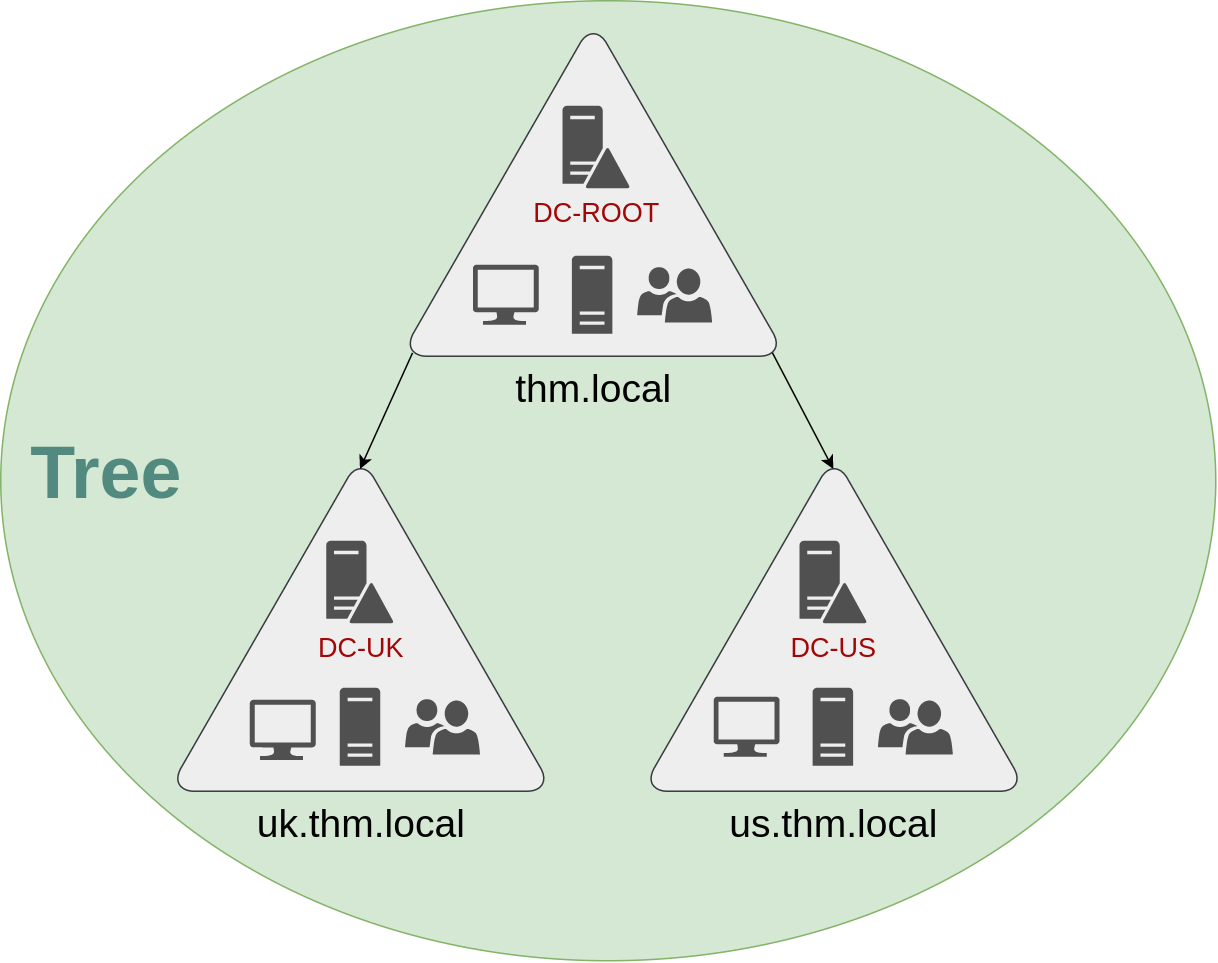
This partitioned structure gives us better control over who can access what in the domain. The IT team from the banking division will have its own DC that manages only the banking resources. For example, a banking user would not be able to alter permissions in the parent domain.
A new security group should be introduced when discussing trees and forests. The Enterprise Admins group grants a user administrative privileges across all of an enterprise's domains. Each domain would still have its Domain Admins with administrator privileges over their single domains, and the Enterprise Admins who can control everything in the enterprise.
Forests
The domains you manage can also be configured in different namespaces. Suppose your company continues growing and eventually needs to integrate with a new vendor called TryVendorMe. Both companies will have their own Active Directory domains (trees) but resources need to be shared across these domains (forests). Luckily, AD also has a method for joining these forests together.
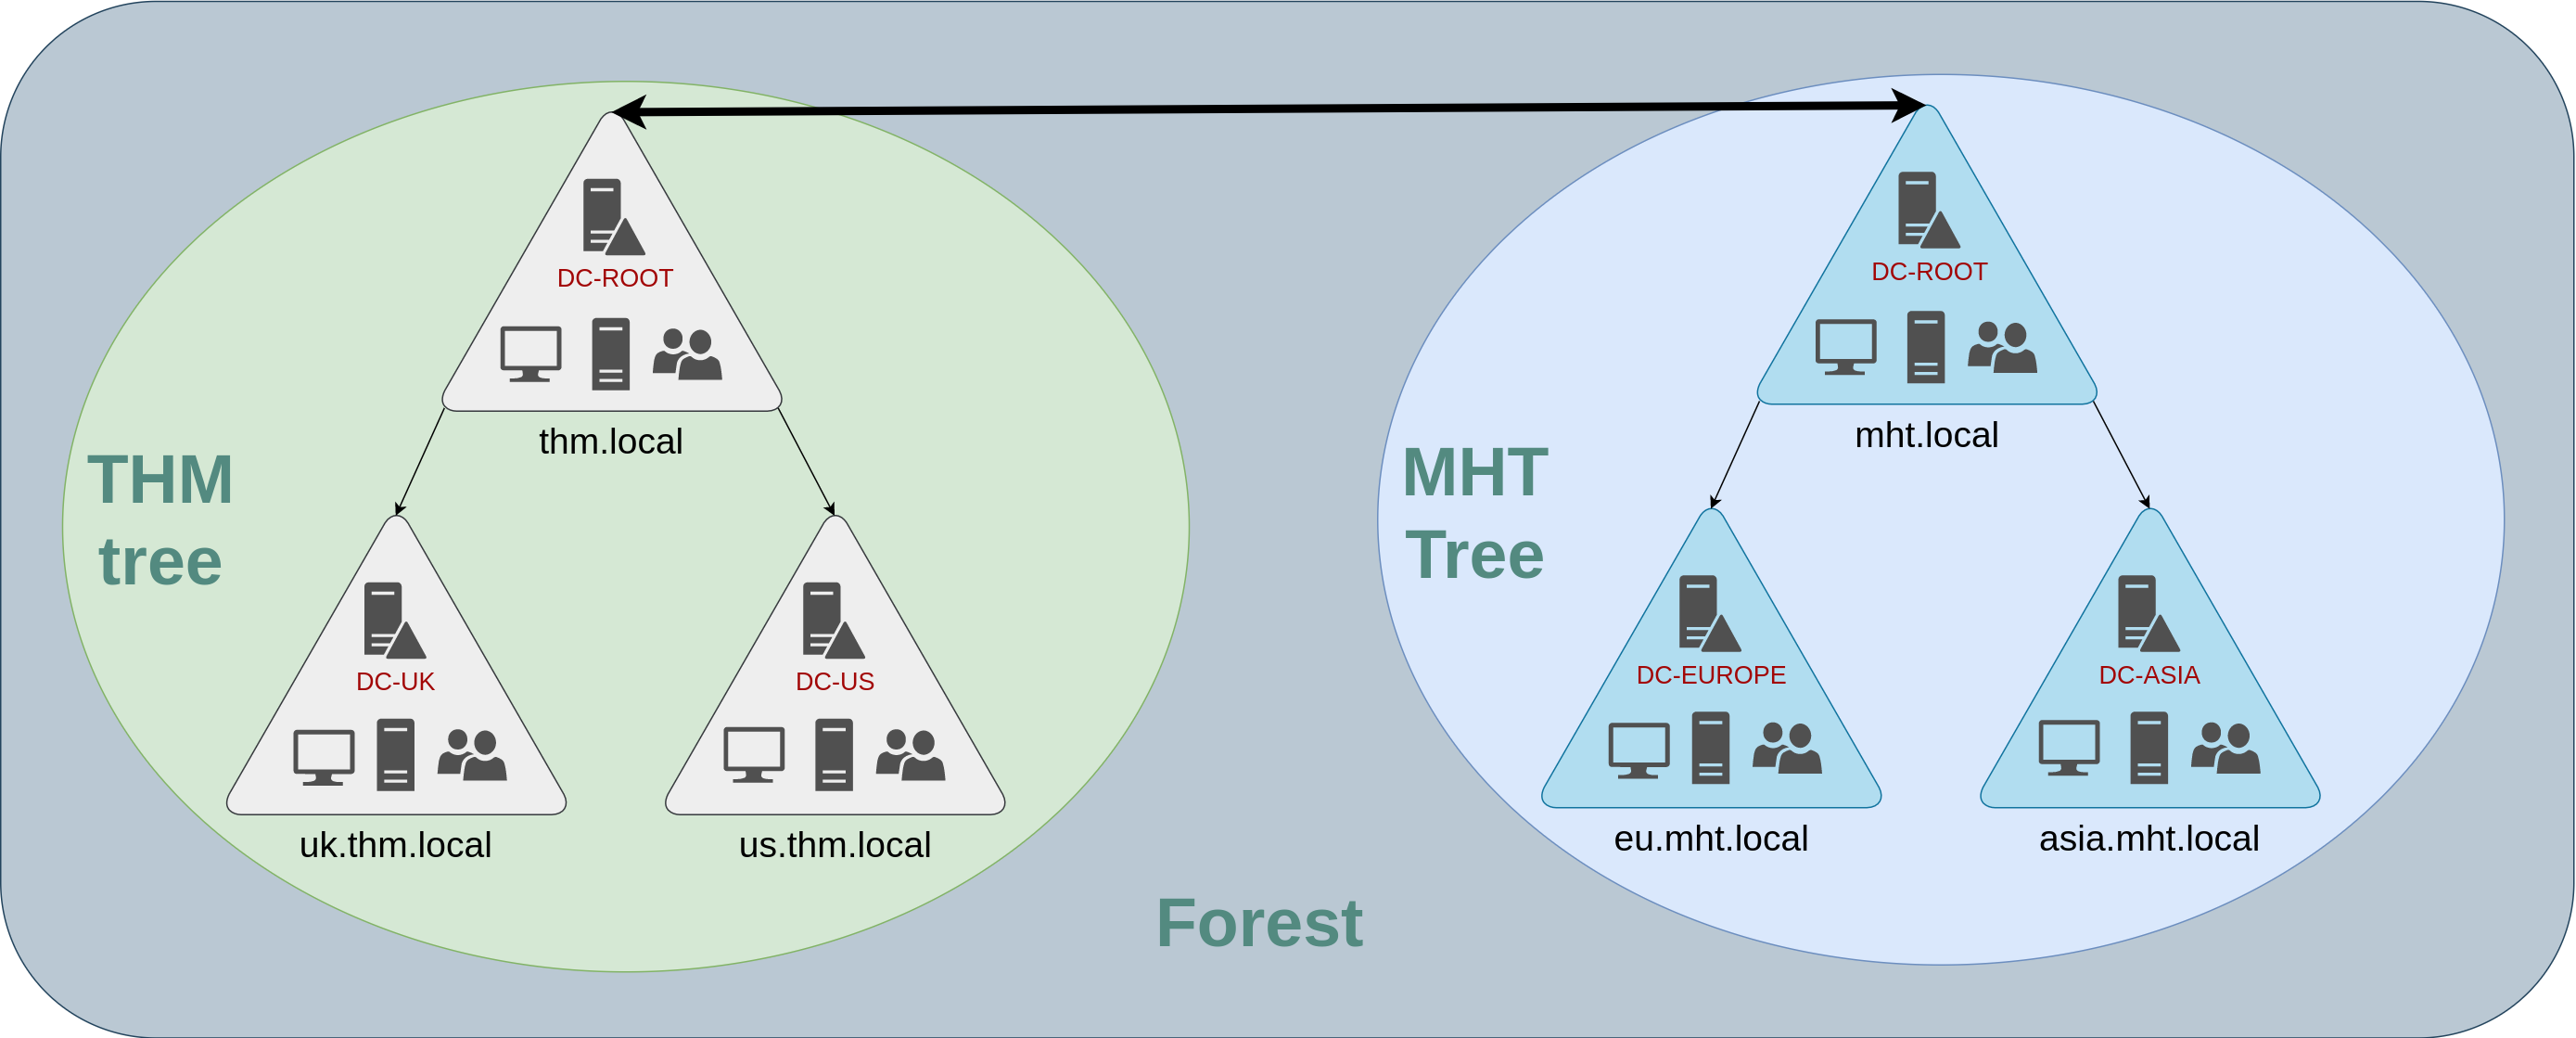
Trust Relationships
Having multiple domains organised in trees and forests allows you to have a well-organised compartmentalised network for management and resource allocation. But at some point, a user at TryVendorMe may need to provide support to a banking employee. For this to happen, domains arranged in trees and forests are joined together by trust relationships.
In simple terms, having a trust relationship between domains allows you to authorise a user from domain tvm.loc to access resources from domain tbm.thm.loc.
The simplest trust relationship that can be established is a one-way trust relationship. In a one-way trust, if Domain AAA trusts Domain BBB, this means that a user on BBB can be authorised to access resources on AAA:
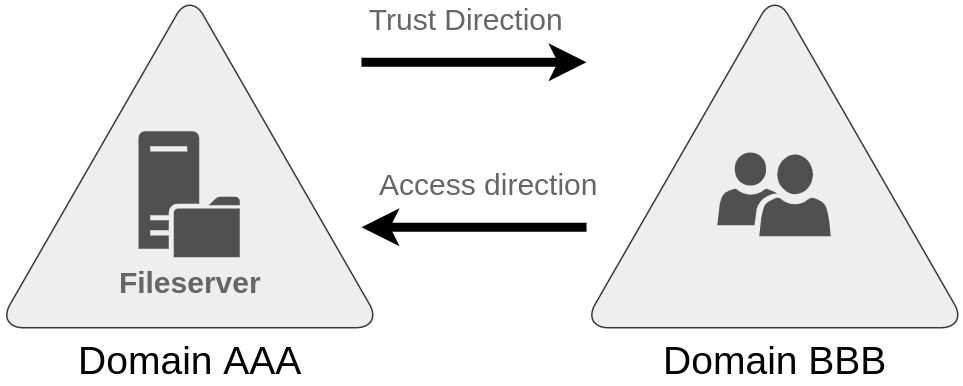
The direction of the one-way trust relationship is the opposite of the access direction.
Two-way trust relationships can also be established to allow both domains to mutually authorise users from the other domain. By default, joining several domains under a tree or forest creates a two-way trust relationship.
It is important to note that having a trust relationship between domains doesn't automatically grant access to all resources on other domains. Once a trust relationship is established, you can authorise users across different domains, but it's up to you what is authorised and what isn't.
Now that we understand the basics of Active Directory and forests, let's configure our very own!
?Answer the questions below
- What is a group of Windows domains that share the same namespace called?
Creating a New Domain
Child Domains
As discussed in the previous task, we want to configure a new tree in our forest for the banking division. We already have our primary domain, TryHackMe (thm.loc), and now want to create a new subsidiary, TryBankMe (TBM). In this case, our child domain will be tbm.thm.loc. Let's RDP into the server that we will promote to a domain controller using the credentials provided below:
Credentials
Domain Promotion
To promote this server to a domain controller, we will use the PowerShell script provided in C:\install-domain.ps1, which is detailed below:
#DNS
$parentdcIPAddress = "192.168.10.100"

echo 'Configuring DNS...'
$adapters = Get-WmiObject Win32_NetworkAdapterConfiguration
if ($adapters) {
    $adapters | ForEach-Object {$_.SetDNSServerSearchOrder($parentdcIPAddress)}
}

#Password Reset
$domainAdministratorPassword = "childdomainftw1!"
$domainSafeModeAdministratorPassword = "childdomainftw1!"

echo 'Resetting the Administrator account password and settings...'
$localAdminPassword = ConvertTo-SecureString $domainAdministratorPassword -AsPlainText -Force
Set-LocalUser `
    -Name Administrator `
    -AccountNeverExpires `
    -Password $localAdminPassword `
    -PasswordNeverExpires:$true `
    -UserMayChangePassword:$true

$safeModePassword = ConvertTo-SecureString $domainSafeModeAdministratorPassword -AsPlainText -Force

#Parent Domain Credentials
$parentAdministratorPassword = "learningadisfun1!"
$parentName = "THM.LOC"

$parentPassword = ConvertTo-SecureString $parentAdministratorPassword -AsPlainText -Force
$parentDA =  $parentName + "\Administrator"

echo 'Configuring the parent domain credentials'
$parentCredentials = New-Object System.Management.Automation.PSCredential($parentDA, $parentPassword)

#Tool Installation
echo 'Installing the AD services and administration tools...'
#Install-WindowsFeature AD-Domain-Services,RSAT-AD-AdminCenter,RSAT-ADDS-Tools

#Promoting to DC
$domainName = "tbm"
$domainNetbiosName = "TBM"
$parentFqdn = "thm.loc"

echo 'Installing the AD domain (be patient, this will take more than 5m to install)...'

Import-Module ADDSDeployment
Install-ADDSDomain `
    -Credential $parentCredentials `
    -NewDomainName $domainName `
    -SafeModeAdministratorPassword $safeModePassword `
    -CreateDnsDelegation:$true `
    -DatabasePath "C:\Windows\NTDS" `
    -DomainMode "6" `
    -NewDomainNetbiosName $domainNetbiosName `
    -InstallDns:$true `
    -NoRebootOnCompletion:$true `
    -Force:$true `
    -ParentDomainName $parentFqdn

echo 'Promotion complete! Restart required!'
Let's walk through what this script will do:
- DNS: This server will need to communicate with the existing Domain Controller. This is done by configuring the IP of ROOTDC as the DNS for this server.
- Password Reset: When we promote the server to a Domain Controller, the current Administrator account becomes the new domain's Administrator account. As such, we need to set the password for this account already.
- Parent Domain Credentials: To promote the server, we will need privileges and permissions from the parent domain. We also need to create a credential object using the parent domain's Administrator account.
- Tool Installation: To promote the server, additional Windows roles and features are required. This command, however, has been commented out because the tools have already been installed for you.
- Promoting to DC: After all the pre-steps are complete, it is time to promote the server to a domain controller. We provide it with the credentials for authentication to the parent domain as well as several configuration options such as where to install its database and what the new domain should be (
TBM).
Now that we understand what the script does, let's execute it using PowerShell:
      Windows PowerShell
Copyright (C) Microsoft Corporation. All rights reserved.

PS C:\Users\Administrator> C:\install-domain.ps1
Once the script has completed, we need to reboot the server to complete the process, as shown below:
PS C:\Users\Administrator> Restart-Computer -Force
Note: Given that we have just promoted this server to be a new domain controller, it will take some time for the configuration to take effect. After the reboot, wait for at least 5 minutes before reauthenticating the host.
However, now that we have created a new domain and domain controller, you will have to alter the credentials that you are using to authenticate:
Credentials
The domain controller may still be applying both Computer and User Policies. This process may take another 5 minutes to complete. Once completed, you will be authenticated to the new domain controller! An automated script would have pre-populated your domain for you. Let's take a look and enumerate some of the objects.
?Answer the questions below
- Once you have promoted the server to a domain controller, navigate to the flag verification system ( http://192.168.10.250:5000 ) and click Verify TBM Domain Promotion to receive a flag in C:\flag1.txt on CDC1. What is the flag?
Managing Users in AD
Your first task as the new domain administrator for the TryBankMe organisation is to review the existing AD OUs and users, as recent changes have happened occured within business. Just as you did on the parent domain controller, open the Active Directory Users and Computers panel and let's get working! When you received your flag in the previous task, the domain should have been automatically populated for you. When you open Active Directory Users and Computers, it should now look something like this:
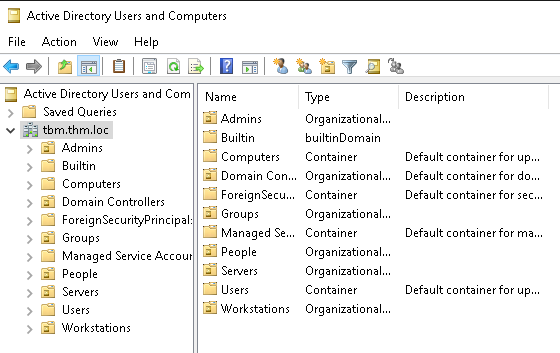
Before we continue, enable the Advanced Features in the View menu:
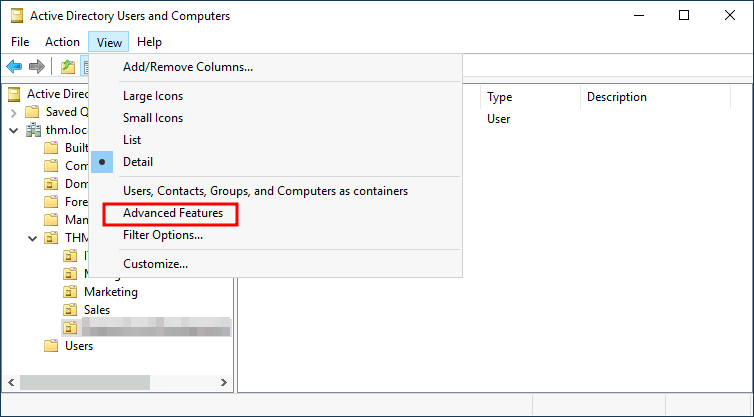
This will show you some additional containers and enable more options, such as allowing you to delete objects. Familiarise yourself with the structure of this domain by taking a closer look at the Groups and People OUs.
Delegation
One of the nice things you can do in AD is give specific users some control over some OUs. This process, known as delegation, allows you to grant users specific privileges to perform advanced tasks on OUs without requiring a Domain Administrator to step in.
One of the most common use cases for this is granting IT support the privileges to reset other low-privilege users' passwords. In the TryBankMe domain, members of the Tech Support group provide IT support to Bankers, so we want to delegate the control of resetting passwords for the Bankers OU to any member of this group.
For this example, we will delegate control over the Bankers OU to Tech Support. To delegate control over an OU, you can right-click it and select Delegate Control:
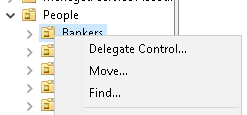
This should open a new window where you will first be asked for the users to whom you want to delegate control.
Note: To avoid mistyping the group's name, write "tech" and click the Check Names button. Windows will autocomplete the user for you.
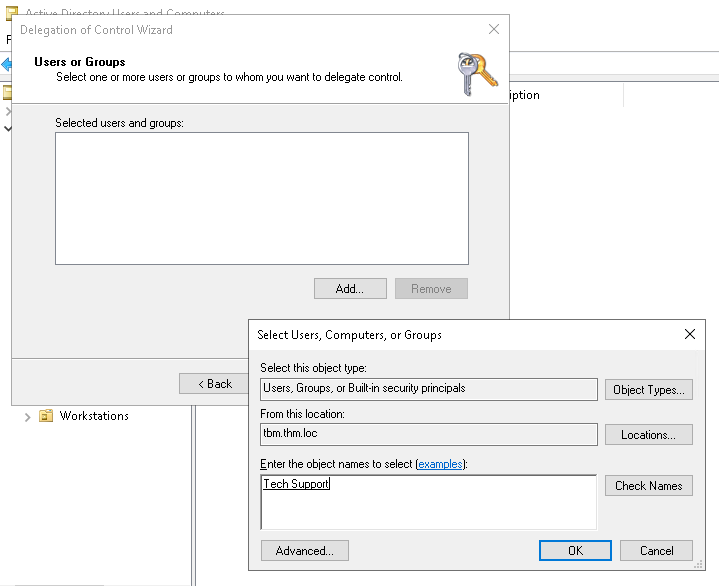
Click OK, and on the next step, select the Reset user passwords and force password change at next logon option:
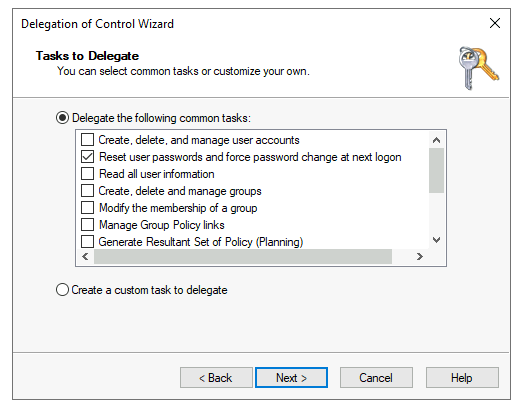
Click Next a couple of times, and then Finish. Now, any user of the Tech Support group should be able to reset passwords for any user in the banking department. There are various permissions that can be delegated. Feel free to play around with these further. You can even create a custom task to delegate, which allows incredibly granular control over the delegation configuration and which objects it applies to within the OU.
?Answer the questions below
- What is the fourth department as listed in the People OU?
- How many bankers are currently servicing private clients?
Domain-Joining a Computer
Domain Computers
TryBankMe has bought a new server (Server1) and is looking to join it to the domain. Once a machine is joined to the domain, Active Directory services can be used to manage this machine and provide access to it. Keeping your RDP session open on the TBM domain controller, let's create a new RDP session to this server:
Credentials
Once again, we will make use of a script in C:\join-domain.ps1 to join this server to our domain, as shown below:
#DNS
$dcIPAddress = "192.168.10.110"

echo "Pointing DNS"
$adapters = Get-WmiObject Win32_NetworkAdapterConfiguration
if ($adapters) {
    $adapters | ForEach-Object {$_.SetDNSServerSearchOrder($dcIPAddress)}
}

#Credentials
$domainAdministratorPassword = "childdomainftw1!"
$domainNetbiosName = "tbm.thm.loc"

$securePassword = ConvertTo-SecureString $domainAdministratorPassword -AsPlainText -Force
$username = $domainNetbiosName + "\Administrator"
$domainAdminCredentials = New-Object System.Management.Automation.PSCredential($username, $securePassword)

#Domain Joining
echo "Joining computer"
Add-Computer -DomainName $domainNetbiosName -Credential $domainAdminCredentials
echo "Computer Joined"
Let's work through the three main steps of the script:
- DNS: Similar to when we promoted the server to a domain controller, we need to tell the server where to find the domain controller. By pointing its DNS to our new DC, it will be able to establish contact with our domain.
- Credentials: Not everyone is authorised to onboard this new server. If anyone could onboard a machine to your domain, that would be a major security risk. As such, we need to provide the script with the credentials of an AD user who has permission to join this computer to the domain. It doesn't have to be the Administrator user, but it usually is a fairly privileged user account that is used.
- Domain Joining: Using the provided credentials, we can request that the server makes contact with the domain controller and join the domain.
Now that we understand what the script does, let's execute it using PowerShell:
      Windows PowerShell
Copyright (C) Microsoft Corporation. All rights reserved.

PS C:\Users\Administrator> C:\join-domain.ps1
Once the script has completed, we need to reboot the server to complete the process, as shown below:
PS C:\Users\Administrator> Restart-Computer -Force
Since the host has now been joined to the AD domain, we no longer need to use the local account for authentication. Instead, we can use the credentials from our domain:
Credentials
In the next task, we will take a look at how we can manage these computers in AD.
?Answer the questions below
- Once the host has been joined to the domain, navigate to the flag verification system ( http://192.168.10.250:5000 ) and click Verify Server1 Domain Joining to receive a flag in C:\flag2.txt on Server1. What is the flag?
Managing Computers in AD
Let's go back to the TryBankMe domain controller. By default, all the machines that join a domain (except DCs) are placed in the container called Computers. If we check our DC, we will see that some devices are already there:
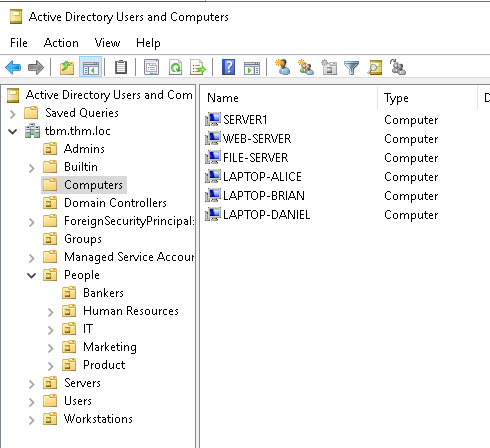
We can see some servers and some laptops corresponding to the users in our network. Having all of our devices there isn't the best idea since it's likely that you want different policies for your servers and the machines that regular users use daily.
While there is no golden rule for organising your machines, an excellent starting point to segregate devices by their use. In general, you'd expect to see devices divided into at least the three following categories:
Workstations
Workstations are one of the most common devices in an Active Directory domain. Each user in the domain will likely log in to a workstation. This is the device they will use for their work or for normal browsing. These devices should never have a privileged user logged in.
Servers
Servers are the second most common device in an Active Directory domain. Servers are generally used to provide services to users or other servers.
Domain Controllers
Domain Controllers are the third most common device in an Active Directory domain. Domain Controllers allow you to manage the Active Directory Domain. These devices are often considered the most sensitive devices in the network because they store hashed passwords for all user accounts in the environment.
Since we are tidying up our AD, let's use separate OUs for Workstations and Servers (Domain Controllers are already in an OU created by Windows). Drag and drop the various servers from the Computers OU into the Servers OU until you end up with this structure:
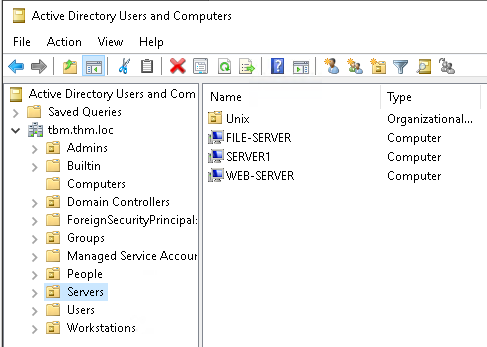
Now, move the laptops to the Workstations OU. Doing so will allow us to configure policies for each OU later.
?Answer the questions below
- After organising the available computers, how many ended up in the Workstations OU?
Group Policies
So far, we have organised users and computers into OUs just for the sake of it, but the main idea is to be able to deploy different policies to each OU individually. That way, we can push different configurations and security baselines to users depending on their department.
Windows manages such policies through Group Policy Objects (GPOs). GPOs are simply a collection of settings that can be applied to OUs. GPOs can contain policies aimed at either users or computers, allowing you to set a baseline on specific machines and identities.
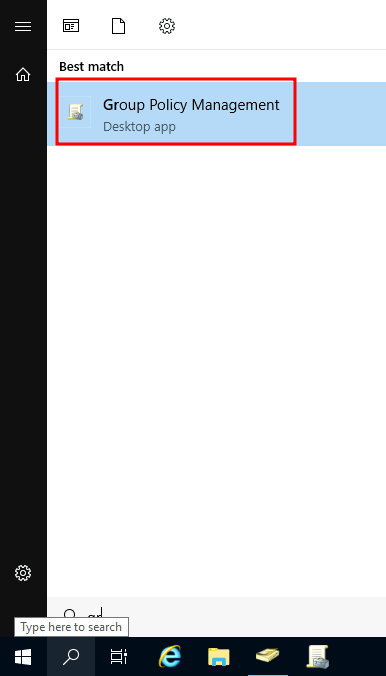
To configure GPOs, you can use the Group Policy Management tool, available from the Start menu:
The first thing you will see when you open it is your complete OU hierarchy, as defined earlier. To configure Group Policies, you first create a GPO under Group Policy Objects and then link it to the OU where you want the policies to apply. As an example, you can see there are some already existing GPOs in your machine:
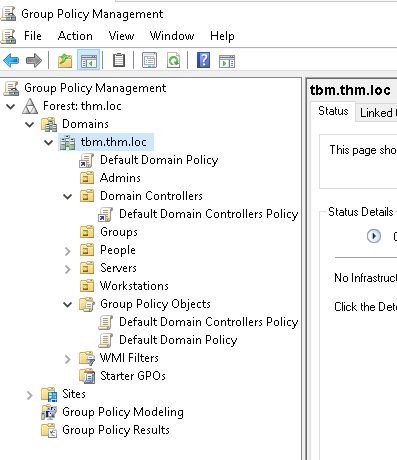
The image above shows that 2 GPOs have been created. From those, the Default Domain Policy is linked to the tbm.thm.loc domain as a whole, and the Default Domain Controllers Policy is linked to the Domain Controllers OU only. Something important to have in mind is that any GPO will apply to the linked OU and any sub-OUs under it. For example, the Bankers OU will still be affected by the Default Domain Policy.
Let's examine the Default Domain Policy to see what's inside a GPO. The first tab you'll see when selecting a GPO shows its scope, which is where the GPO is linked in the AD. For the current policy, we can see that it has only been linked to the tbm.thm.loc domain:
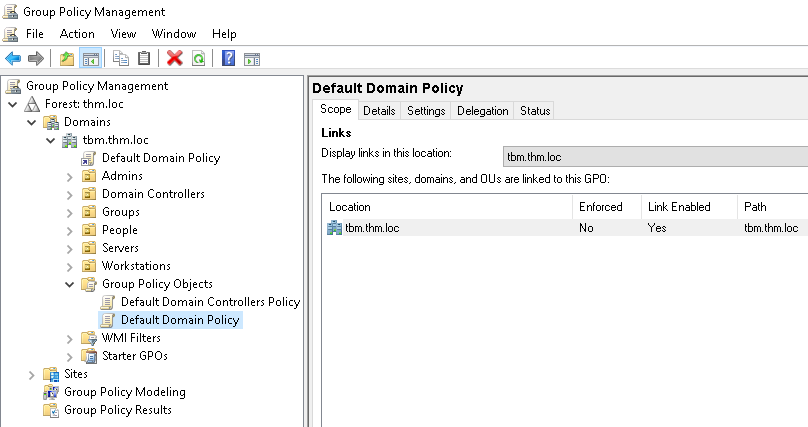
As you can see, you can also apply Security Filtering to GPOs so that they are only applied to specific users/computers under an OU. By default, they will apply to the Authenticated Users group, which includes all users/PCs.
The Settings tab includes the actual contents of the GPO and shows us which specific configurations it applies. As stated before, each GPO has configurations that apply to computers only and to users only.
Creating Local Admins
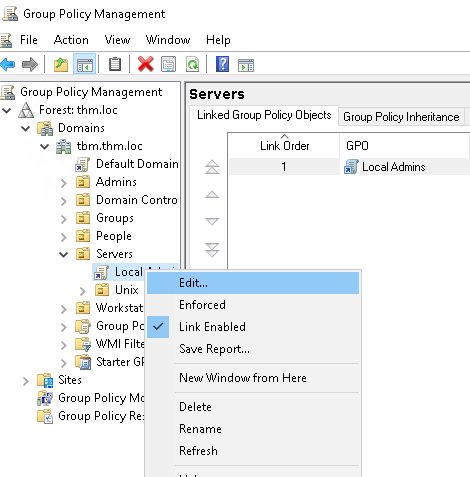
TryBankMe wants to ensure that members of the Product Admins group can perform administrative tasks on all servers. This means we need to ensure the Product Admins group is added to the local Administrators group on all servers in the Servers OU. Let's create a new GPO to push this configuration. Right-click on the Servers OU, and then click Create a GPO in this domain, and Link it here.
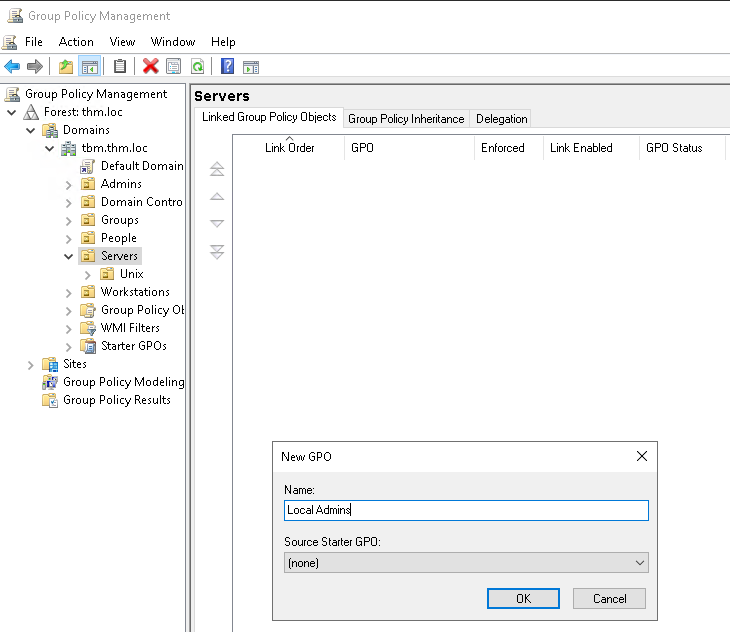
Give the GPO a name, click Ok, and then right-click on the newly created GPO to Edit it:
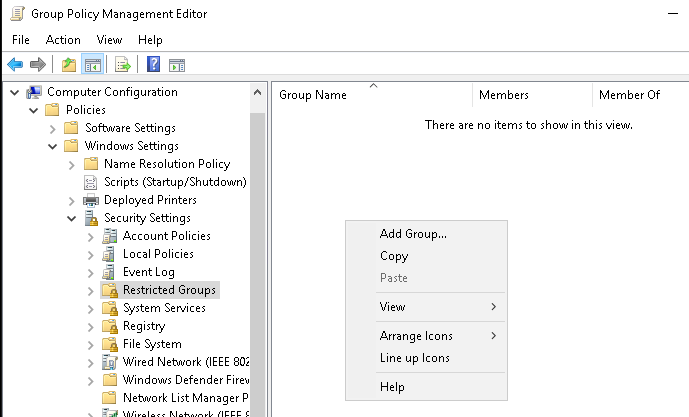
The change we want to make needs to apply to Computer objects. As such, we need to modify the Computer Configuration in the GPO. Navigate to Computer Configuration -> Policies -> Windows Settings -> Security Settings -> Restricted Groups. Here we can right-click to add a new group:
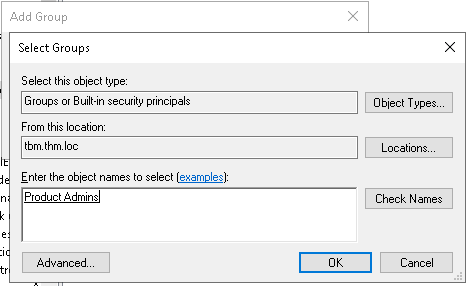
Using Browse, type "Product" and then click Check Names to search for the Product Admins group:
Click OK. Now we can specify that Product Admins should be added to the Administrators group, as shown below:
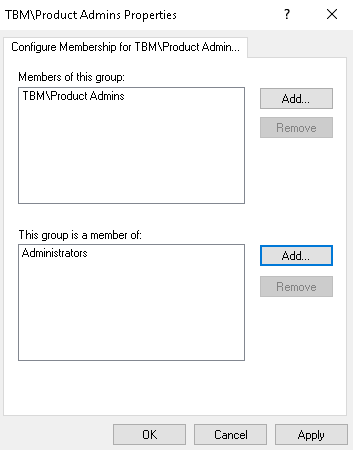
Click OK, and your GPO should be configured:
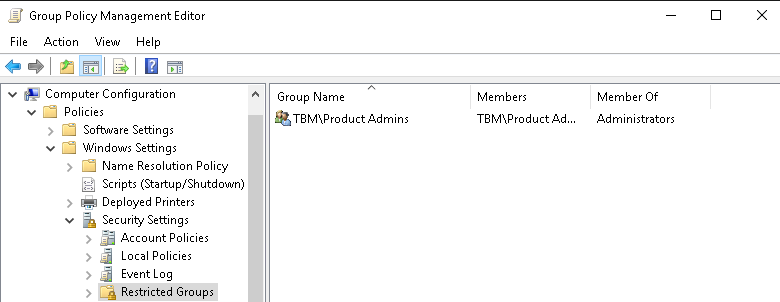
Let's test to see if our GPO has applied!
GPO distribution
GPOs are distributed to the network via a network share called SYSVOL, which is stored in the DC. All users in a domain should typically have network access to sync their GPOs periodically. The SYSVOL share points by default to the C:\Windows\SYSVOL\sysvol\ directory on each DC in our network.
Once a change has been made to any GPOs, it might take up to 2 hours for computers to catch up. If you want to force any particular computer to sync its GPOs immediately, you can always run the following command on the desired computer:
PS C:\> gpupdate /force
To check if our GPO has applied, run this command on Server1. Once completed, you can use the following credentials to RDP to Server1 as a member of the Product Admins group:
Credentials
If the GPO has been applied, the terry.fox account will be able to RDP into Server1.
?Answer the questions below
- What is the name of the network share used to distribute GPOs to domain machines?
- Once you have applied the GPO, navigate to the flag verification system ( http://192.168.10.250:5000 ) and click Verify Servers OU GPO to receive a flag in C:\flag3.txt on Server1. What is the flag?
Foreign Forest Trust
TryVendorMe
TryHackMe has decided to proceed with a partnership with TryVendorMe. As part of this partnership, certain members from TryHackMe need access to resources in TryVendorMe's domain, and vice versa. Before we can grant access to these resources, we first need to establish trust between the two forests.
Start by authenticating to TryVendorMe's domain controller:
Credentials
Once authenticated, let's look at establishing the trust between the two forests. Click Start and search for "Trust":
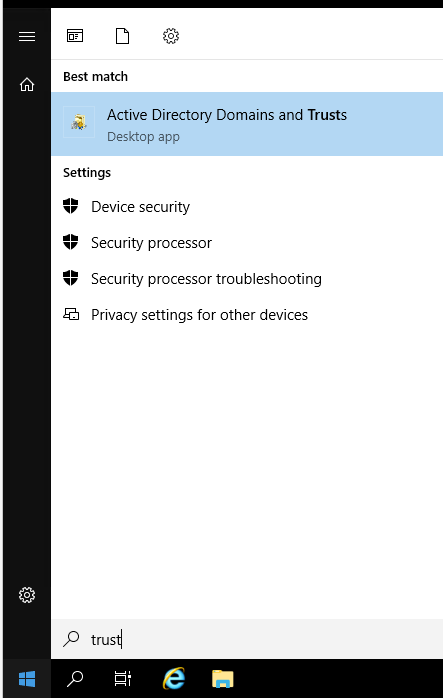
Open Active Directory Domains and Trusts:
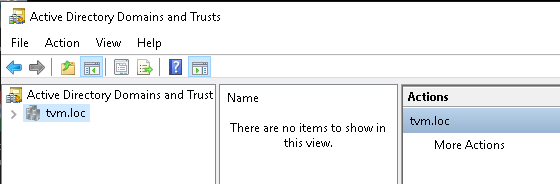
Right-click on the tvm.loc domain and select Properties and then Trusts. Click the New Trust button:
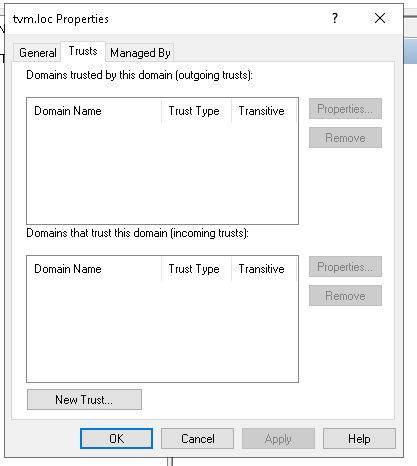
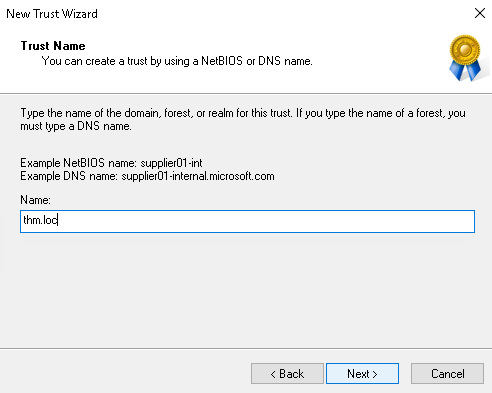
Click Next on the first screen and then provide the domain name of thm.loc:
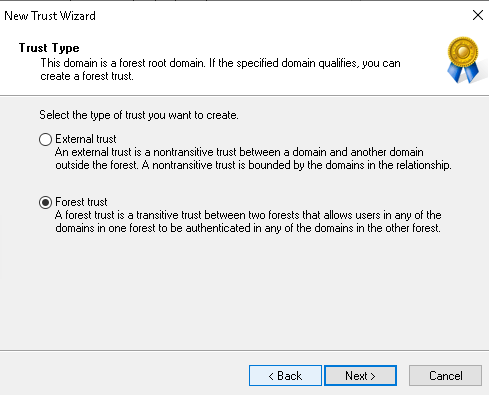
Select the Forest Trust option, since we control both forests:
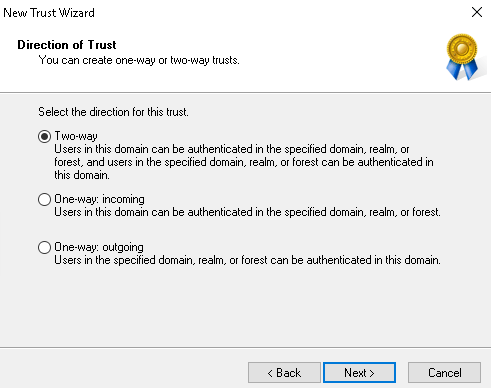
Since resources need to be shared in both directions, we need to configure a Two-way trust relationship:
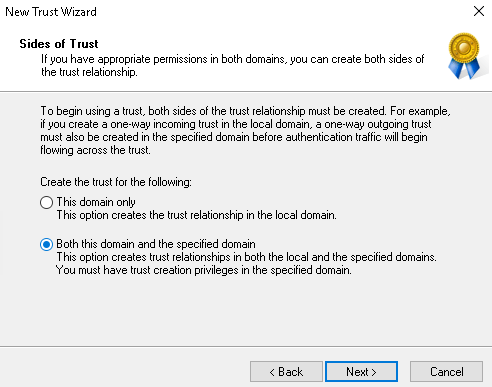
Since we have the credentials for the TryHackMe domain, select the option to configure the trust relationship for both domains:
Provide the credentials for the TryHackMe domain (Administrator:learningadisfun1!) and select the Forest-wide authentication method twice for both domains:
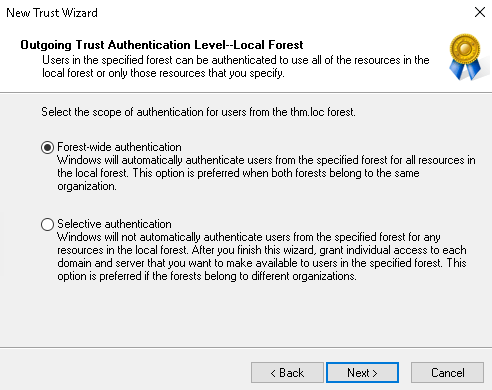
Once ready, hit Next to configure the trust:
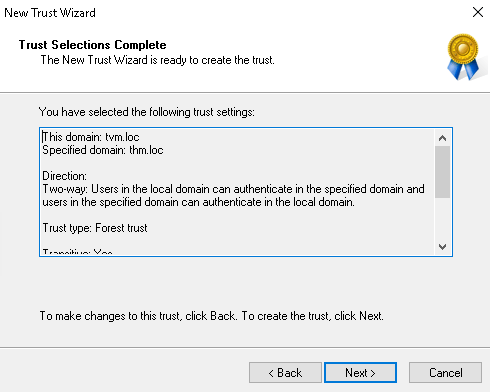
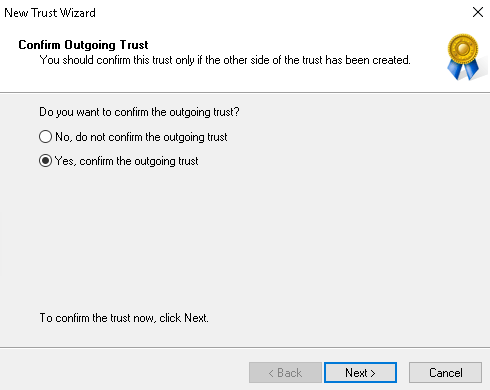
Select the option to confirm both the outgoing and incoming trusts:
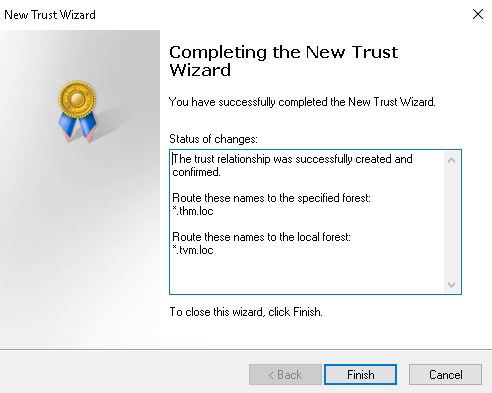
Once confirmed, you should see the following:
Sharing Resources
Now that our trust relationship has been established, we can share resources. On the TVM domain controller, open Active Directory Users and Computers and look for the Groups OU:
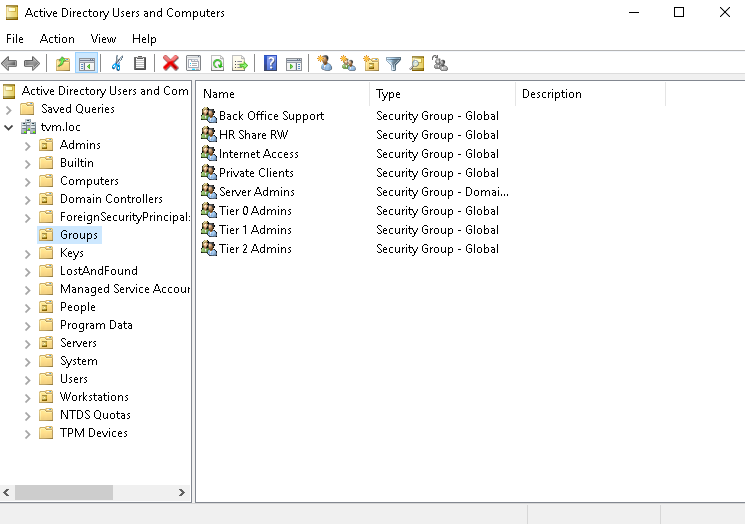
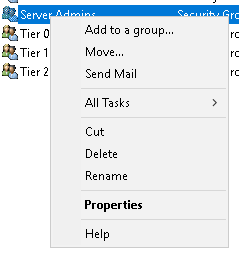
We want to grant Claire from TryHackMe administrative access to Server2. Let's configure this by adding the account to the Server Admins group. Right-click on this group and select Properties:
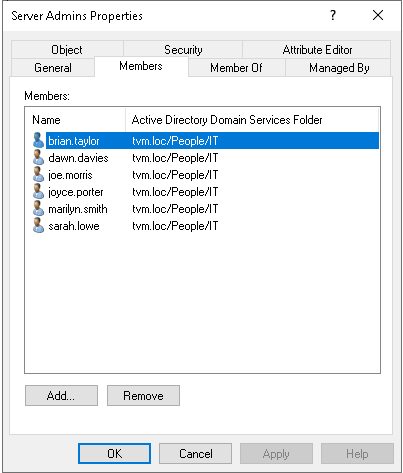
Under the Members tab, click the Add button:
In the text box, let's add Claire's account using “THM\Claire” and then select Check Names. You need to specify THM\ to indicate that Claire does not belong to the TVM domain:
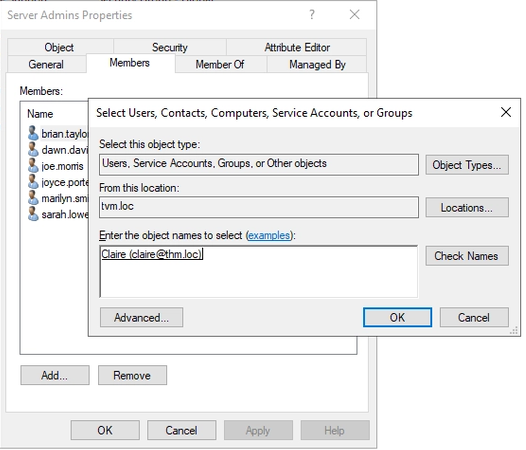
Click OK, then OK again, and Claire's account will be added. Now that Claire is a server admin in the TryVendorMe domain, the account can be used to authenticate to Server2 using the following credentials:
Credentials
Bidirectional Trust
As mentioned before, we have created a bidirectional trust relationship between the tvm.loc and thm.loc domains. However, given that thm.loc and tbm.thm.loc are part of the same forest in a parent-child configuration, this trust now also extends between the tvm.loc and tbm.thm.loc domains.
Using your RDP session on TBM's DC, let's explore this in AD Users and Computers by adding the alice.king account to the Product Admins group. Let's start by confirming that we can actually see the tvm.loc domain from TBM. Right-click on tbm.thm.loc, select the Change Domain option and change it to tvm.loc:
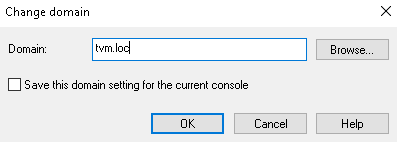
This will allow you to view the entire tvm.loc domain directly from the TBM DC. Change the domain back to tbm.thm.loc and let's add tvm\alice.king to the Product Admins group using the same Properties -> Members -> Add step we followed last time:
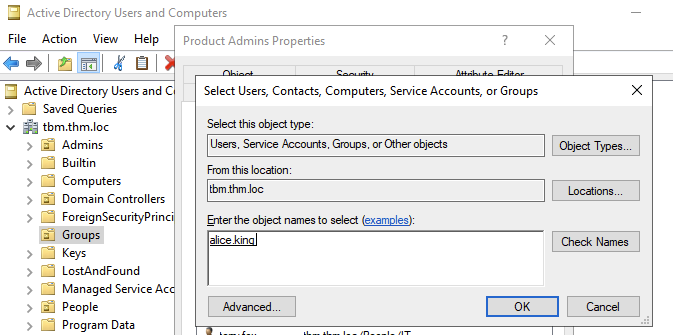
Once added, it should look like this:
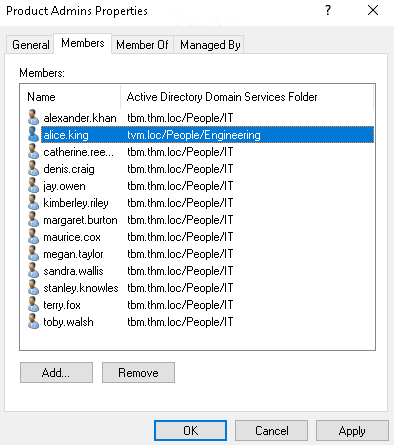
Click OK to apply the change. Given that we have configured the GPO in the previous task to grant all Product Admins local administrator rights on servers, the alice.king account should now be able to authenticate to Server1. Let's just step back and admire how interconnected we can create things in AD:
- The
alice.kingaccount is being managed in thetvm.locdomain. - There is bidirectional trust between the
tvm.locandthm.locforests. - Given that
tbm.thm.locis a child domain ofthm.loc, there is intrinsic bidrectional trust between these domains in thethm.locforest. - This means that there is bidirectional trust between
tvm.locandtbm.thm.loc, which allows us to make thealice.kingaccount a member of theProduct Adminsgroup. - The
Product Adminsgroup is being managed in thetbm.thm.locdomain.Server1is in theServersOU of thetbm.thm.locdomain where a GPO has been configured to grantProduct Adminslocal admin rights to all machines in this OU. - Therefore, the
alice.kingaccount fromtvm.locnow has local administrative rights overServer1!
Let's test this by authenticating to Server1 using the alice.king account:
Credentials
?Answer the questions below
- Once Claire has been enabled to authenticate to Server2, navigate to the flag verification system ( http://192.168.10.250:5000 ) and click Verify TVM Foreign Trust (Claire) to receive a flag in C:\flag4.txt on Server2. What is the flag?
- Once alice.king has been enabled to authenticate to Server1, navigate to the flag verification system ( http://192.168.10.250:5000 ) and click Verify TVM Foreign Trust (alice.king) to receive a flag in C:\flag5.txt on Server1. What is the flag?
Conclusion
In this room, we have explored the basic components and concepts of Active Directory and Windows Domains. Keep in mind that this room should only serve as an introduction to the basic concepts, as there's quite a bit more to explore to implement a production-ready Active Directory environment.
If you are interested in learning how to secure an Active Directory installation, be sure to check out the Active Directory Hardening Room. If, on the other hand, you'd like to know how attackers can take advantage of common AD misconfigurations and other AD hacking techniques, the Compromising Active Directory module is the way to go.
?Answer the questions below
- I have successfully completed the room!
 Windows Privilege Escalation
 Intro to AD Authentication