
Protocols and Servers 2
Introduction
Imagine logging into your email from a coffee shop's open Wi-Fi network. Your email client connects to the mail server, sends your username and password, and retrieves your messages. If that connection uses a cleartext protocol, every piece of data, including your credentials, is visible to anyone else on the network. This room examines how that happens, what attackers do with that access, and how modern protocols prevent it.
The Protocols and Servers room covered the following protocols:
- Telnet
- HTTP
- FTP
- SMTP
- POP3
- IMAP
These protocols were designed decades ago when security was not a primary concern. They transmit data, including credentials, in cleartext. While the protocols themselves are still in use, modern deployments almost always use encrypted versions: HTTPS instead of HTTP, SFTP or FTPS instead of FTP, SMTPS instead of SMTP, and so on. Telnet has been largely replaced by SSH for remote administration. Understanding the insecure versions helps you recognise misconfigurations, legacy systems, and the underlying mechanics that the secure versions build upon.
Servers implementing these protocols are subject to different kinds of attacks:
- Sniffing Attack (Network Packet Capture)
- Man-in-the-Middle (MITM) Attack
- Password Attack (Authentication Attack)
- Vulnerabilities
From a security perspective, you always need to think about what you aim to protect. Consider the security triad: Confidentiality, Integrity, and Availability (CIA). Confidentiality refers to keeping the contents of communications accessible only to the intended parties. Integrity is the assurance that any data sent is accurate, consistent, and complete when reaching its destination. Availability refers to being able to access the service when you need it. Different parties will put varying emphasis on these three. For instance, confidentiality would be the highest priority for an intelligence agency. Online banking will put most emphasis on the integrity of transactions. Availability is of the highest importance for any platform making money by serving ads.
Knowing that you are protecting Confidentiality, Integrity, and Availability (CIA), an attack aims to cause Disclosure, Alteration, and Destruction (DAD). The figure below reflects this relationship.
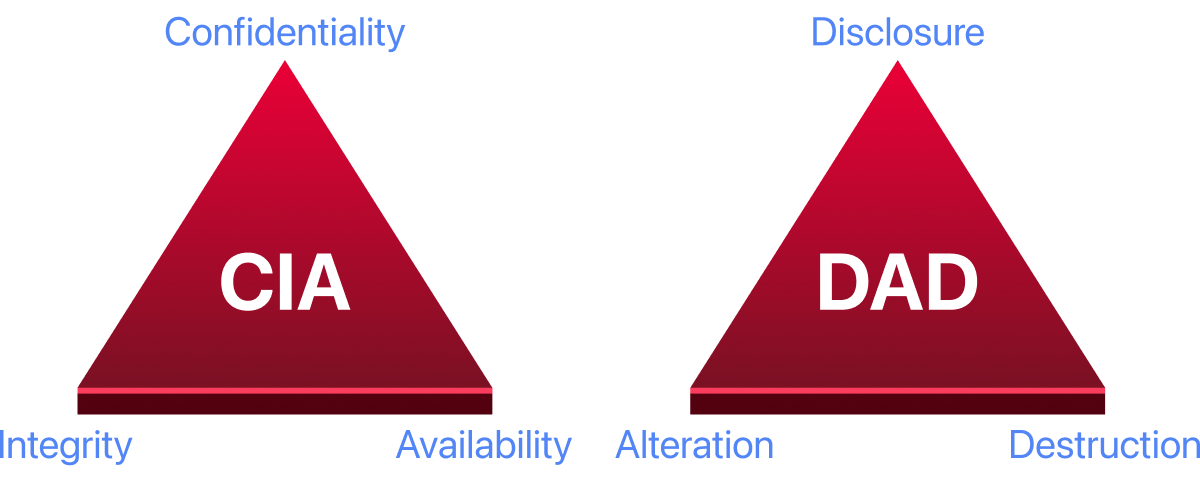
These attacks directly affect the security of the system. Network packet capture violates confidentiality and leads to the disclosure of information. A successful password attack can also lead to disclosure. A Man-in-the-Middle (MITM) attack breaks the system's integrity as it can alter the communicated data. This room focuses on these three attacks because they are integral to protocol design and server implementation.
The Modern Attack Landscape
While the fundamental attack categories remain the same, the landscape has evolved:
- Sniffing attacks are harder on properly configured networks due to widespread TLS adoption, but they remain effective against misconfigured services, internal networks without encryption, and legacy systems.
- MITM attacks are mitigated by technologies like HSTS (HTTP Strict Transport Security), certificate pinning, and Certificate Transparency logs, but they can still succeed when these protections are absent or improperly implemented.
- Password attacks have evolved beyond simple brute force. Attackers now use credential stuffing (trying leaked username/password pairs from breaches), password spraying (trying common passwords across many accounts), and leverage massive breach databases.
Vulnerabilities are of a broader spectrum, and exploited vulnerabilities have different impacts on target systems. For instance, exploiting a Denial of Service (DoS) vulnerability can affect the system's availability, while exploiting a Remote Code Execution (RCE) vulnerability can lead to more severe damage. A vulnerability by itself creates a risk; damage can occur only when the vulnerability is exploited. Vulnerabilities are not covered in this room as they have their own module, Vulnerability Research.
This room focuses on how a protocol can be upgraded or replaced to protect against disclosure and alteration, protecting the confidentiality and integrity of transmitted data. Hydra, a powerful tool for testing password strength by attempting authentication with wordlists, is also introduced. Understanding how attackers approach credential attacks helps you appreciate why strong passwords, account lockout policies, and multi-factor authentication are essential defences.
Note on the lab machine: You will need the attached lab machine starting from Task 5 (SSH). You can start it now or when you reach that task. Tasks 2 through 4 are informational and do not require the VM.
?Answer the questions below
- We suggest that you start the AttackBox and the lab machine as you proceed to tackle the following tasks. You can connect to the different services over Telnet or Netcat for better practice and learning experience.
Sniffing Attack
A sniffing attack refers to using a network packet capture tool to collect information about the target. When a protocol communicates in cleartext, the data exchanged can be captured by a third party to analyse. A simple network packet capture can reveal information such as the content of private messages and login credentials if the data is not encrypted in transit.
Where Sniffing Attacks Are Still Relevant
You might think that sniffing attacks are outdated, given the widespread adoption of TLS encryption. However, they remain a significant threat in several scenarios:
- Internal corporate networks where traffic between systems may not be encrypted
- Legacy systems that still use cleartext protocols (older mail servers, embedded devices, industrial control systems)
- Misconfigured services where TLS is available but not enforced
- IoT devices that often use unencrypted protocols for communication
- Wireless networks where attackers within range can capture traffic
- After a successful MITM attack that downgrades or strips encryption
During internal penetration tests and red team engagements, sniffing remains a valuable technique for gathering credentials and understanding how systems communicate.
Packet Capture Tools
A sniffing attack can be conducted using an Ethernet (802.3) network card, provided that the user has proper permissions (root permissions on Linux and administrator privileges on Windows). There are many programs available to capture network packets. The following are the most common:
- Tcpdump is a free, open-source command-line interface (CLI) program that has been ported to work on many operating systems. It is lightweight and available on most Linux systems by default.
- Wireshark is a free open-source graphical user interface (GUI) program available for several operating systems, including Linux, macOS, and Windows. It provides powerful filtering, protocol dissection, and visualisation capabilities.
- Tshark is a CLI alternative to Wireshark that uses the same dissection engine. It is useful for scripting and automation.
Other tools worth knowing about include tcpflow for reassembling TCP streams, ngrep for pattern matching in network traffic, and NetworkMiner for extracting files and images from captured traffic. There are also several specialised tools for capturing passwords and complete messages. However, this can still be achieved by Tcpdump and Wireshark with some added effort.
Practical Example: Capturing POP3 Credentials
Consider a user checking email messages using POP3. The following example uses Tcpdump to capture the username and password.
This attack requires access to the network traffic. An attacker could achieve this via a wiretap, a switch with port mirroring configured, ARP spoofing on a local network, or a compromised system on the same network segment. Alternatively, the traffic can be accessed by launching a successful Man-in-the-Middle (MITM) attack.
The command used is sudo tcpdump port 110 -A. The sudo prefix is required because packet captures require root privileges. The port 110 filter limits captured packets to those exchanged with the POP3 server (POP3 uses port 110 by default). The -A flag displays the contents of captured packets in ASCII format, making cleartext credentials readable in the output.
pentester@TryHackMe$ sudo tcpdump port 110 -A
[...]
09:05:15.132861 IP 10.20.30.1.58386 > 10.20.30.148.pop3: Flags [P.], seq 1:13, ack 19, win 502, options [nop,nop,TS val 423360697 ecr 3958275530], length 12
E..@.V@.@.g.
...
......n......"............
.;....}.USER frank

09:05:15.133465 IP 10.20.30.148.pop3 > 10.20.30.1.58386: Flags [.], ack 13, win 510, options [nop,nop,TS val 3958280553 ecr 423360697], length 0
E..4..@.@.O~
...
....n....".........?P.....
...i.;..
09:05:15.133610 IP 10.20.30.148.pop3 > 10.20.30.1.58386: Flags [P.], seq 19:43, ack 13, win 510, options [nop,nop,TS val 3958280553 ecr 423360697], length 24
E..L..@.@.Oe
...
....n....".........<-.....
...i.;..+OK Password required.

09:05:15.133660 IP 10.20.30.1.58386 > 10.20.30.148.pop3: Flags [.], ack 43, win 502, options [nop,nop,TS val 423360698 ecr 3958280553], length 0
E..4.W@.@.g.
...
......n......".....??.....
.;.....i
09:05:22.852695 IP 10.20.30.1.58386 > 10.20.30.148.pop3: Flags [P.], seq 13:28, ack 43, win 502, options [nop,nop,TS val 423368417 ecr 3958280553], length 15
E..C.X@.@.g.
...
......n......".....6......
.<.....iPASS D2xc9CgD
[...]
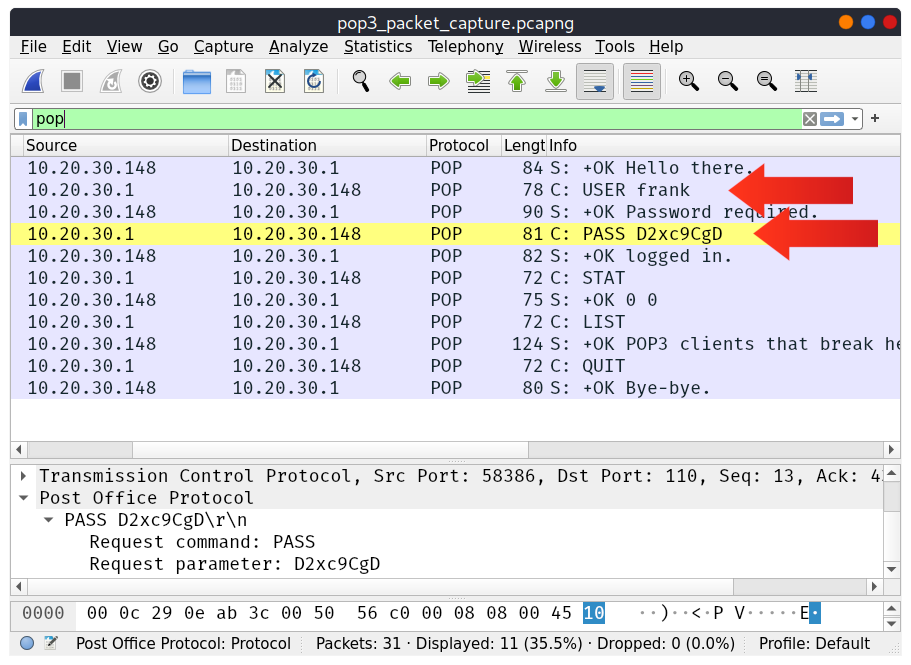
In the terminal output above, unimportant packets have been removed for clarity. The username and password were sent in separate packets. The first packet explicitly displays USER frank, while the last packet reveals the password PASS D2xc9CgD.
Wireshark can achieve the same results. In the Wireshark window below, the filter field contains pop. With only POP3 traffic displayed, the captured username and password are visible.
Useful Tcpdump Filters
When capturing traffic, effective filtering helps you focus on relevant packets:
# Capture traffic on a specific port
sudo tcpdump port 110 -A

# Capture traffic to/from a specific host
sudo tcpdump host 10.20.30.148 -A

# Capture HTTP traffic (may include credentials in POST requests)
sudo tcpdump port 80 -A

# Capture FTP traffic (credentials sent in cleartext)
sudo tcpdump port 21 -A

# Write captured packets to a file for later analysis
sudo tcpdump -w capture.pcap

# Read and analyse a capture file
tcpdump -r capture.pcap -A
Mitigation
Any protocol that uses cleartext communication is susceptible to this kind of attack. The only requirement for the attack to succeed is access to a system between the two communicating parties or on the same network segment.
The primary mitigation is adding an encryption layer on top of the network protocol. Transport Layer Security (TLS) has been added to HTTP, FTP, SMTP, POP3, IMAP, and many others. For remote access, Telnet has been replaced by the secure alternative Secure Shell (SSH).
Additional mitigations include:
- Network segmentation limits which systems can see each other's traffic by dividing the network into isolated zones.
- Encrypted VLANs and tunnels protect sensitive traffic even on internal networks.
- 802.1X port-based authentication requires devices to authenticate before gaining network access, preventing unauthorised devices from connecting and sniffing traffic.
- Zero trust architecture is a security model that treats all network traffic as potentially hostile, encrypting all communications regardless of whether they originate inside or outside the network perimeter.
- Monitoring for ARP spoofing and other traffic redirection techniques helps detect sniffing attempts in progress.
Modern best practice assumes the network is hostile, even internal networks. This means encrypting all traffic, not just traffic that crosses the internet.
For further exploration of Wireshark, see the Wireshark 101 room.
?Answer the questions below
- What do you need to add to the command sudo tcpdump to capture only Telnet traffic?
- What is the simplest display filter you can use with Wireshark to show only IMAP traffic?
Man-in-the-Middle (MITM) Attack
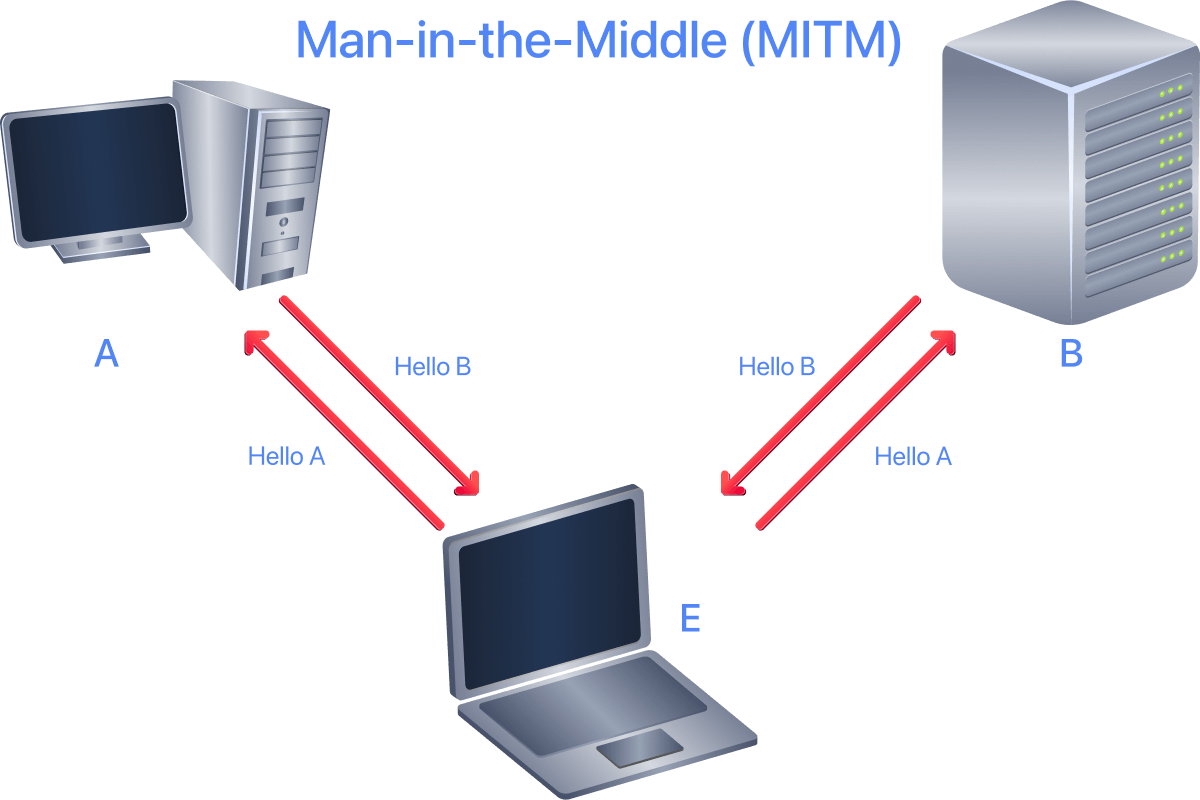
A Man-in-the-Middle (MITM) attack occurs when a victim (A) believes they are communicating with a legitimate destination (B) but is unknowingly communicating with an attacker (E). In the figure below, A requests the transfer of $20 to M. However, E alters this message and replaces the original value with a new one. B receives the modified message and acts on it.
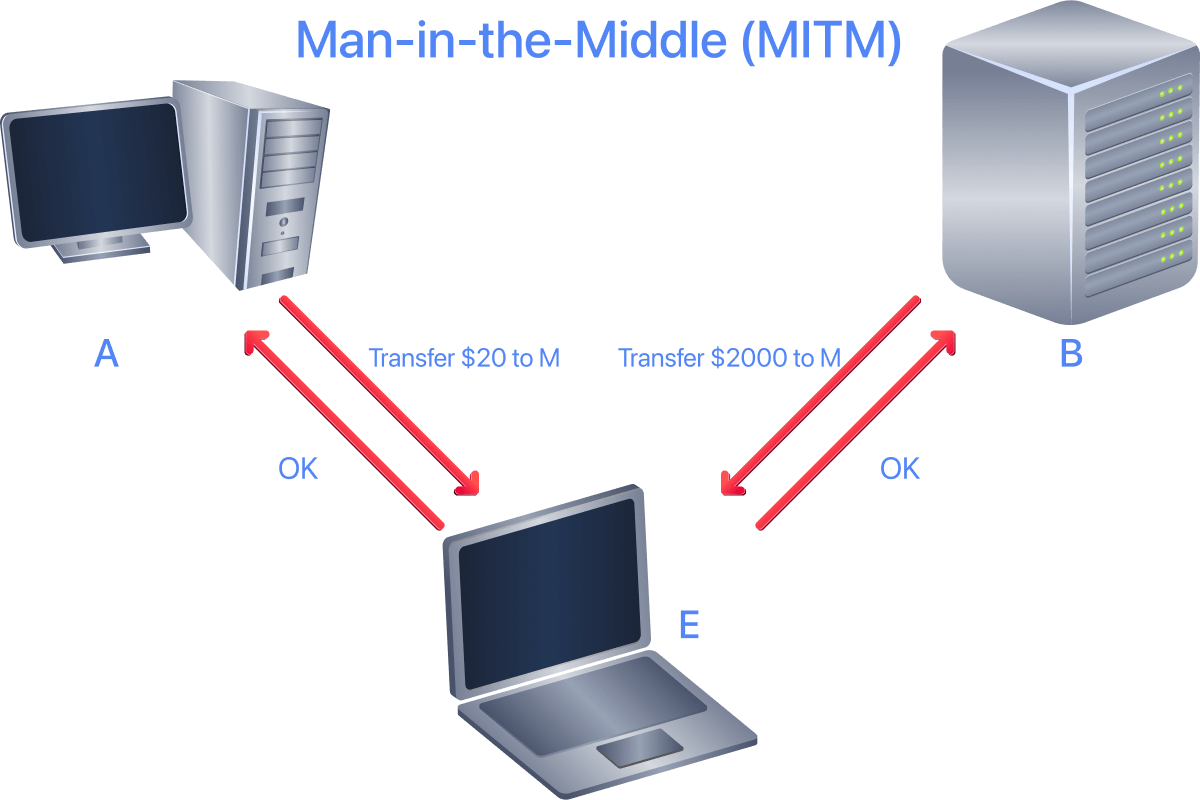
This attack is relatively simple to carry out if the two parties do not confirm the authenticity and integrity of each message. In some cases, the chosen protocol does not provide secure authentication or integrity checking. Some protocols have inherent insecurities that make them susceptible to this kind of attack.
How MITM Attacks Work
For an attacker to position themselves between two communicating parties, they typically need to redirect traffic through their system. Common techniques include:
ARP Spoofing is effective on local networks. The attacker sends forged ARP (Address Resolution Protocol) messages to associate their MAC address with the IP address of the default gateway or target system. As a result, traffic intended for those systems is sent to the attacker instead.
DNS Spoofing involves providing false DNS responses to redirect victims to attacker-controlled servers. This can happen through compromised DNS servers, DNS cache poisoning, or by responding to DNS queries faster than the legitimate server.
Rogue Access Points are fake wireless access points set up by attackers. When victims connect to these networks (often named to look like legitimate networks such as Airport_WiFi_Free), all their traffic flows through the attacker's system.
BGP Hijacking operates at the internet routing level, where attackers announce false BGP routes to redirect traffic through their infrastructure. This is a more sophisticated attack, typically targeting specific organisations or regions.
Tools for MITM Attacks
Many tools can aid in carrying out MITM attacks. Understanding these helps you recognise what attackers can do and why mitigations matter:
- Bettercap is the modern successor to Ettercap and is actively maintained. It supports ARP spoofing, DNS spoofing, HTTP/HTTPS proxying, and has a modular architecture for various attack scenarios.
- Ettercap is a classic tool for MITM attacks on LANs. While still functional, Bettercap is generally preferred for modern assessments.
- mitmproxy is an interactive HTTPS proxy that allows inspection and modification of traffic. It is particularly useful for analysing and manipulating HTTP/HTTPS communications.
- Responder is designed for Windows environments and exploits name resolution protocols such as LLMNR (Link-Local Multicast Name Resolution) and NBT-NS (NetBIOS Name Service). These are fallback protocols that Windows systems use when standard DNS resolution fails. Responder listens for these broadcast queries and responds with its own IP address, tricking victims into sending authentication credentials to the attacker. This is a common technique during internal penetration tests of Active Directory environments.
MITM Against Encrypted Traffic
MITM attacks can target HTTPS and other encrypted protocols through several approaches:
SSL Stripping downgrades HTTPS connections to HTTP. When a victim tries to connect to a website, the attacker intercepts the request, establishes an HTTPS connection with the legitimate server, but serves the content to the victim over unencrypted HTTP. The victim may not notice the missing padlock icon, especially if they did not explicitly type https://.
Fake Certificates involve the attacker presenting their own certificate and establishing separate encrypted connections with both parties. This works if the victim accepts an invalid certificate warning or if the attacker has compromised a Certificate Authority (CA).
Compromised or Rogue CAs represent a more serious threat. If an attacker controls a trusted CA (or obtains a fraudulent certificate from one), they can generate valid-looking certificates for any domain.
Modern Defences Against MITM
Modern security mechanisms make MITM attacks significantly harder than they were a decade ago:
HTTPS Everywhere: Most websites now use HTTPS by default. Major browsers mark HTTP sites as "Not Secure", and some have begun blocking mixed content entirely.
HSTS (HTTP Strict Transport Security) tells browsers to only connect via HTTPS for a specified period. Once a browser has seen an HSTS header for a domain, it will refuse to connect over HTTP, preventing SSL stripping attacks. Many major sites are also on the HSTS preload list, meaning browsers ship with knowledge that these sites should only be accessed via HTTPS.
Certificate Transparency (CT) requires CAs to log all issued certificates to public, auditable logs. This makes it much harder for attackers to obtain fraudulent certificates without detection. Browsers can check these logs and reject certificates that are not properly logged.
Certificate Pinning allows applications to specify exactly which certificates or public keys are valid for their connections. This is common in mobile apps and prevents attacks even if a CA is compromised. However, it makes certificate rotation more complex.
DANE (DNS-based Authentication of Named Entities) uses DNSSEC to publish certificate information in DNS records, providing an alternative trust path that does not rely solely on the CA system.
Despite these protections, MITM attacks remain possible when users ignore certificate warnings, applications do not properly validate certificates, the target uses cleartext protocols, the attacker can compromise a trusted CA, internal networks lack encryption, or legacy systems do not support modern security features.
MITM can also affect other cleartext protocols such as FTP, SMTP, and POP3. The fundamental mitigation requires the use of cryptography. The solution lies in proper authentication along with encryption or signing of exchanged messages. With the help of Public Key Infrastructure (PKI) and trusted root certificates, Transport Layer Security (TLS) protects against MITM attacks when properly implemented.
?Answer the questions below
- How many different interfaces does Ettercap offer?
- In how many ways can you invoke Bettercap?
Transport Layer Security (TLS)
This task covers the standard solution to protecting the confidentiality and integrity of exchanged packets. The approach described here can protect against password sniffing and MITM attacks.
A Brief History of SSL and TLS
SSL (Secure Sockets Layer) originated when the World Wide Web began to see new applications, such as online shopping and sending payment information. Netscape introduced SSL in 1994, with SSL 3.0 being released in 1996. Eventually, more security was needed, and the TLS (Transport Layer Security) protocol was introduced in 1999 with TLS 1.0.
Since then, the protocol has evolved significantly:
- SSL 2.0 and 3.0 are deprecated and considered insecure. They should never be used.
- TLS 1.0 and 1.1 were deprecated in 2021 due to known vulnerabilities. Major browsers no longer support them.
- TLS 1.2 (2008) remains widely used and is considered secure when properly configured with modern cipher suites.
- TLS 1.3 (2018) is the current standard. It removes outdated cryptographic algorithms, reduces handshake latency, and provides forward secrecy by default.
You will still see the term "SSL" used colloquially (such as "SSL certificate"), but in practice, all modern systems use TLS. When someone says "SSL," they almost always mean TLS.
Where TLS Fits in the Network Model
The common protocols covered so far send data in cleartext, making it possible for anyone with access to the network to capture, save, and analyse the exchanged messages. The image below shows the ISO/OSI network layers. The protocols covered so far in this room are on the application layer. Encryption can be added via the presentation layer. As a result, data will be presented in an encrypted format (ciphertext) instead of its original form.
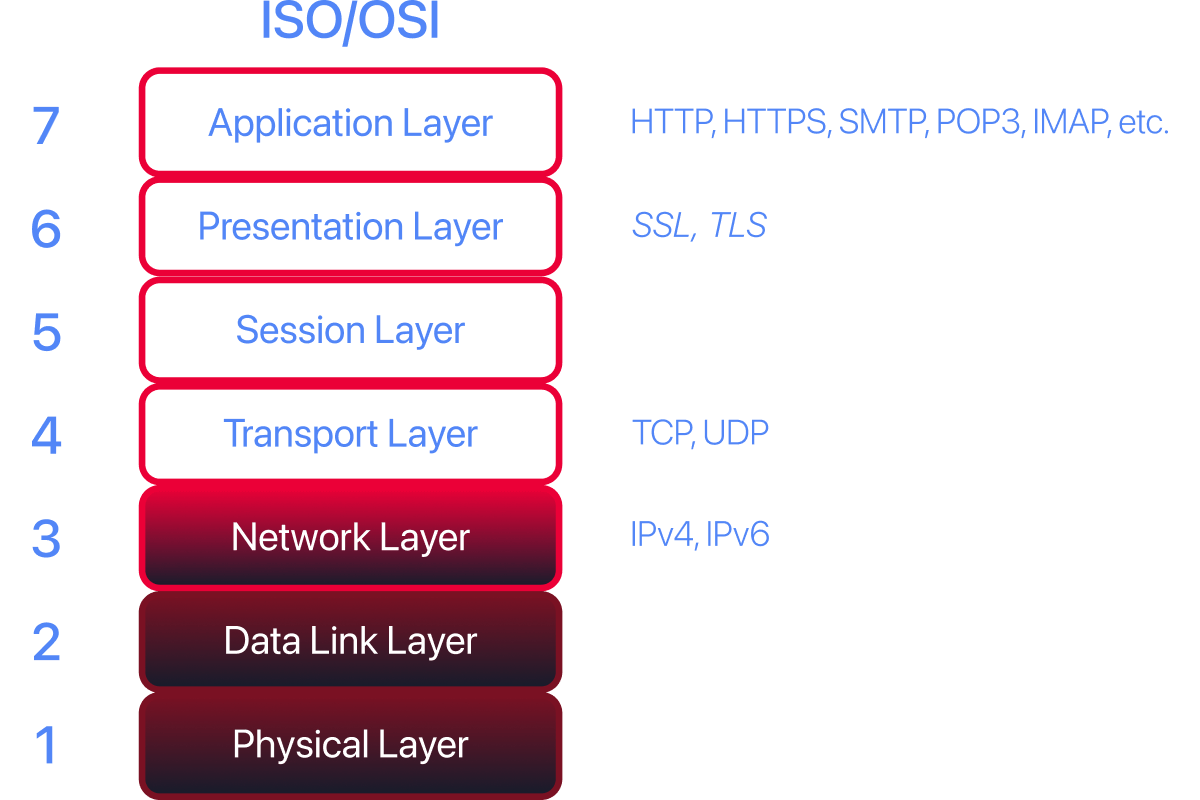
It is worth noting that the OSI model is a conceptual simplification. In practice, TLS operates between the transport and application layers rather than mapping neatly to a single OSI layer. However, the diagram is useful for understanding that encryption sits below the application protocol, wrapping its data before transmission.
Upgrading Protocols with TLS
An existing cleartext protocol can be upgraded to use encryption via TLS. The following table lists the protocols covered so far and their default ports before and after the encryption upgrade via TLS.
| Protocol | Default Port | Secured Protocol | Default Port with TLS |
|---|---|---|---|
| HTTP | 80 | HTTPS | 443 |
| FTP | 21 | FTPS | 990 |
| SMTP | 25 | SMTPS | 465 |
| POP3 | 110 | POP3S | 995 |
| IMAP | 143 | IMAPS | 993 |
TLS is not limited to web and email protocols. DNS can also be secured using TLS. DNS over TLS (DoT) encrypts DNS queries by wrapping standard DNS traffic inside a TLS connection, typically on port 853. A related approach, DNS over HTTPS (DoH), sends DNS queries as HTTPS requests on port 443. Both prevent eavesdropping on DNS lookups, which would otherwise reveal which websites a user is visiting.
Implicit TLS vs STARTTLS
There are two approaches to adding TLS to a protocol:
Implicit TLS uses a dedicated port (as shown in the table above). The connection is encrypted from the start. When you connect to port 443 for HTTPS or port 993 for IMAPS, TLS negotiation begins immediately.
STARTTLS allows upgrading an existing cleartext connection to TLS on the same port. The client connects on the standard port (e.g., port 25 for SMTP), and then issues a STARTTLS command to upgrade the connection to TLS. This approach is common for email protocols. For SMTP, port 587 (submission) with STARTTLS is the recommended configuration for mail clients.
Both approaches provide encryption. However, implicit TLS is generally preferred because STARTTLS can be vulnerable to downgrade attacks if not properly implemented. An attacker performing a MITM attack could strip the STARTTLS command from the communication, forcing the connection to remain in cleartext.
How HTTPS Works
Consider the case of HTTP. Initially, to retrieve a web page over HTTP, the web browser would need to perform at least the following two steps:
- Establish a TCP connection with the remote web server.
- Send HTTP requests to the web server, such as
GETandPOSTrequests.
HTTPS requires an additional step to encrypt the traffic. The new step takes place after establishing a TCP connection and before sending HTTP requests. As a result, HTTPS requires at least the following three steps:
- Establish a TCP connection.
- Establish a TLS connection.
- Send HTTP requests to the web server.
The TLS Handshake
To establish a TLS connection, the client needs to perform a handshake with the server. The handshake differs between TLS versions. Here is a simplified overview of the TLS 1.2 handshake:
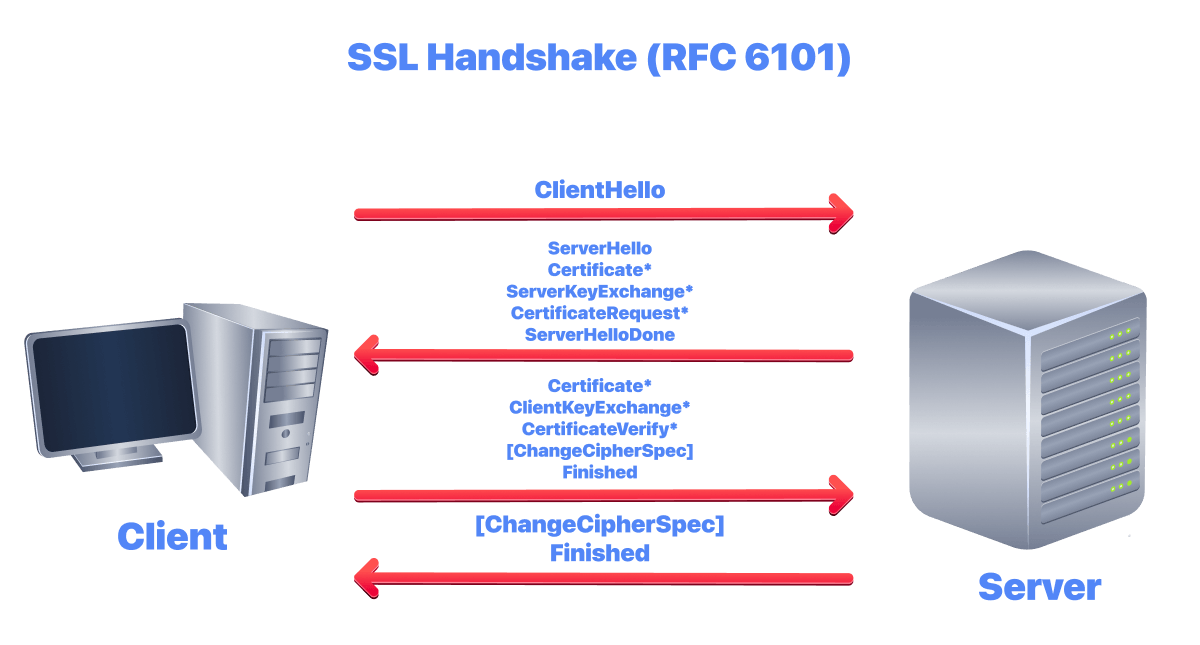
- ClientHello: The client sends a message indicating its capabilities, including supported TLS versions, cipher suites, and a random value.
- ServerHello: The server responds with the selected connection parameters, its certificate (a digital file signed by a Certificate Authority to prove the server's identity), and its own random value.
- Key Exchange: The client and server exchange information needed to generate the shared secret key. The exact process depends on the chosen cipher suite.
- Finished: Both sides confirm the handshake completed successfully and switch to encrypted communication.
TLS 1.3 Improvements
TLS 1.3 significantly improves upon earlier versions:
- Faster handshake: TLS 1.3 requires only one round trip (1-RTT) to establish a connection, compared to two round trips for TLS 1.2. It even supports 0-RTT resumption for returning clients, though this has some security trade-offs.
- Forward secrecy by default: All TLS 1.3 cipher suites provide forward secrecy, meaning that if the server's private key is compromised in the future, past recorded sessions cannot be decrypted.
- Simplified cipher suites: Outdated and insecure algorithms have been removed. There are no more choices that could lead to weak configurations.
- Encrypted handshake: More of the handshake is encrypted, revealing less information to observers.
The key point is this: the client and server securely agree on a secret key that a third party monitoring the channel cannot discover. All further communication is encrypted using this key. As a result, once a TLS handshake has been established, HTTP requests and exchanged data are not accessible to anyone watching the communication channel.
Certificates and Trust
For TLS to be effective, especially when browsing the web over HTTPS, the system relies on public certificates signed by Certificate Authorities (CAs) trusted by your system. When you browse to TryHackMe over HTTPS, your browser expects the TryHackMe web server to provide a signed certificate from a trusted certificate authority. This ensures that you are communicating with the correct server and that a MITM attack cannot easily occur.
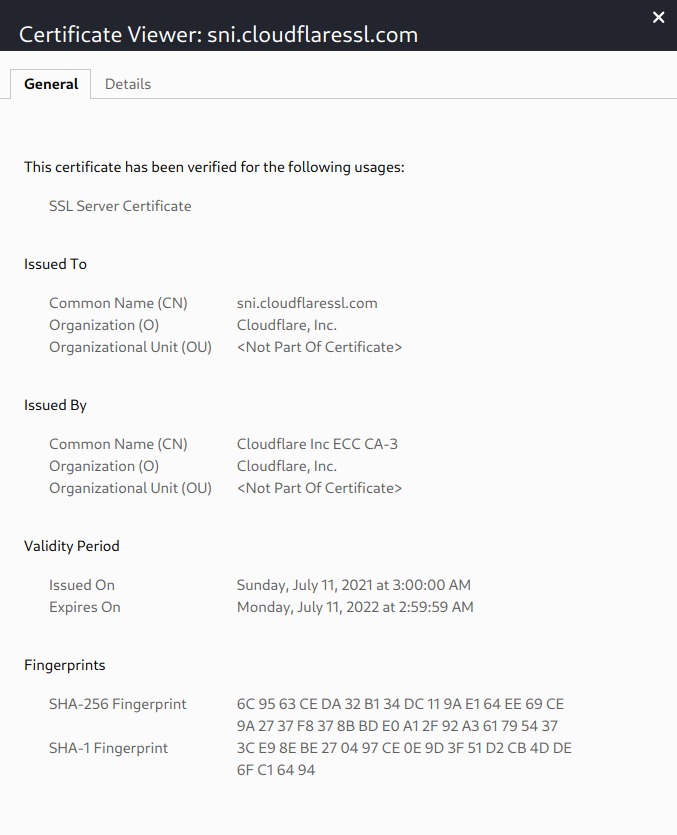
In the figure above, the following information is visible:
- To whom is the certificate issued? This is the name of the company that will use this certificate.
- Who issued the certificate? This is the certificate authority that issued this certificate.
- Validity period. An expired certificate should not be trusted.
Your web browser handles this automatically, ensuring that you are talking with the correct server and that your communication is secure.
Modern Certificate Ecosystem
The certificate landscape has evolved significantly:
Let's Encrypt launched in 2015 and provides free, automated TLS certificates. This removed the cost barrier that previously prevented many websites from using HTTPS. As a result, HTTPS adoption has grown from under 50% of web traffic in 2015 to over 95% today.
Certificate Transparency (CT) requires CAs to log all issued certificates to public, auditable logs. Browsers can check these logs and reject certificates that are not properly logged. This makes it much harder for attackers to obtain fraudulent certificates without detection.
Short-lived certificates are becoming more common. Let's Encrypt certificates are valid for only 90 days, encouraging automation and reducing the window of exposure if a certificate is compromised. Some organisations use certificates valid for just hours or days.
Automated Certificate Management Environment (ACME) is the protocol used by Let's Encrypt and other CAs to automate certificate issuance and renewal. Tools like Certbot make it straightforward to obtain and renew certificates automatically.
Testing TLS Configurations
As a security professional, you may need to assess TLS configurations. Useful tools include:
- testssl.sh: A command-line tool that checks a server's TLS configuration for supported protocols, cipher suites, and common vulnerabilities. It is the best choice for detailed assessments, especially against internal systems that are not publicly accessible.
- sslyze: A Python tool for analysing SSL/TLS configurations, useful for automation and integration into CI/CD pipelines.
- SSL Labs (ssllabs.com): A web-based service that provides detailed analysis of public-facing HTTPS servers. It is the quickest option for a one-off assessment of a public website.
- nmap ssl-enum-ciphers: An Nmap script that enumerates supported cipher suites as part of a broader port scan.
Common issues to look for include support for deprecated protocols (TLS 1.0/1.1), weak cipher suites, missing forward secrecy, and certificate problems.
?Answer the questions below
- DNS can also be secured using TLS. What is the three-letter acronym of the DNS protocol that uses TLS?
Secure Shell (SSH)
This task covers SSH authentication methods, key generation, host key verification, file transfer over SSH, and SSH hardening considerations.
Ensure the lab machine from Task 1 is running before proceeding. If it has expired, restart it now.
Secure Shell (SSH) was created to provide a secure way for remote system administration. It allows you to securely connect to another system over the network and execute commands on the remote system. The "S" in SSH stands for secure, which can be summarised as:
- You can confirm the identity of the remote server.
- Exchanged messages are encrypted and can only be decrypted by the intended recipient.
- Both sides can detect any modification in the messages.
The above three points are ensured by cryptography. In more technical terms, they are part of confidentiality and integrity, made possible through the proper use of different encryption algorithms.
SSH has become the universal standard for remote administration of servers, network devices, and cloud infrastructure. It completely replaced Telnet for interactive remote access due to its security guarantees.
SSH Authentication Methods
To use SSH, you need an SSH server and an SSH client. The SSH server listens on port 22 by default. The SSH client can authenticate using several methods:
Password authentication is the simplest method. The user provides a username and password, which are transmitted over the encrypted SSH connection. While the password is protected in transit, this method is vulnerable to brute force attacks if weak passwords are used.
Public key authentication is the recommended method for regular use. You generate a key pair consisting of a private key (kept secret on your machine) and a public key (placed on servers you want to access). When connecting, the server challenges you to prove you possess the private key without actually transmitting it.
Certificate-based authentication is used in larger organisations. An SSH Certificate Authority signs user and host keys, eliminating the need to distribute public keys to every server. This scales better and allows for key expiration and revocation.
Multi-factor authentication (MFA) combines multiple methods. Many organisations now require both a key and a one-time password from an authenticator app.
Connecting via SSH
On Linux, macOS, and Windows 10/11, you can connect to an SSH server using the command ssh username@MACHINE_IP. This command tries to connect to the server at the specified IP address with the given login name. If an SSH server is listening on the default port, it will ask you to provide the password for that user (or use your key if configured). Once authenticated, you have access to the target server's terminal.
user@TryHackMe$ ssh mark@MACHINE_IP
mark@MACHINE_IP's password: XBtc49AB

The programs included with the Debian GNU/Linux system are free software;
the exact distribution terms for each program are described in the
individual files in /usr/share/doc/*/copyright.

Debian GNU/Linux comes with ABSOLUTELY NO WARRANTY, to the extent
permitted by applicable law.
Last login: Mon Sep 20 13:53:17 2021
mark@debian8:~$
In the example above, the command ssh mark@MACHINE_IP was issued. Once the correct password was entered, access to the remote system's terminal was granted. SSH is reliable for remote administration because the username and password were sent encrypted. All commands executed on the remote system are sent over an encrypted channel.
Host Key Verification
If this is the first time you connect to a system, you will need to confirm the fingerprint of the SSH server's public key to avoid man-in-the-middle (MITM) attacks. In the case of SSH, there is usually no third party to verify if the public key is valid, so this must be done manually or through out-of-band verification.
When you connect to a new server, you will see a message like:
The authenticity of host 'MACHINE_IP' can't be established.
ED25519 key fingerprint is SHA256:xxxxxxxxxxxxxxxxxxxxxxxxxxxxxxxxxxxxxxxxxxx.
Are you sure you want to continue connecting (yes/no/[fingerprint])?
Ideally, you should verify this fingerprint through a separate channel (such as a secure configuration management system or by asking the server administrator) before accepting it. Once accepted, the host key is stored in ~/.ssh/known_hosts. If the key ever changes unexpectedly, SSH will warn you, which could indicate a MITM attack or that the server was reinstalled.
SSH Key Generation
To set up key-based authentication, generate a key pair using ssh-keygen:
# Generate an Ed25519 key (recommended for modern systems)
ssh-keygen -t ed25519 -C "your_email@example.com"

# For systems that don't support Ed25519, use RSA with 4096 bits
ssh-keygen -t rsa -b 4096 -C "your_email@example.com"
Ed25519 keys are the current recommendation. They are shorter, faster, and considered more secure than RSA keys. RSA keys should use at least 4096 bits if Ed25519 is not available.
Your private key is stored in ~/.ssh/id_ed25519 (or ~/.ssh/id_rsa) and should be protected with a strong passphrase. The public key is stored with a .pub extension and can be safely shared.
To enable key-based login on a server, add your public key to the ~/.ssh/authorized_keys file on the remote system:
# Copy your public key to a remote server
ssh-copy-id mark@MACHINE_IP
Useful SSH Options
SSH has many useful features for penetration testers and system administrators:
# Connect on a non-standard port
ssh -p 2222 mark@MACHINE_IP

# Use a specific private key
ssh -i ~/.ssh/custom_key mark@MACHINE_IP

# Jump through a bastion/jump host to reach an internal server
ssh -J bastion.example.com mark@internal-server

# Local port forwarding (access remote service through local port)
ssh -L 8080:localhost:80 mark@MACHINE_IP

# Dynamic port forwarding (SOCKS proxy)
ssh -D 9050 mark@MACHINE_IP

# Run a single command without interactive shell
ssh mark@MACHINE_IP "cat /etc/passwd"
SSH Config File
For frequent connections, you can create shortcuts in ~/.ssh/config:
Host webserver
    HostName MACHINE_IP
    User mark
    Port 22
    IdentityFile ~/.ssh/id_ed25519

Host internal
    HostName 10.10.10.50
    User admin
    ProxyJump bastion.example.com
With this configuration, you can simply type ssh webserver instead of the full command.
Secure File Transfer
SSH provides secure file transfer capabilities through several methods:
SFTP (SSH File Transfer Protocol) is the recommended method for interactive file transfers. It provides a familiar FTP-like interface over an encrypted SSH connection:
sftp mark@MACHINE_IPSCP (Secure Copy Protocol) has traditionally been used for simple file copies. However, the OpenSSH project has deprecated scp in favour of sftp due to security concerns with the SCP protocol. SCP still works but displays a deprecation warning on newer systems:
# Copy from remote to local
scp mark@MACHINE_IP:/home/mark/archive.tar.gz ~/

# Copy from local to remote
scp backup.tar.bz2 mark@MACHINE_IP:/home/mark/
rsync over SSH is preferred for transferring large amounts of data or synchronising directories, as it only transfers changed portions of files:
rsync -avz -e ssh /local/directory/ mark@MACHINE_IP:/remote/directory/user@TryHackMe$ scp document.txt mark@MACHINE_IP:/home/mark
mark@MACHINE_IP's password:
document.txt 100% 1997KB 70.4MB/s 00:00SSH vs FTPS vs SFTP
It is worth clarifying the difference between these secure file transfer options:
- SFTP runs over SSH (port 22) and is the most common choice for secure file transfers today.
- FTPS is FTP secured with TLS (port 990 for implicit TLS). It is a different protocol from SFTP despite the similar names.
- SCP also runs over SSH but is being phased out in favour of SFTP.
For most use cases, SFTP is the recommended choice because it uses the same authentication and encryption as SSH, simplifying management.
SSH Hardening Considerations
When assessing or configuring SSH servers, consider these security settings in /etc/ssh/sshd_config:
- Disable password authentication (
PasswordAuthentication no) after setting up key-based auth. - Disable root login (
PermitRootLogin no) to force users to authenticate as regular users first. - Use AllowUsers or AllowGroups to restrict which accounts can log in via SSH.
- Change the default port to reduce automated scanning noise (security through obscurity, not a strong control).
- Enable fail2ban or similar to block repeated failed authentication attempts.
- Use modern key exchange and cipher algorithms by configuring
KexAlgorithms,Ciphers, andMACs.
?Answer the questions below
- Use SSH to connect to MACHINE_IP as mark with the password XBtc49AB . Using uname -r , find the Kernel release?
- Use SSH to download the file book.txt from the remote system. How many KBs did scp display as download size?
Password Attack
Ensure the lab machine from Task 1 is running before proceeding. If it has expired, restart it now.
Many protocols require you to authenticate. Authentication is proving who you claim to be. When using protocols such as POP3, access to the mailbox should not be granted before verifying identity. The POP3 example from the Protocols and Servers room is repeated below for reference. In this example, the user is identified as frank, and the server authenticated them because the correct password was provided.
pentester@TryHackMe$ telnet MACHINE_IP 110
Trying MACHINE_IP...
Connected to MACHINE_IP.
Escape character is '^]'.
+OK MACHINE_IP Mail Server POP3 Wed, 15 Sep 2021 11:05:34 +0300
USER frank
+OK frank
PASS D2xc9CgD
+OK 1 messages (179) octets
STAT
+OK 1 179
LIST
+OK 1 messages (179) octets
1 179
.
RETR 1
+OK
From: Mail Server
To: Frank
subject: Sending email with Telnet
Hello Frank,
I am just writing to say hi!
.
QUIT
+OK MACHINE_IP closing connection
Connection closed by foreign host.
Authentication Factors
Authentication, or proving your identity, can be achieved through one of the following, or a combination of two or more:
- Something you know, such as a password or PIN code.
- Something you have, such as a phone, security key, or smart card.
- Something you are, such as a fingerprint or facial recognition.
This task focuses on attacks against passwords, the "something you know" factor.
Why Weak Passwords Persist
Based on the 150 million usernames and passwords leaked from the Adobe breach in 2013, the top ten passwords included 123456, password, qwerty, and similar obvious choices.
Password habits have not improved significantly. Analysis of more recent breaches shows common passwords in the 2020s still include:
123456and variations (123456789,12345678,1234567890)passwordandPassword1qwertyandqwerty123- Company or service names with numbers (
Summer2024,Welcome1) - Sports teams and pop culture references
The availability of massive breach databases has made password attacks more effective than ever. Attackers can cross-reference leaked credentials across services because many users reuse passwords.
Types of Password Attacks
Attacks against passwords have evolved beyond simple brute force:
Password Guessing requires some knowledge of the target, such as their pet's name, birth year, favourite sports team, or children's names. Social media makes gathering this information easier than ever.
Dictionary Attack attempts common words from a dictionary or wordlist. This is effective because many users choose real words or simple variations.
Brute Force Attack tries all possible character combinations. This is exhaustive and time-consuming, but effective against short passwords. The search space grows exponentially with password length, which is why longer passwords are significantly more secure.
Credential Stuffing uses username/password pairs leaked from previous breaches and tries them against other services. This exploits password reuse and is extremely effective. Attackers use automated tools to test millions of credentials across many sites simultaneously.
Password Spraying tries a small number of commonly used passwords against many accounts. Instead of trying many passwords against one account (which triggers lockouts), an attacker tries one or two passwords against thousands of accounts. This evades account lockout mechanisms.
Hybrid Attacks combine dictionary words with common patterns. For example, trying Summer with years appended (Summer2023, Summer2024) or common substitutions (P@ssw0rd, Adm1n!).
Wordlists and Breach Data
Over time, security researchers and attackers have compiled extensive wordlists containing leaked passwords from data breaches. One classic example is RockYou's list of breached passwords, which you can find on the AttackBox at /usr/share/wordlists/rockyou.txt.
Modern wordlists go far beyond RockYou:
- SecLists is a collection of multiple wordlists for different purposes, available at
/usr/share/seclists/on many security distributions. - CrackStation provides wordlists optimised for password cracking.
- Breach compilations contain billions of real passwords from various data breaches.
The choice of wordlist should depend on your knowledge of the target. A French user might use French words. A company's employees might use the company name with years or seasons. Custom wordlists tailored to the target are often more effective than generic ones.
THC Hydra
THC Hydra is a fast and flexible password cracking tool that supports many protocols, including FTP, POP3, IMAP, SMTP, SSH, and all methods related to HTTP. It provides an automated way to try common passwords or entries from a wordlist against network services.
The general command-line syntax is:
hydra -l username -P wordlist.txt server serviceWhere the following options are specified:
-l username: The login name of the target.-P wordlist.txt: A text file containing passwords to try.server: The hostname or IP address of the target server.service: The service you are attacking (e.g.,ftp,ssh,imap,pop3,smtp).
Consider the following examples:
# Attack FTP with username mark
hydra -l mark -P /usr/share/wordlists/rockyou.txt MACHINE_IP ftp

# Alternative syntax (equivalent to above)
hydra -l mark -P /usr/share/wordlists/rockyou.txt ftp://MACHINE_IP

# Attack SSH with username frank
hydra -l frank -P /usr/share/wordlists/rockyou.txt MACHINE_IP ssh

# Attack IMAP with username lazie
hydra -l lazie -P /usr/share/wordlists/rockyou.txt MACHINE_IP imap

# Attack with a list of usernames (credential stuffing style)
hydra -L users.txt -P passwords.txt MACHINE_IP ssh
Useful Hydra Options
| Option | Description |
|---|---|
| -l username | Single username to attack |
| -L users.txt | File containing a list of usernames |
| -p password | Single password to try |
| -P wordlist.txt | File containing a list of passwords |
| -s PORT | Specify a non-default port |
| -V or -vV | Verbose output showing attempts |
| -t n | Number of parallel connections (threads) |
| -d | Debug mode for troubleshooting |
| -f | Stop after the first valid password found |
| -w n | Wait time between connections |
Once the password is found, you can issue CTRL-C to end the process. In TryHackMe tasks, any attack is expected to finish within less than five minutes. In real-world scenarios, attacks take longer, and verbose or debug options help you monitor progress.
Other Password Attack Tools
While Hydra is excellent for network service attacks, other tools serve different purposes:
- Medusa is similar to Hydra but with a modular design. Some find it more stable for certain protocols.
- Ncrack is developed by the Nmap project and designed for high-speed parallel authentication testing.
- CrackMapExec (CME) / NetExec specialises in Windows/Active Directory environments and can spray passwords across SMB, WinRM, LDAP, and other protocols.
- Burp Suite Intruder is useful for attacking web-based login forms where Hydra's HTTP modules may not work correctly.
- Hashcat and John the Ripper are used for cracking password hashes offline rather than attacking live services. If you obtain password hashes (from a database breach, for example), these tools can recover the plaintext passwords much faster than attacking a live service.
Mitigating Password Attacks
Mitigation against password attacks depends on the target system. Modern defences include:
Password Policies enforce minimum complexity constraints. Modern guidance such as NIST SP 800-63B (a U.S. government standard for digital identity guidelines) recommends focusing on password length over complexity rules, blocking known compromised passwords, and not requiring regular password changes unless there is evidence of compromise.
Account Lockout temporarily or permanently locks an account after a certain number of failed attempts. This is effective against brute force but can be bypassed by password spraying or abused for denial of service.
Throttling and Rate Limiting delay responses to login attempts. A few seconds of delay is tolerable for legitimate users but severely hinders automated tools. More sophisticated implementations use exponential backoff.
CAPTCHA requires solving a challenge difficult for machines. Modern CAPTCHAs use behavioural analysis and risk scoring rather than just image recognition.
Multi-Factor Authentication (MFA) requires additional verification beyond the password, such as a code from an authenticator app, SMS (though SMS is less secure), or a hardware security key. MFA is one of the most effective defences against password attacks.
Passwordless Authentication eliminates passwords entirely using methods like:
- Passkeys (FIDO2/WebAuthn) use cryptographic keys stored on devices, replacing passwords with biometric or PIN verification.
- Magic links sent via email.
- Hardware security keys like YubiKeys.
Breached Password Detection checks passwords against known breach databases during registration and login. Services like "Have I Been Pwned" provide APIs for this purpose.
Behavioural Analysis detects anomalies such as login attempts from unusual locations, impossible travel scenarios, or patterns consistent with automated attacks.
IP-based Controls including geofencing, blocking known malicious IPs, and requiring additional verification for new devices or locations.
Using a combination of the above approaches provides defence in depth against password attacks. For high-security environments, moving towards passwordless authentication eliminates many of these attack vectors entirely.
?Answer the questions below
- We learned that one of the email accounts is lazie . What is the password used to access the IMAP service on MACHINE_IP?
Summary
This room examined three common attacks against network protocols:
- Sniffing Attack
- MITM Attack
- Password Attack
For each of these, the focus was on both the attack mechanics and the mitigation steps. Understanding these fundamental attacks is essential because they form the basis for more sophisticated techniques encountered in advanced penetration testing.
Key Takeaways
The central theme of this room is that cleartext protocols are inherently insecure. Any protocol that transmits data without encryption is vulnerable to sniffing and MITM attacks. The solution is to use encrypted alternatives:
- Use HTTPS instead of HTTP.
- Use SSH instead of Telnet.
- Use SFTP or FTPS instead of FTP.
- Use IMAPS/POP3S/SMTPS instead of their cleartext counterparts.
Even with encryption, password-based authentication remains a weak point. Strong passwords, account lockout policies, rate limiting, and multi-factor authentication are essential defences. Where possible, passwordless authentication using passkeys or certificate-based authentication provides stronger security.
The Modern Landscape
Most internet-facing services use TLS encryption by default. However, you will still encounter cleartext protocols in:
- Legacy systems that have not been updated
- Internal corporate networks where encryption was never implemented
- IoT devices and embedded systems with limited capabilities
- Misconfigured services where TLS is available but not enforced
- Development and testing environments
As a penetration tester, identifying these weaknesses and demonstrating their impact is a valuable skill. As a defender, ensuring all services use encryption and strong authentication is a fundamental security control.
Related Learning Paths
Many other attacks can be conducted against specific servers and protocols. The following modules will help you build on what you learned here:
- Vulnerability Research: Provides more information about vulnerabilities and exploits.
- Metasploit: Trains you on how to use Metasploit to exploit target systems.
- Burp Suite: Teaches you how to use Burp Suite to intercept HTTP traffic and launch attacks related to the web.
- Network Security: Covers network security concepts, including Nmap and firewall evasion.
Protocol and Port Reference
The services covered in this room are listed in the following table, sorted by alphabetical order.
| Protocol | TCP Port | Application(s) | Data Security |
|---|---|---|---|
| FTP | 21 | File Transfer | Cleartext |
| FTPS | 990 | File Transfer | Encrypted (implicit TLS) |
| HTTP | 80 | Worldwide Web | Cleartext |
| HTTPS | 443 | Worldwide Web | Encrypted (implicit TLS) |
| IMAP | 143 | Email (MDA) | Cleartext |
| IMAPS | 993 | Email (MDA) | Encrypted (implicit TLS) |
| POP3 | 110 | Email (MDA) | Cleartext |
| POP3S | 995 | Email (MDA) | Encrypted (implicit TLS) |
| SFTP | 22 | File Transfer | Encrypted (SSH) |
| SMTP | 25 | Email (MTA) | Cleartext |
| SMTP Submission | 587 | Email (MTA, client submission) | STARTTLS* |
| SMTPS | 465 | Email (MTA) | Encrypted (implicit TLS) |
| SSH | 22 | Remote Access and File Transfer | Encrypted |
| Telnet | 23 | Remote Access | Cleartext |
*STARTTLS means the connection starts unencrypted on the standard port and is then upgraded to TLS after the client issues a STARTTLS command. This differs from implicit TLS, where encryption begins immediately upon connection. STARTTLS is common on port 587 for email submission and can also be used on ports 25, 110, and 143.
Hydra Quick Reference
Hydra remains a very efficient tool for password attacks against network services. Its main options are summarised in the following table.
| Option | Explanation |
|---|---|
-l username |
Provide a single login name |
-L users.txt |
Provide a file containing usernames |
-p password |
Provide a single password to try |
-P wordlist.txt |
Specify the password list to use |
server service |
Set the server address and service to attack |
-s PORT |
Use in case of non-default service port number |
-V or -vV |
Show the username and password combinations being tried |
-t n |
Number of parallel connections (threads) |
-w n |
Wait time between connections in seconds |
-f |
Stop after the first valid credential found |
-d |
Display debugging output if verbose output is not helping |
Additional Tools to Explore
Beyond Hydra, consider learning these tools that complement what this room covered:
| Tool | Purpose |
|---|---|
| Wireshark / tcpdump | Network packet capture and analysis |
| Bettercap | MITM attacks, ARP spoofing, and network reconnaissance |
| mitmproxy | Interactive HTTPS proxy for inspecting and modifying traffic |
| testssl.sh | Testing TLS/SSL configuration and vulnerabilities |
| Nmap | Port scanning, service detection, and scripting |
| CrackMapExec / NetExec | Password spraying and lateral movement in Windows environments |
| Hashcat / John the Ripper | Offline password hash cracking |
| Burp Suite | Web application security testing |
Defensive Checklist
When assessing or securing systems, verify the following:
- All services use TLS 1.2 or TLS 1.3 with strong cipher suites.
- Cleartext protocols (Telnet, FTP, HTTP) are disabled or restricted to isolated networks.
- SSH uses key-based authentication with password authentication disabled.
- Strong password policies are enforced with breached password detection.
- Account lockout or rate limiting is implemented for all authentication endpoints.
- Multi-factor authentication is enabled for sensitive systems.
- Network segmentation limits the impact of sniffing attacks.
- Certificate validation is properly implemented to prevent MITM attacks.
- HSTS (HTTP Strict Transport Security) is enabled for web applications to prevent SSL stripping.
- Logging and monitoring detect authentication anomalies.
Understanding both the attack and defence perspectives makes you a more effective security professional, whether you are conducting penetration tests or building secure systems.
?Answer the questions below
- By now, you have completed the eighth room of the Network Security module. Please proceed to the final room of this module to test your skills.
 Protocols and Servers
 Nmap Live Host Discovery