
Nmap Advanced Port Scans
Introduction
In Nmap Basic Port Scans, we covered TCP flags and reviewed the TCP 3-way handshake. To initiate a connection, TCP requires that the first packet include the SYN flag. Consequently, we can tell if a TCP port is open based on the response we receive.
Security researchers and hackers examined the TCP flags shown in the figure below to determine what would happen if they sent a TCP packet that was not part of any ongoing TCP connection, with one or more flags set.
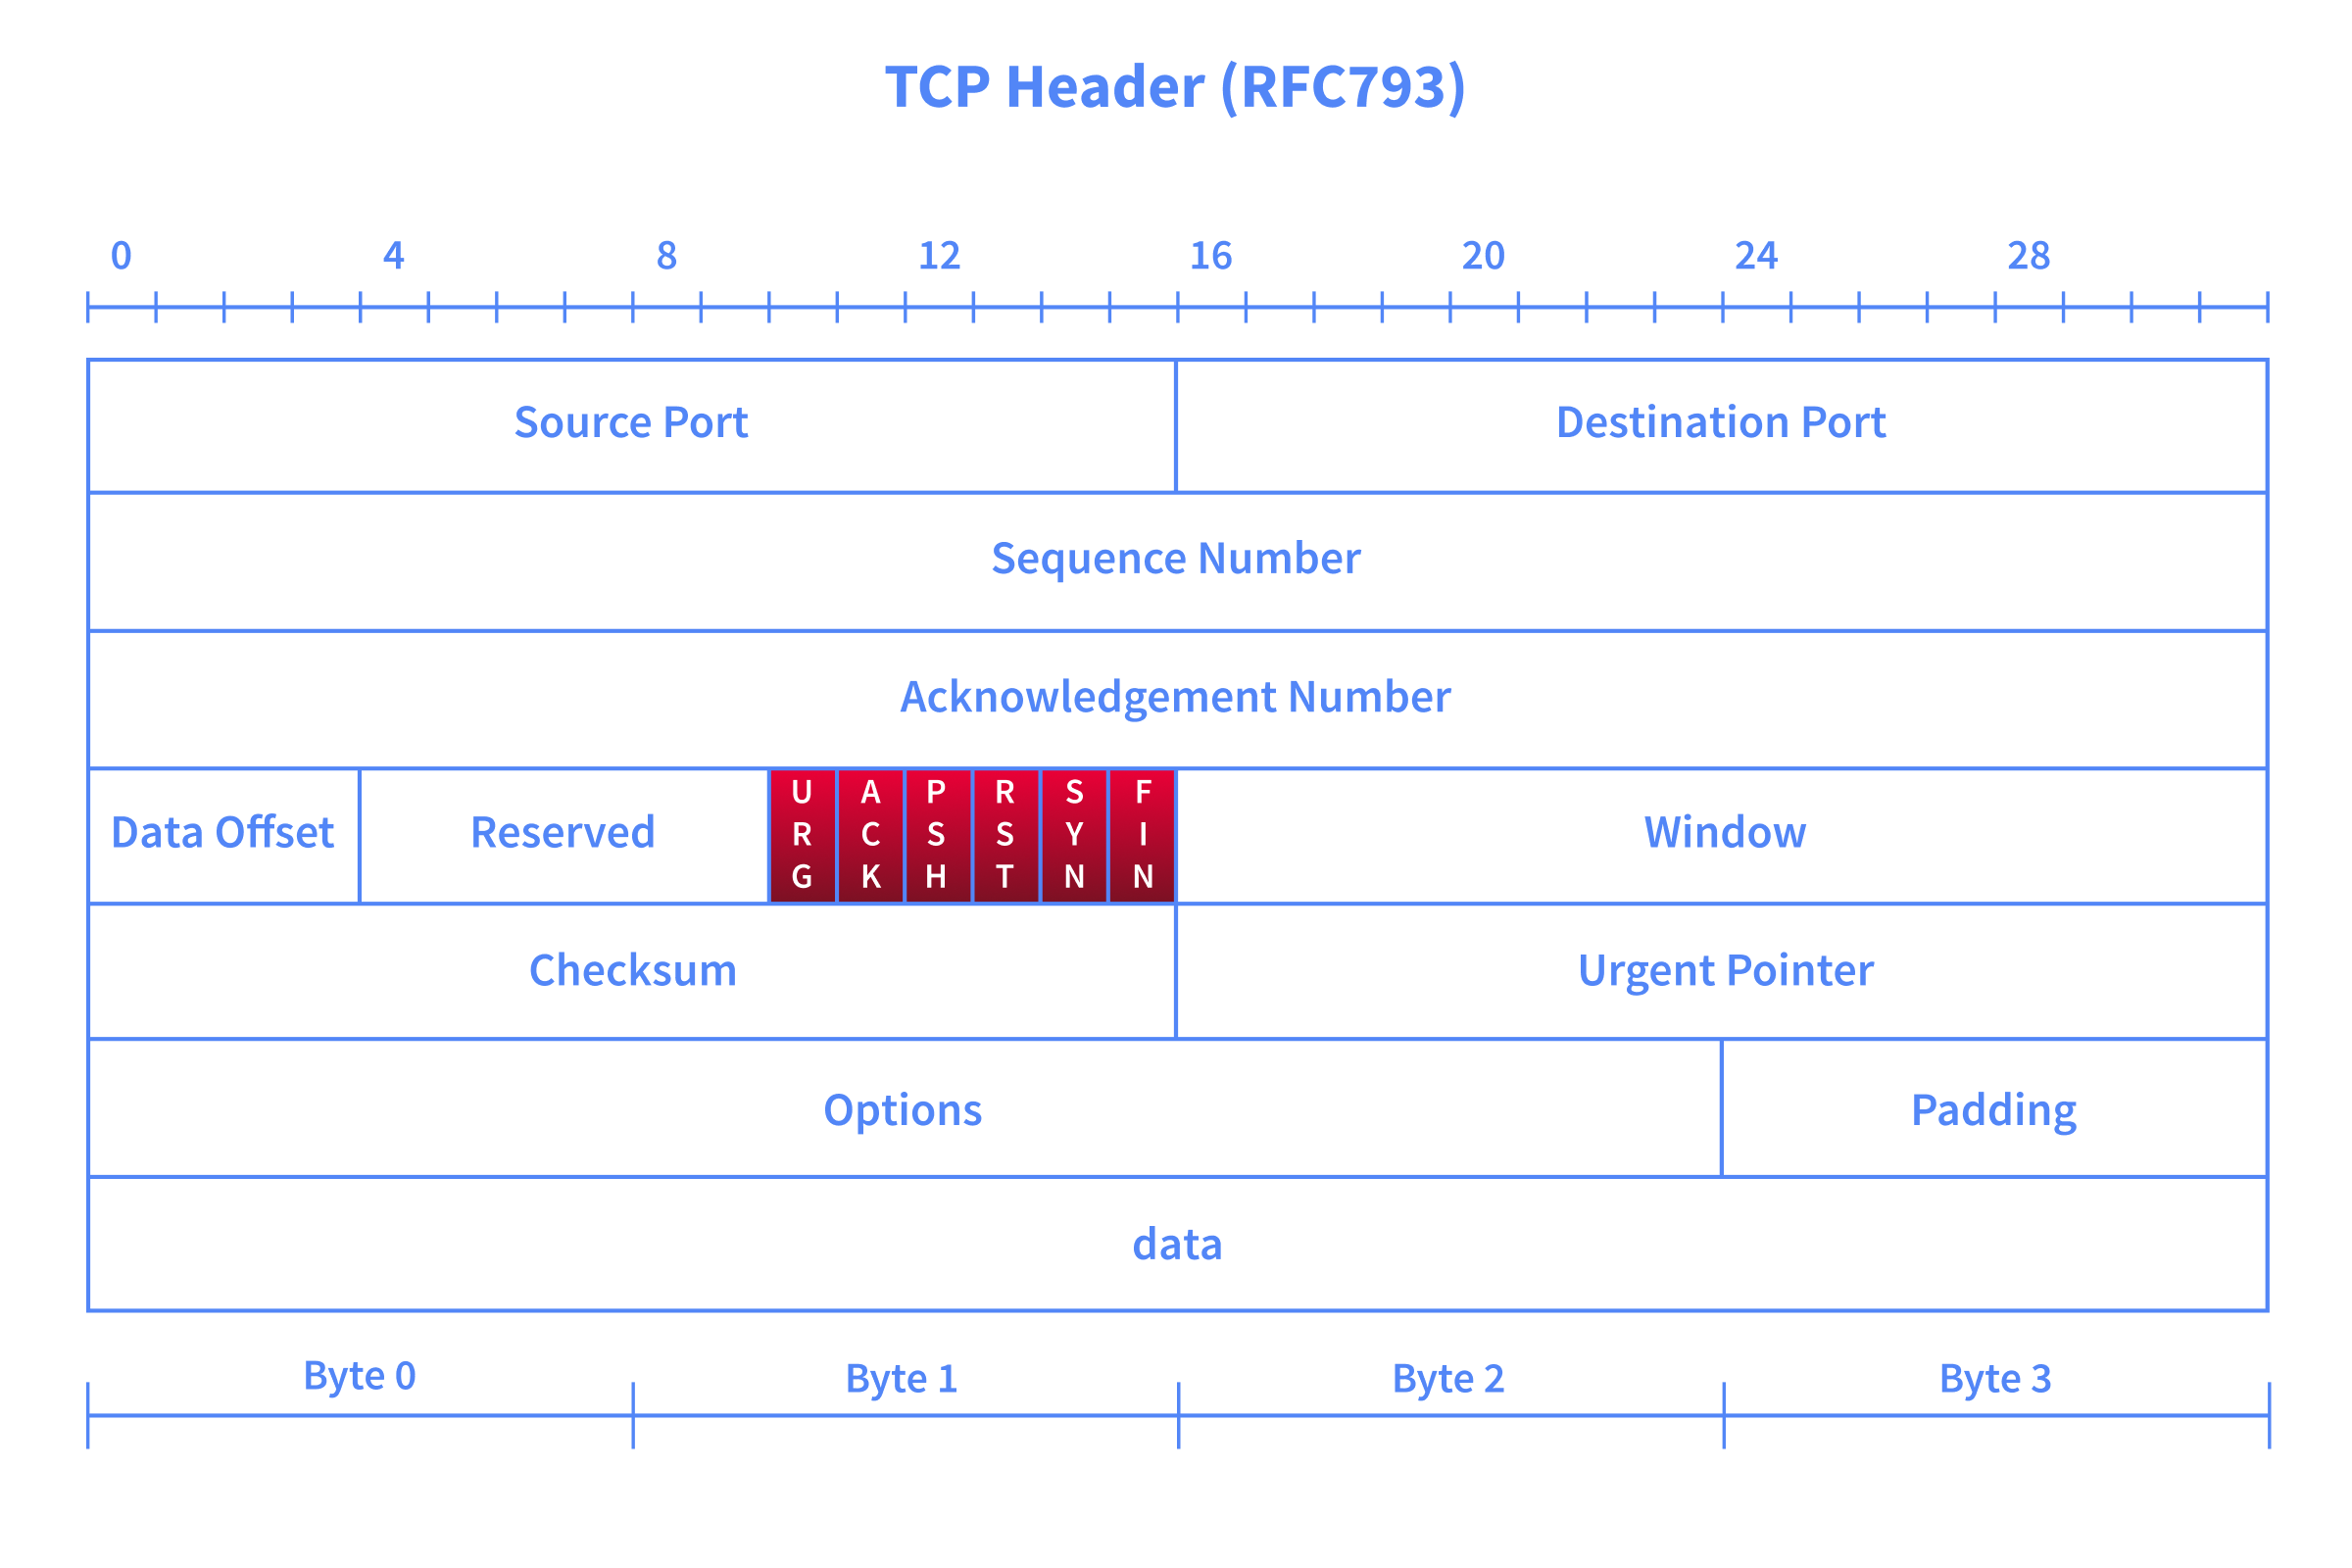
For instance, the ACK flag is set when you acknowledge receipt of data. An ACK scan is like trying to acknowledge data that was neither sent nor received in the first place. Consider this simple analogy: someone coming to you out of nowhere to tell you, “Yes, I hear you, please continue.” when you haven’t said anything.
This room is the third in the Nmap series. In the first two rooms, we learned about live host discovery and basic port scans.
Prerequisites
Before diving in, make sure you have completed the following rooms, as we will build on concepts covered there:
You should also be comfortable with the following concepts from the previous rooms:
- TCP flags (SYN, ACK, FIN, RST, PSH, URG) and how they are used in communication
- The TCP 3-way handshake and how it establishes a connection
- The difference between open, closed, and filtered ports
- Basic Nmap scan types such as TCP connect scan (
-sT) and SYN scan (-sS)
Learning Objectives
This room explains advanced scan types and options. By the end of this room, you will be able to perform the following:
Advanced Port Scan
- Types Null Scan - Send a TCP packet with no flags set to infer open ports from the lack of a response.
- FIN Scan - Send a TCP packet with only the FIN flag to probe ports without initiating a connection.
- Xmas Scan - Set FIN, PSH, and URG flags simultaneously to probe ports behind stateless firewalls.
- Maimon Scan - Set FIN and ACK flags together to exploit a behaviour found in certain BSD-derived systems.
- ACK Scan - Send a packet with only the ACK flag to map firewall rules rather than discover open ports.
- Window Scan - Examine the TCP Window field in RST responses to differentiate open from closed ports.
- Custom Scan - Use --scanflags to craft your own TCP flag combinations for tailored probing.
Evasion and Spoofing Techniques
- Spoofing IP - Forge the source IP address using -S so scan traffic appears to originate from a different host.
- Spoofing MAC - Forge the source MAC address using --spoof-mac when on the same local network as the target.
- Decoy Scan - Mix your real IP among multiple decoy addresses using -D to obscure the true scan source.
- Fragmented Packets - Split packets into smaller IP fragments using -f or -ff to evade firewalls and IDS.
- Idle/Zombie Scan - Use an idle third-party host with -sI to scan a target without revealing your own IP address.
Moreover, we will explore options for getting more verbose details from Nmap, including --reason, -v, -vv, and debugging flags.
Connecting to the Machine
Launch the AttackBox by using the Start AttackBox button and the Lab machine by using the Start Lab Machine button. Get ready to experiment with different Nmap scan types against various lab machines.
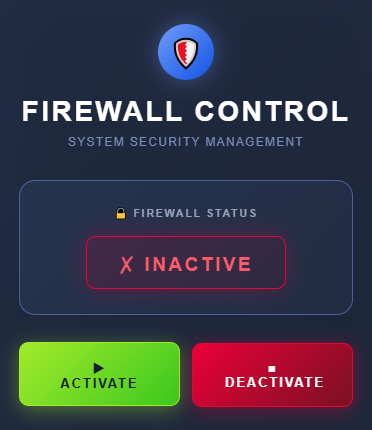
We will discuss options and techniques to evade firewalls and IDS systems. We also cover options to get more verbose details from Nmap. In the upcoming exercises, we will also observe the machine's behaviour with and without a firewall. You can access the link http://MACHINE_IP:5000 to enable or disable the firewall, it is disabled by default, as shown below:
?Answer the questions below
- I have started the machines.
TCP Null Scan, FIN Scan, and Xmas Scan
Null Scan
The null scan does not set any flag; all six flag bits are set to zero. You can choose this scan using the -sN option. A TCP packet with no flags set will not trigger any response when it reaches an open port, as shown in the figure below. Therefore, from Nmap’s perspective, a lack of reply in a null scan indicates that either the port is open or a firewall is blocking the packet.
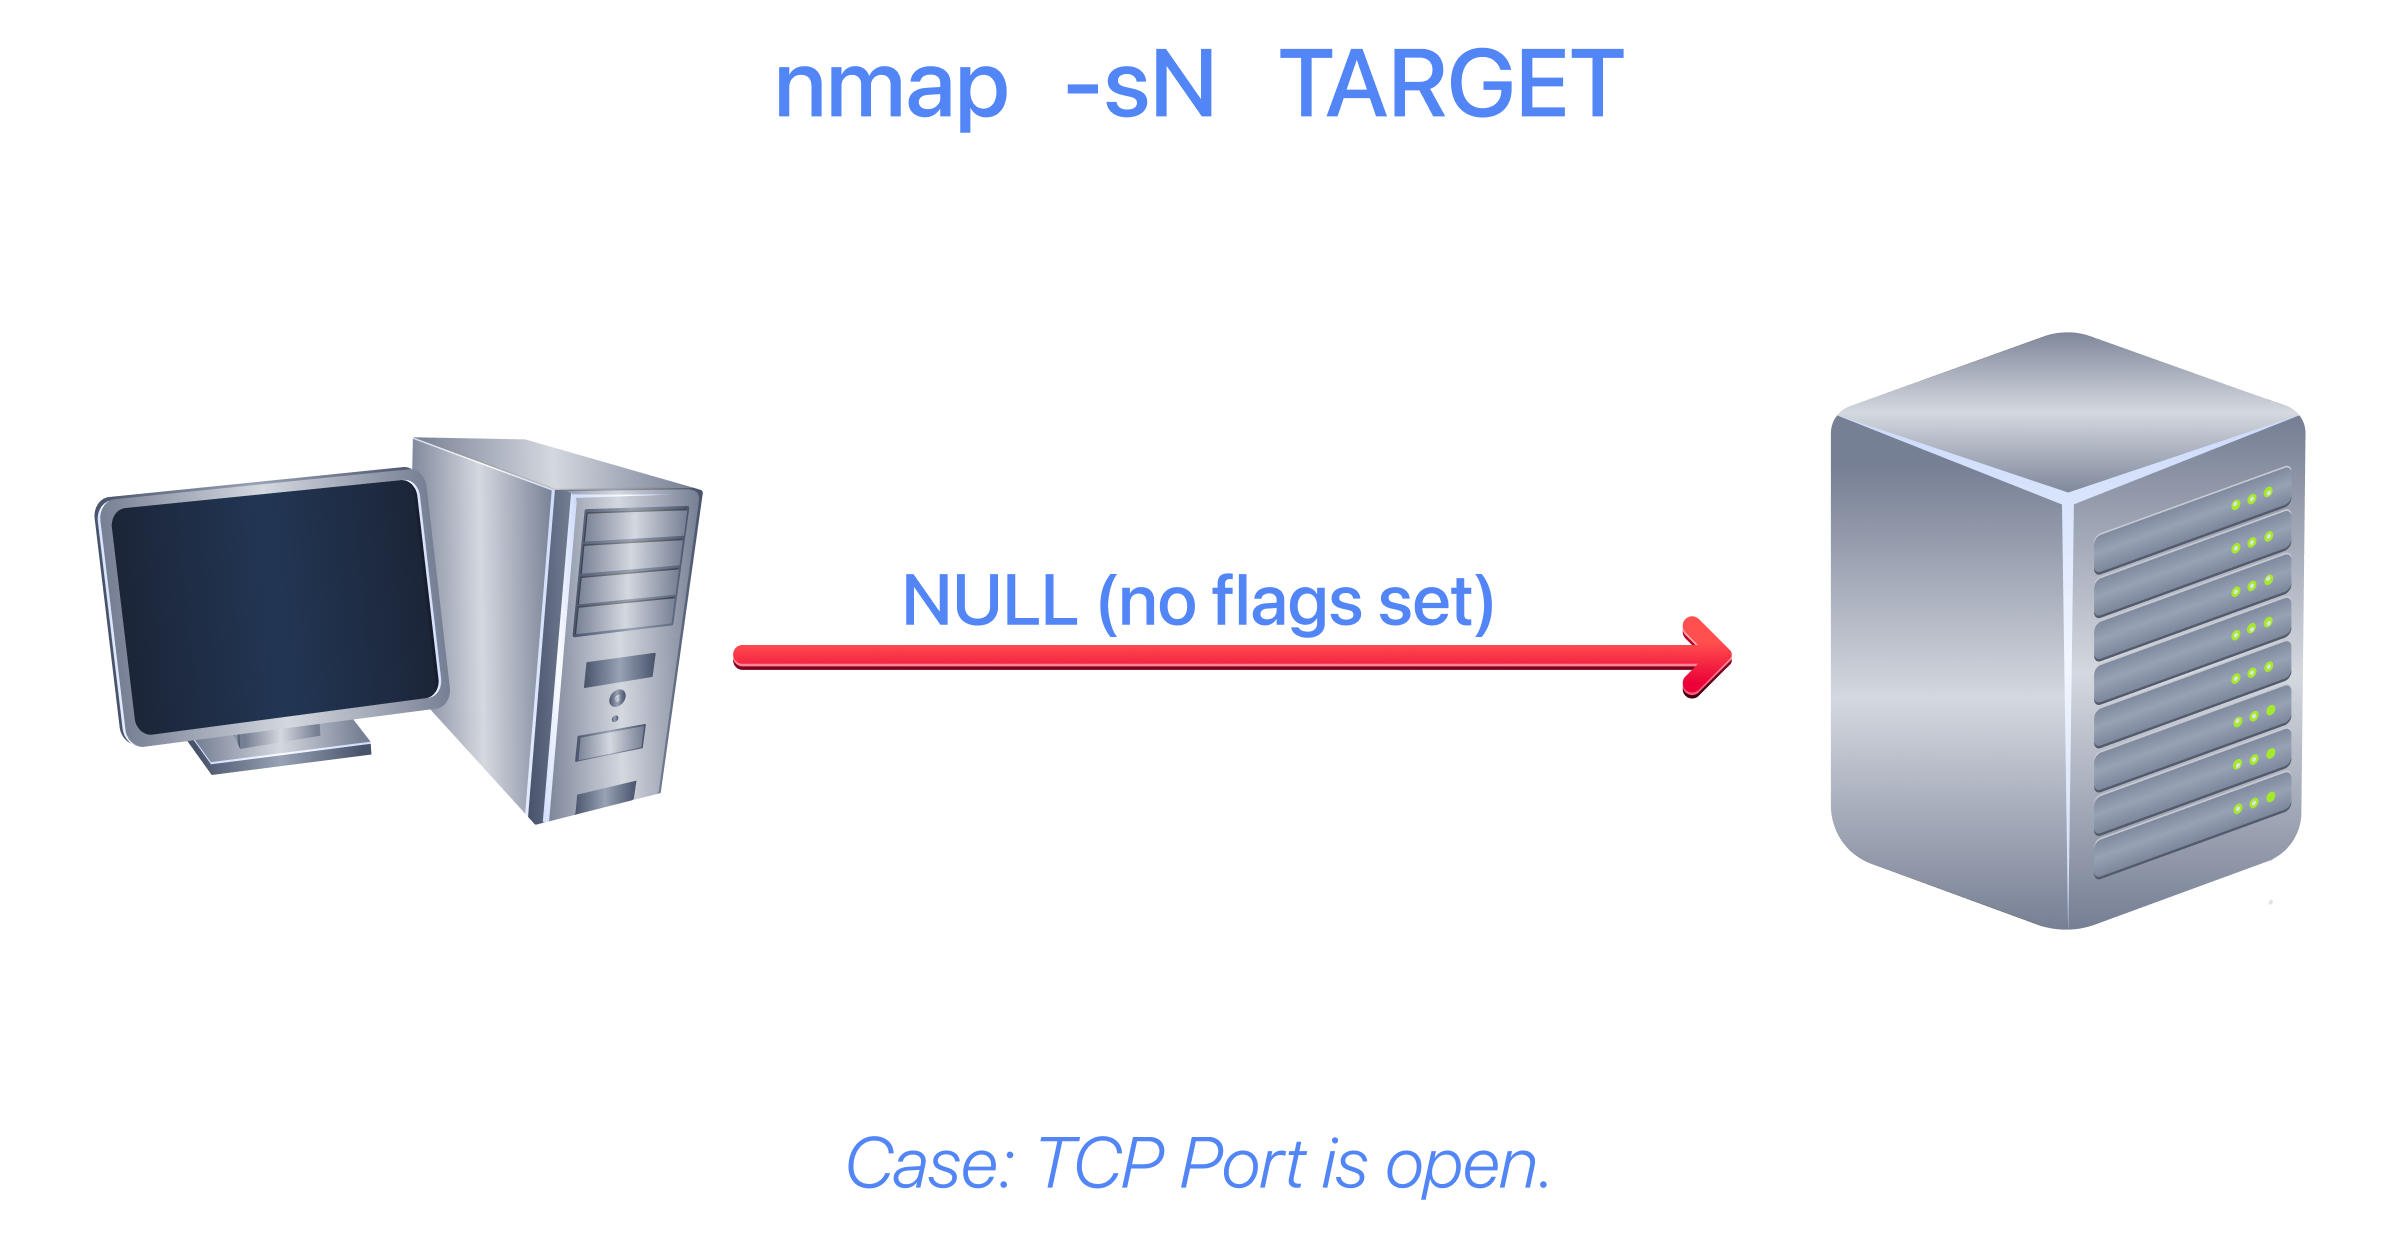
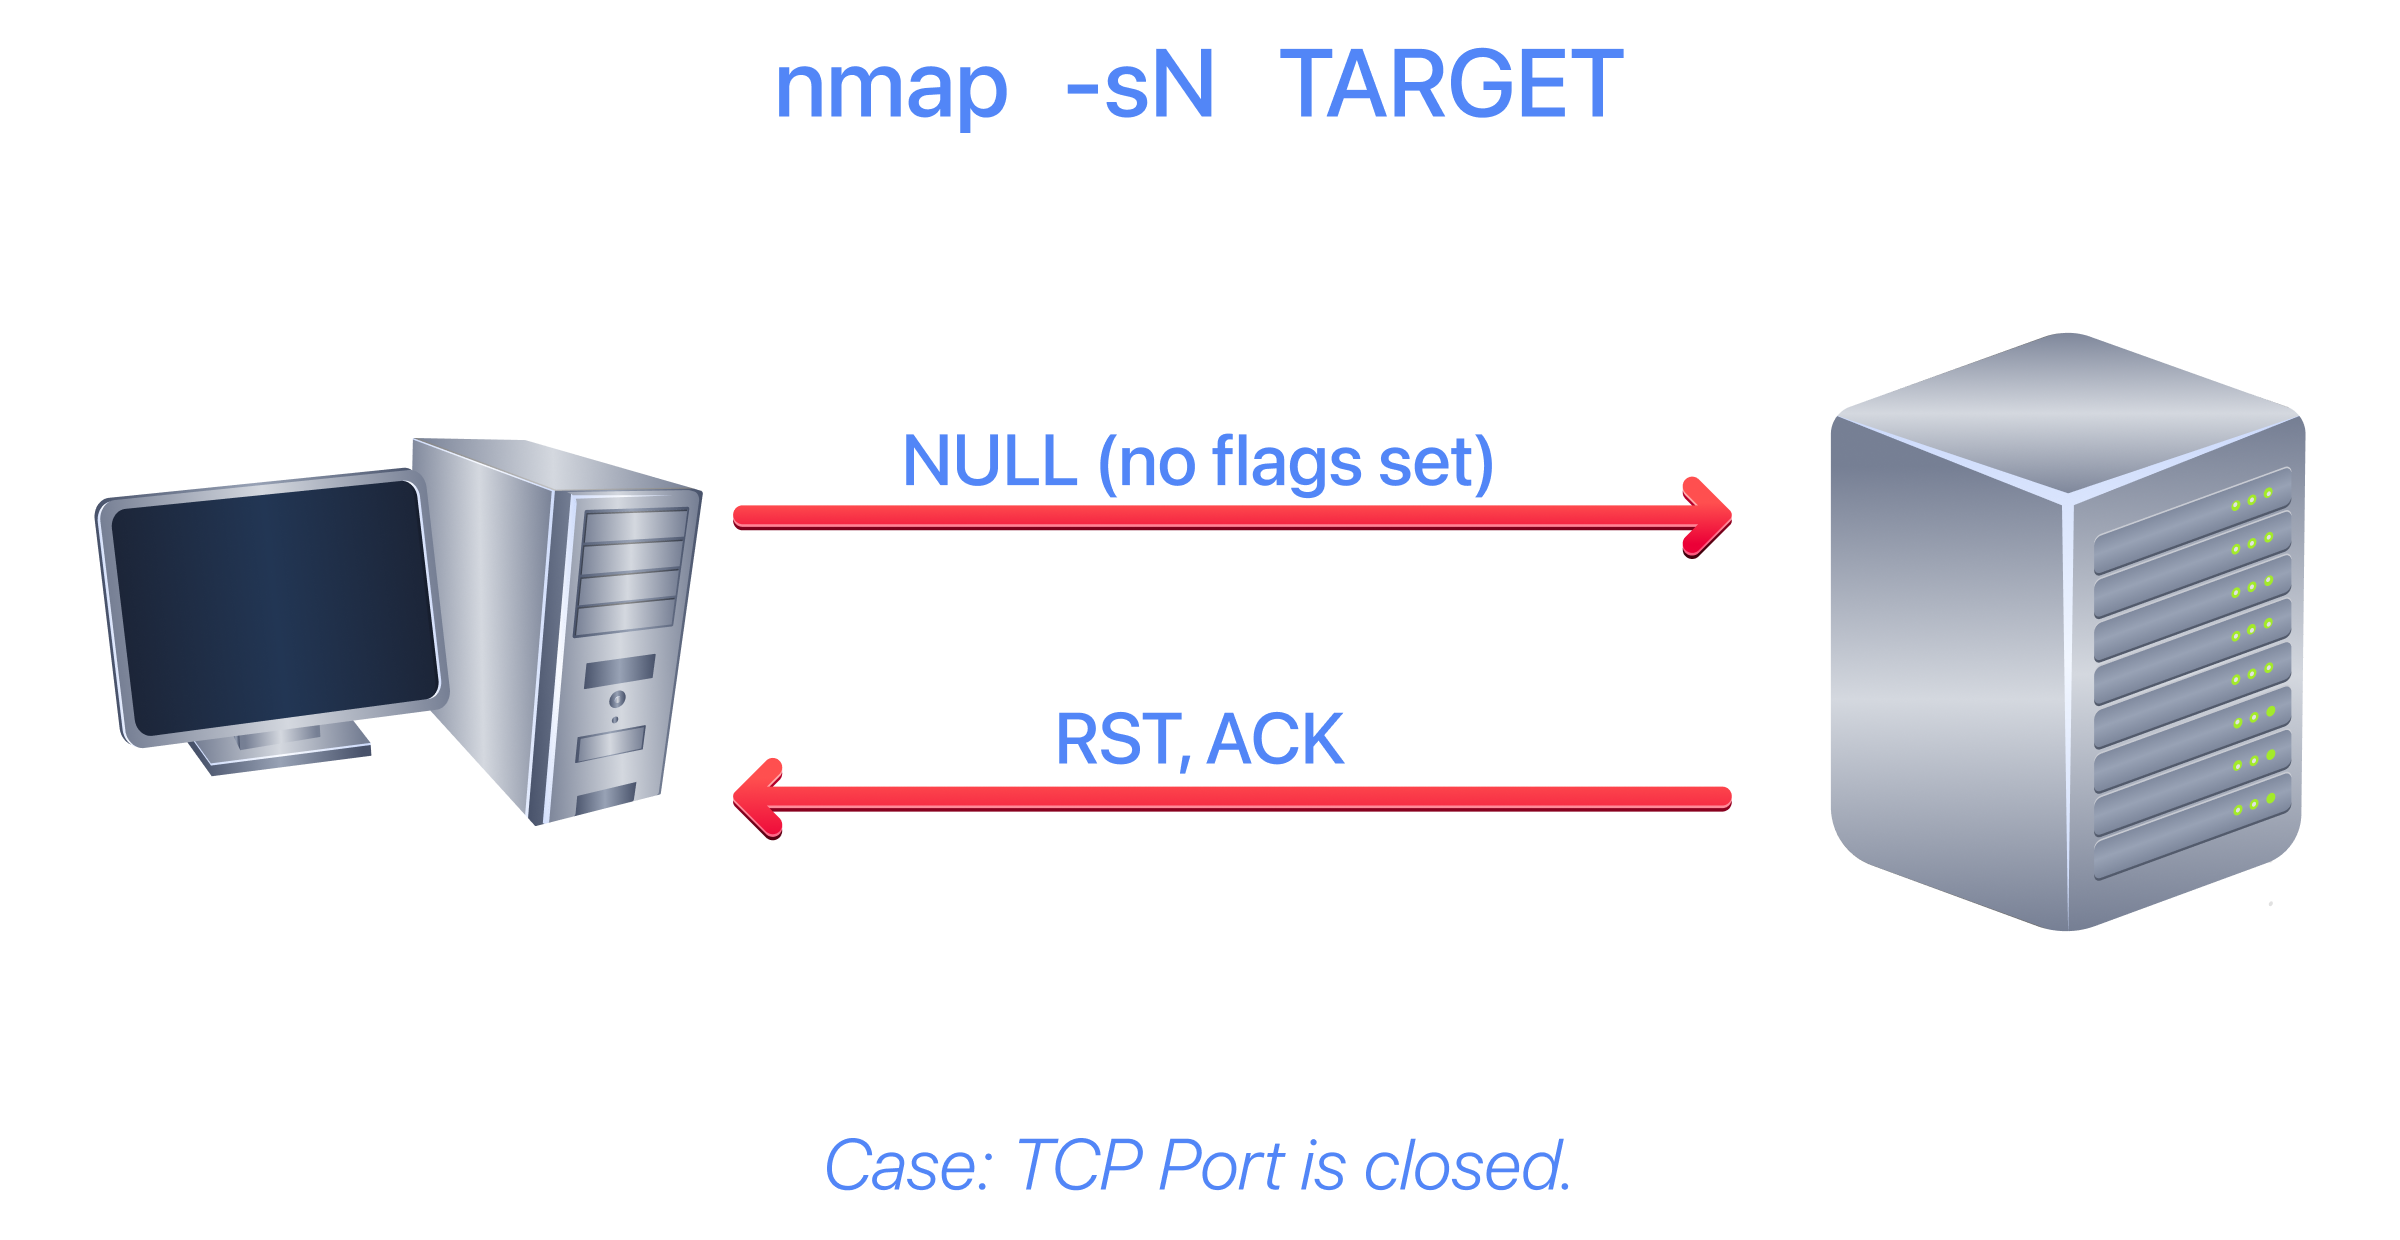
However, we expect the target server to respond with an RST packet if the port is closed. Consequently, we can use the lack of RST response to determine which ports are not closed: open or filtered.
Below is an example of a null scan against a Linux server. The null scan we conducted successfully identified the nine open ports on the target system. Because the null scan relies on the lack of a response to infer that a port is open, it cannot conclusively indicate that these ports are open; it is possible that they are not responding due to a firewall rule. In the AB, enter the following command in the terminal:
           root@ip-10-10-166-81:~# sudo nmap -sN MACHINE_IP
sudo: unable to resolve host ip-10-10-166-81: Name or service not known
Starting Nmap 7.80 ( https://nmap.org ) at 2026-02-17 06:52 GMT
mass_dns: warning: Unable to open /etc/resolv.conf. Try using --system-dns or specify valid servers with --dns-servers
mass_dns: warning: Unable to determine any DNS servers. Reverse DNS is disabled. Try using --system-dns or specify valid servers with --dns-servers
Nmap scan report for 10.201.89.221
Host is up (0.070s latency).
Not shown: 991 closed ports
PORT STATE SERVICE
22/tcp open|filtered ssh
25/tcp open|filtered smtp
80/tcp open|filtered http
110/tcp open|filtered pop3
111/tcp open|filtered rpcbind
143/tcp open|filtered imap
993/tcp open|filtered imaps
995/tcp open|filtered pop3s
5000/tcp open|filtered upnp

Nmap done: 1 IP address (1 host up) scanned in 2.43 seconds
Note that many Nmap options require root privileges. Unless you are running Nmap as root, you need to use sudo as in the example above using the -sN option.
FIN Scan
The FIN scan sends a TCP packet with the FIN flag set. You can choose this scan type using the -sF option. Similarly, no response will be sent if the TCP port is open. Again, Nmap cannot be sure whether the port is open or whether a firewall is blocking traffic on this TCP port.
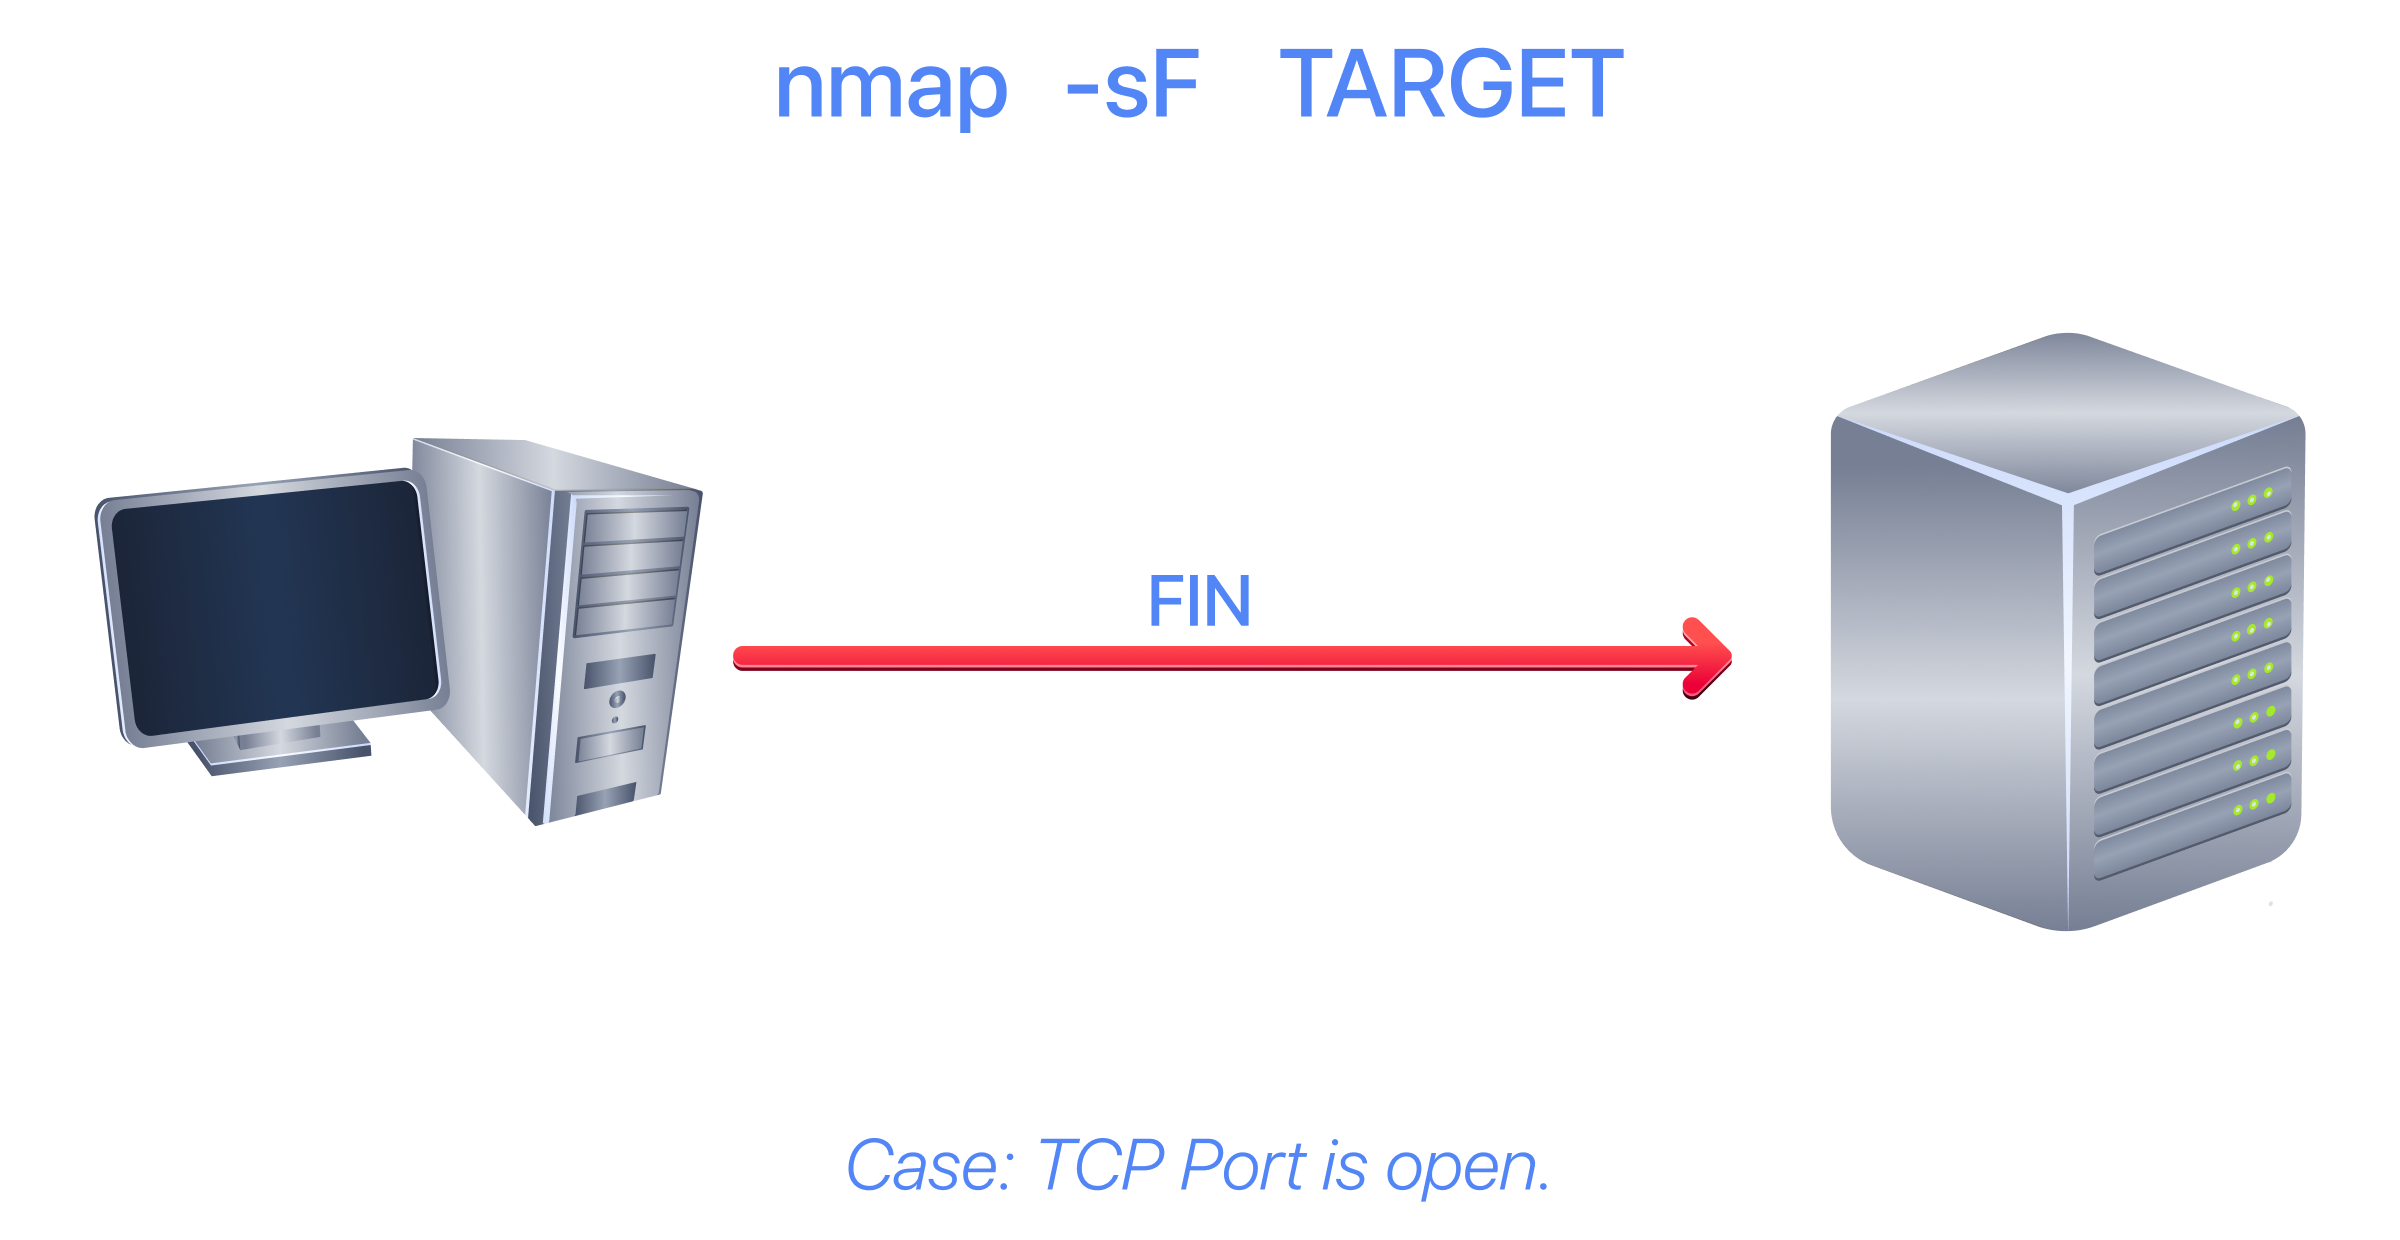
However, the target system should respond with an RST if the port is closed. Consequently, we will be able to identify which ports are closed and use this knowledge to infer which are open or filtered. It's worth noting that some firewalls will 'silently' drop the traffic without sending an RST.
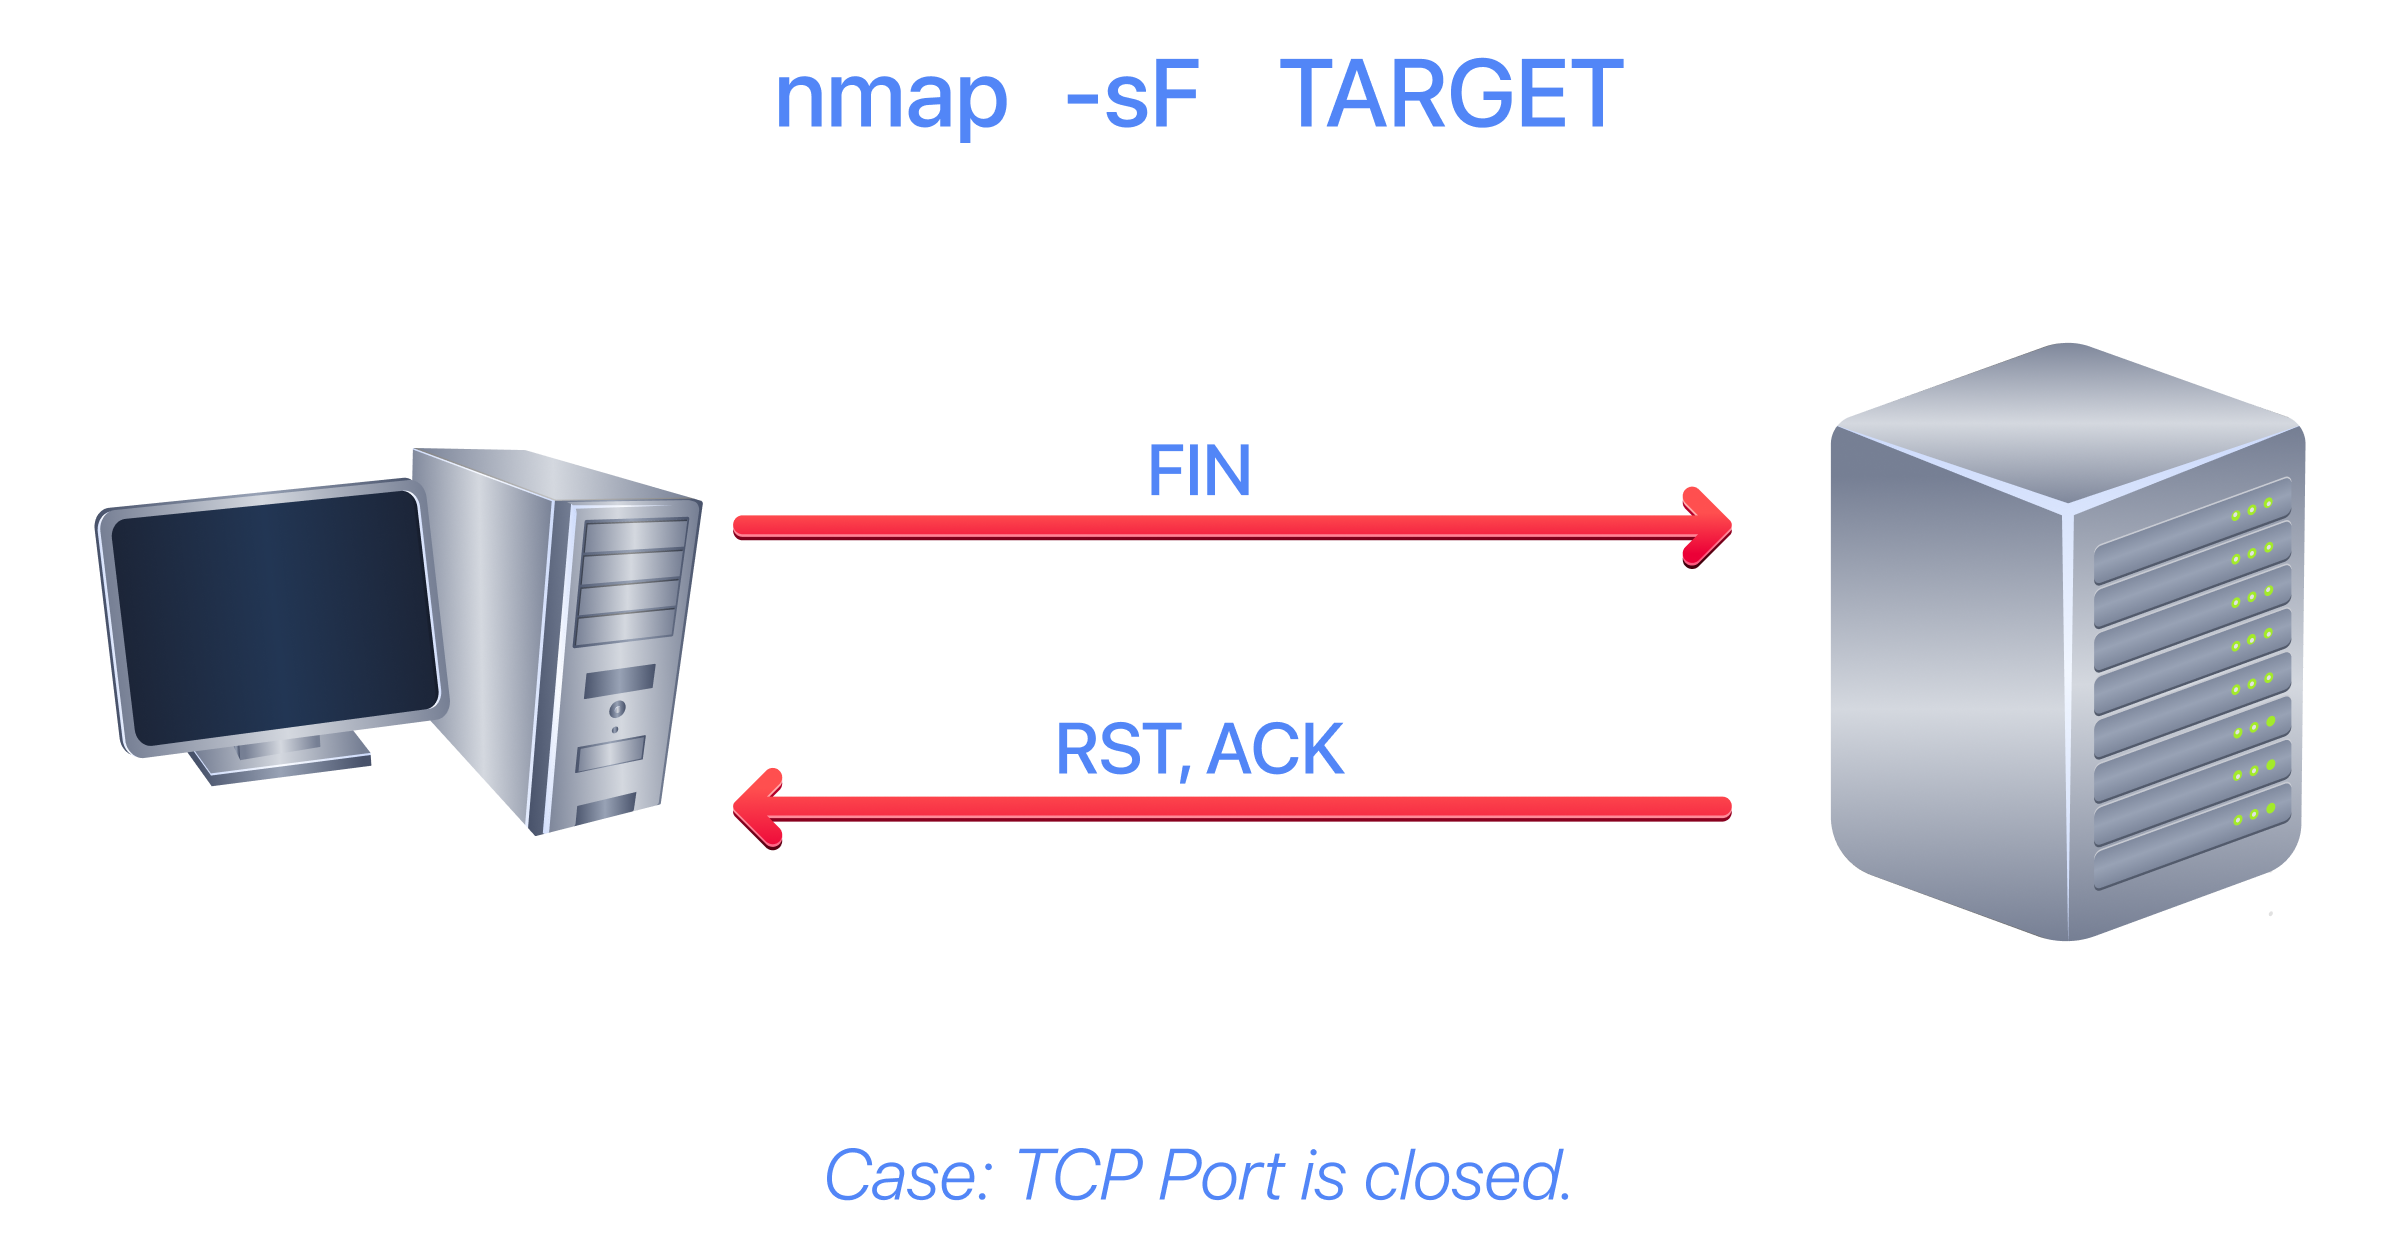
Below is an example of a FIN scan against a Linux server. The result is quite similar to that obtained earlier using a null scan. In the AB, enter the following command:
           root@ip-10-10-166-81:~# sudo nmap -sF MACHINE_IP
sudo: unable to resolve host ip-10-10-166-81: Name or service not known
Starting Nmap 7.80 ( https://nmap.org ) at 2026-02-17 07:10 GMT
mass_dns: warning: Unable to open /etc/resolv.conf. Try using --system-dns or specify valid servers with --dns-servers
mass_dns: warning: Unable to determine any DNS servers. Reverse DNS is disabled. Try using --system-dns or specify valid servers with --dns-servers
Nmap scan report for 10.201.89.221
Host is up (0.072s latency).
Not shown: 991 closed ports
PORT STATE SERVICE
22/tcp open|filtered ssh
25/tcp open|filtered smtp
80/tcp open|filtered http
110/tcp open|filtered pop3
111/tcp open|filtered rpcbind
143/tcp open|filtered imap
993/tcp open|filtered imaps
995/tcp open|filtered pop3s
5000/tcp open|filtered upnp

Nmap done: 1 IP address (1 host up) scanned in 2.39 seconds
Xmas Scan
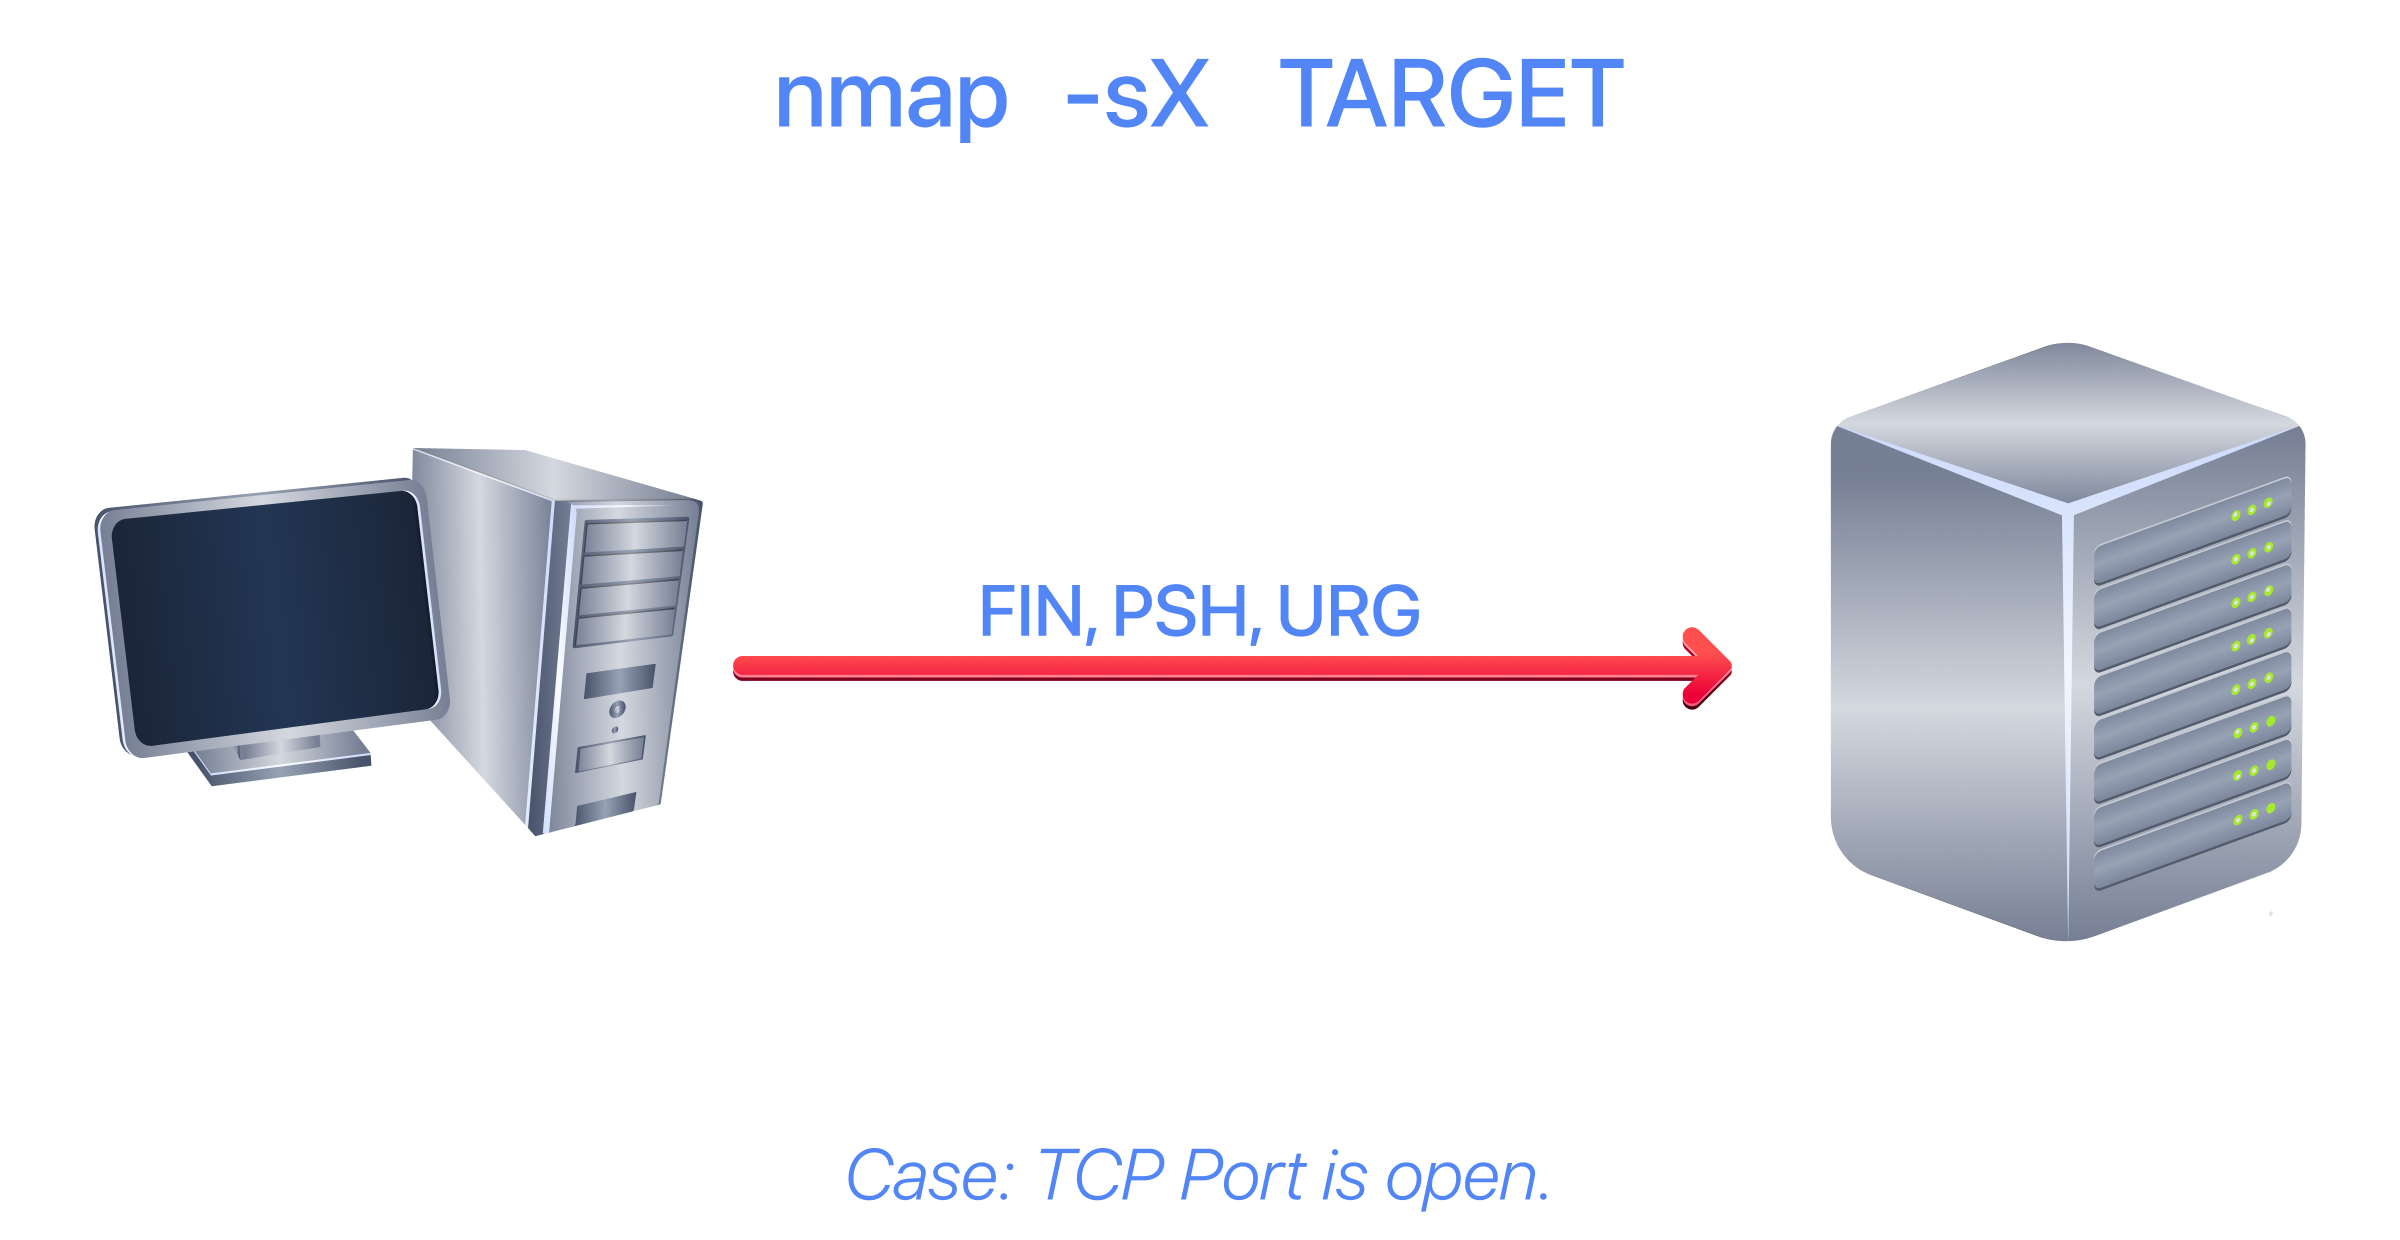
The Xmas scan gets its name from the Christmas tree lights. An Xmas scan sets the FIN, PSH, and URG flags simultaneously. You can select the Xmas scan with the option -sX.
As with the Null and FIN scans, receiving an RST packet indicates that the port is closed. Otherwise, it will be reported as open|filtered.
The following two figures show the cases when the TCP port is open and when it is closed.
In case the port is closed.
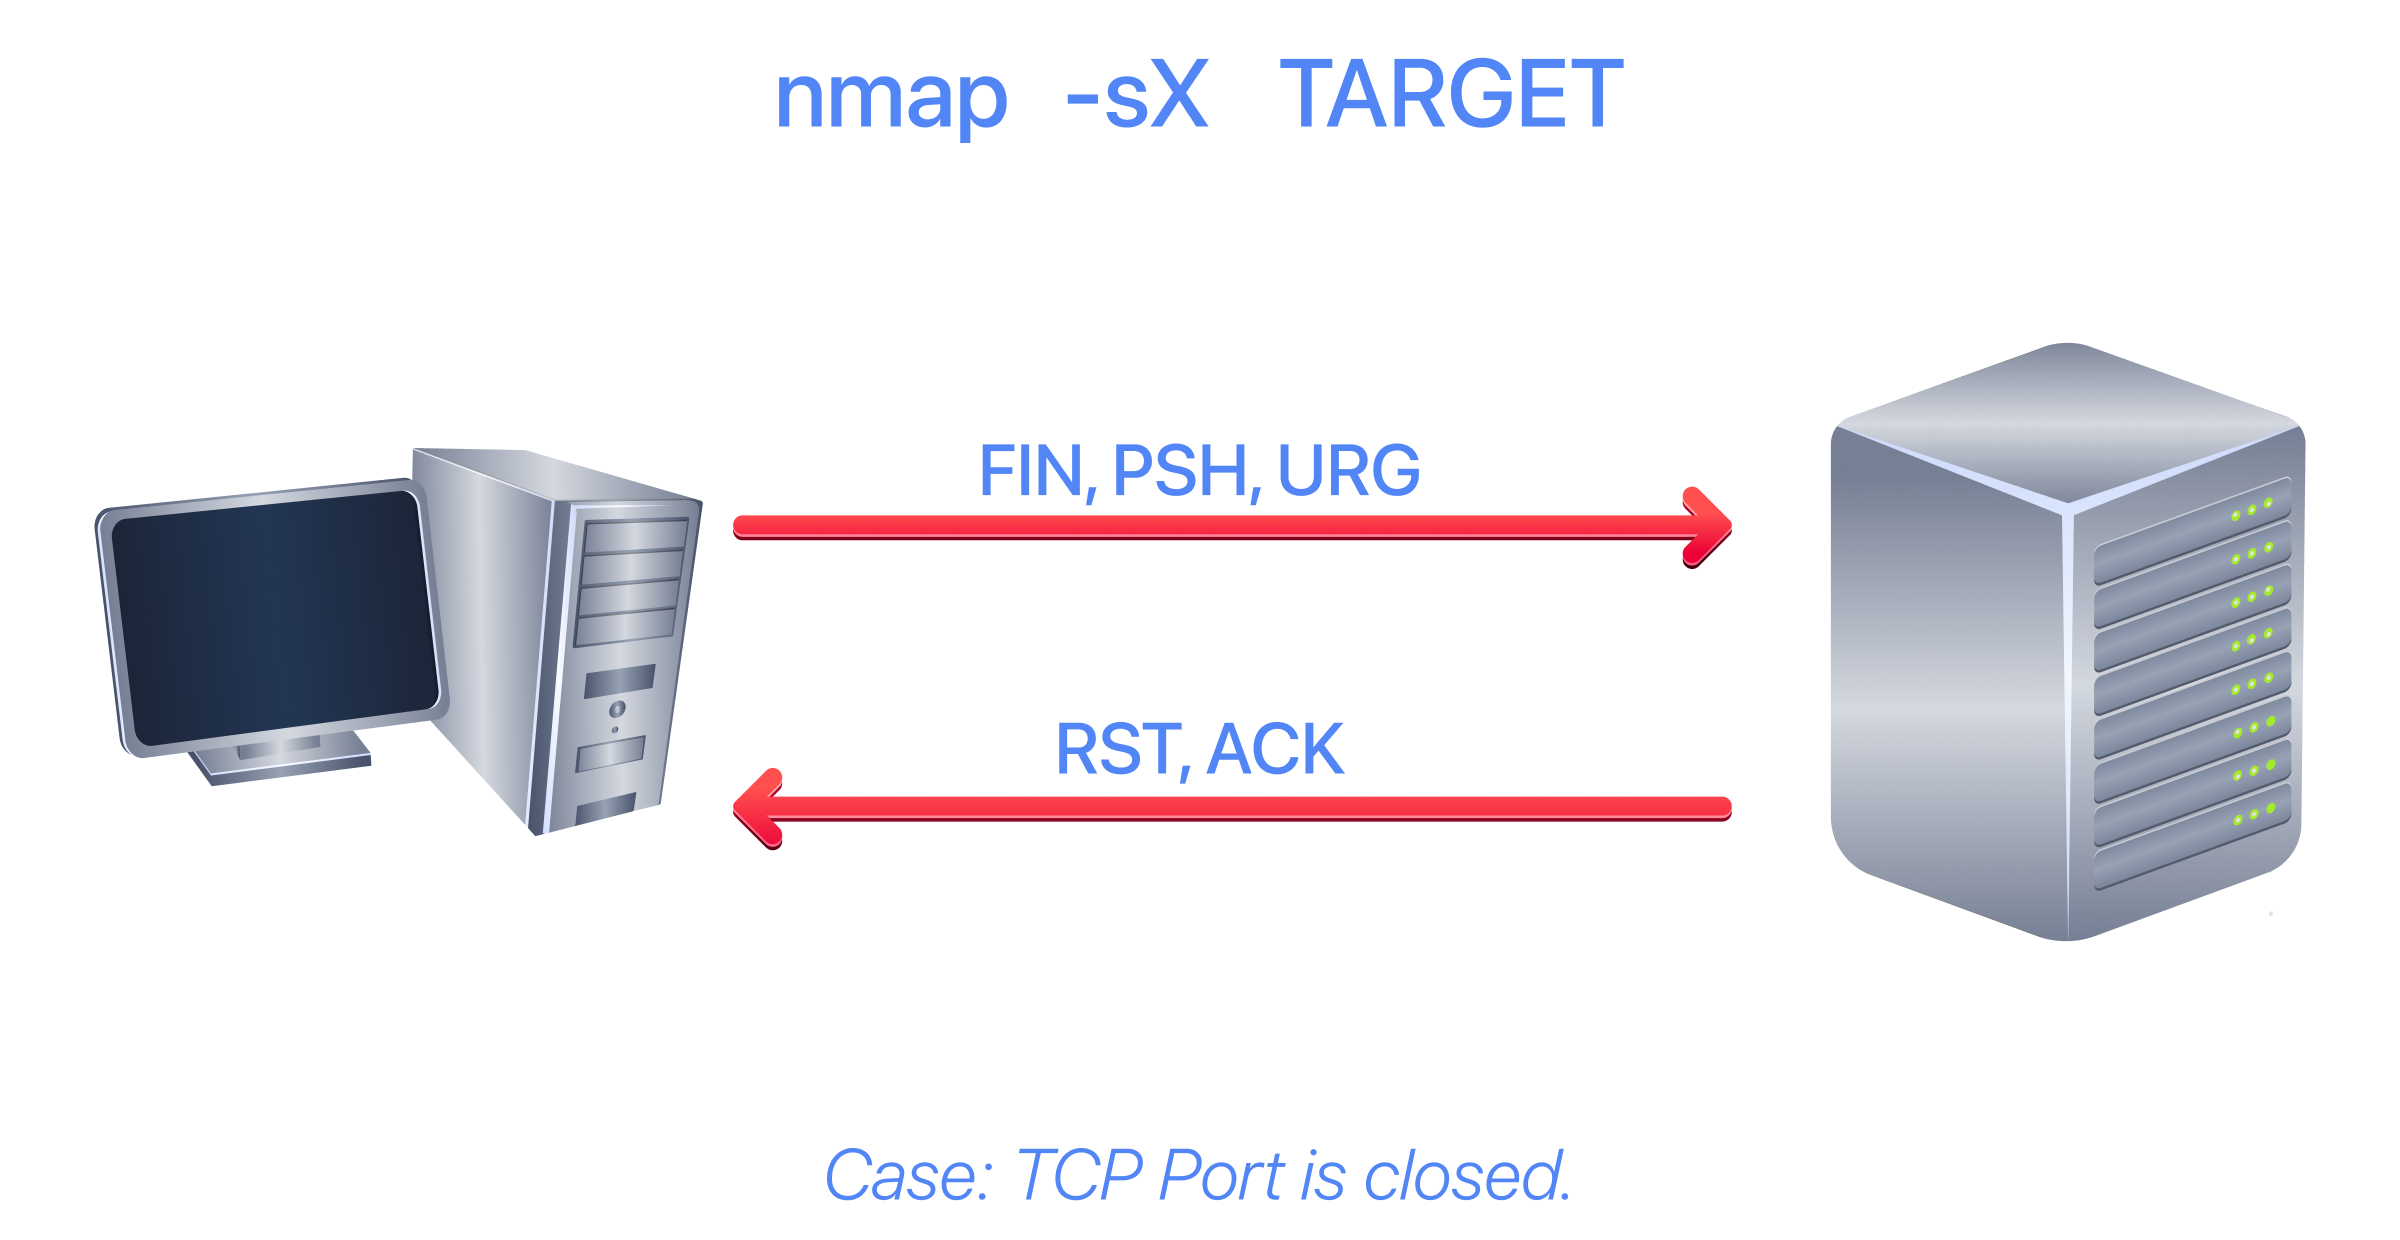
The console output below shows an example of a Xmas scan against a Linux server. The results are pretty similar to those of the null and FIN scans. In the AB, enter the following command:
           root@ip-10-10-166-81:~# sudo nmap -sX MACHINE_IP
sudo: unable to resolve host ip-10-10-166-81: Name or service not known
Starting Nmap 7.80 ( https://nmap.org ) at 2026-02-17 07:13 GMT
mass_dns: warning: Unable to open /etc/resolv.conf. Try using --system-dns or specify valid servers with --dns-servers
mass_dns: warning: Unable to determine any DNS servers. Reverse DNS is disabled. Try using --system-dns or specify valid servers with --dns-servers
Nmap scan report for 10.201.89.221
Host is up (0.073s latency).
Not shown: 991 closed ports
PORT STATE SERVICE
22/tcp open|filtered ssh
25/tcp open|filtered smtp
80/tcp open|filtered http
110/tcp open|filtered pop3
111/tcp open|filtered rpcbind
143/tcp open|filtered imap
993/tcp open|filtered imaps
995/tcp open|filtered pop3s
5000/tcp open|filtered upnp

Nmap done: 1 IP address (1 host up) scanned in 2.40 seconds
One scenario where these three scan types can be efficient is when scanning a target behind a stateless (non-stateful) firewall. A stateless firewall checks whether the incoming packet has the SYN flag set to detect a connection attempt. Using a flag combination that does not match the SYN packet allows deception of the firewall and access to the system behind it. However, a stateful firewall will practically block all such crafted packets, rendering this kind of scan useless.
?Answer the questions below
- In a null scan, how many flags are set to 1?
- In a FIN scan, how many flags are set to 1?
- In a Xmas scan, how many flags are set to 1?
- Launch a FIN scan against the target VM. How many ports appear as open|filtered?
- Repeat your scan launching a null scan against the target VM. How many ports appear as open|filtered?
TCP Maimon Scan
Uriel Maimon first described this scan in 1996. In this scan, the FIN and ACK bits are set. The target should send an RST packet as a response. However, certain BSD-derived systems drop the packet if it is an open port exposing the open ports. This scan won’t work on most targets encountered in modern networks; however, we include it in this room to better understand the port scanning mechanism and the hacking mindset. To select this scan type, use the -sM option.
Most target systems respond with an RST packet regardless of whether the TCP port is open. In such a case, we won’t be able to discover the open ports. The figure below shows the expected behaviour for both open and closed TCP ports.
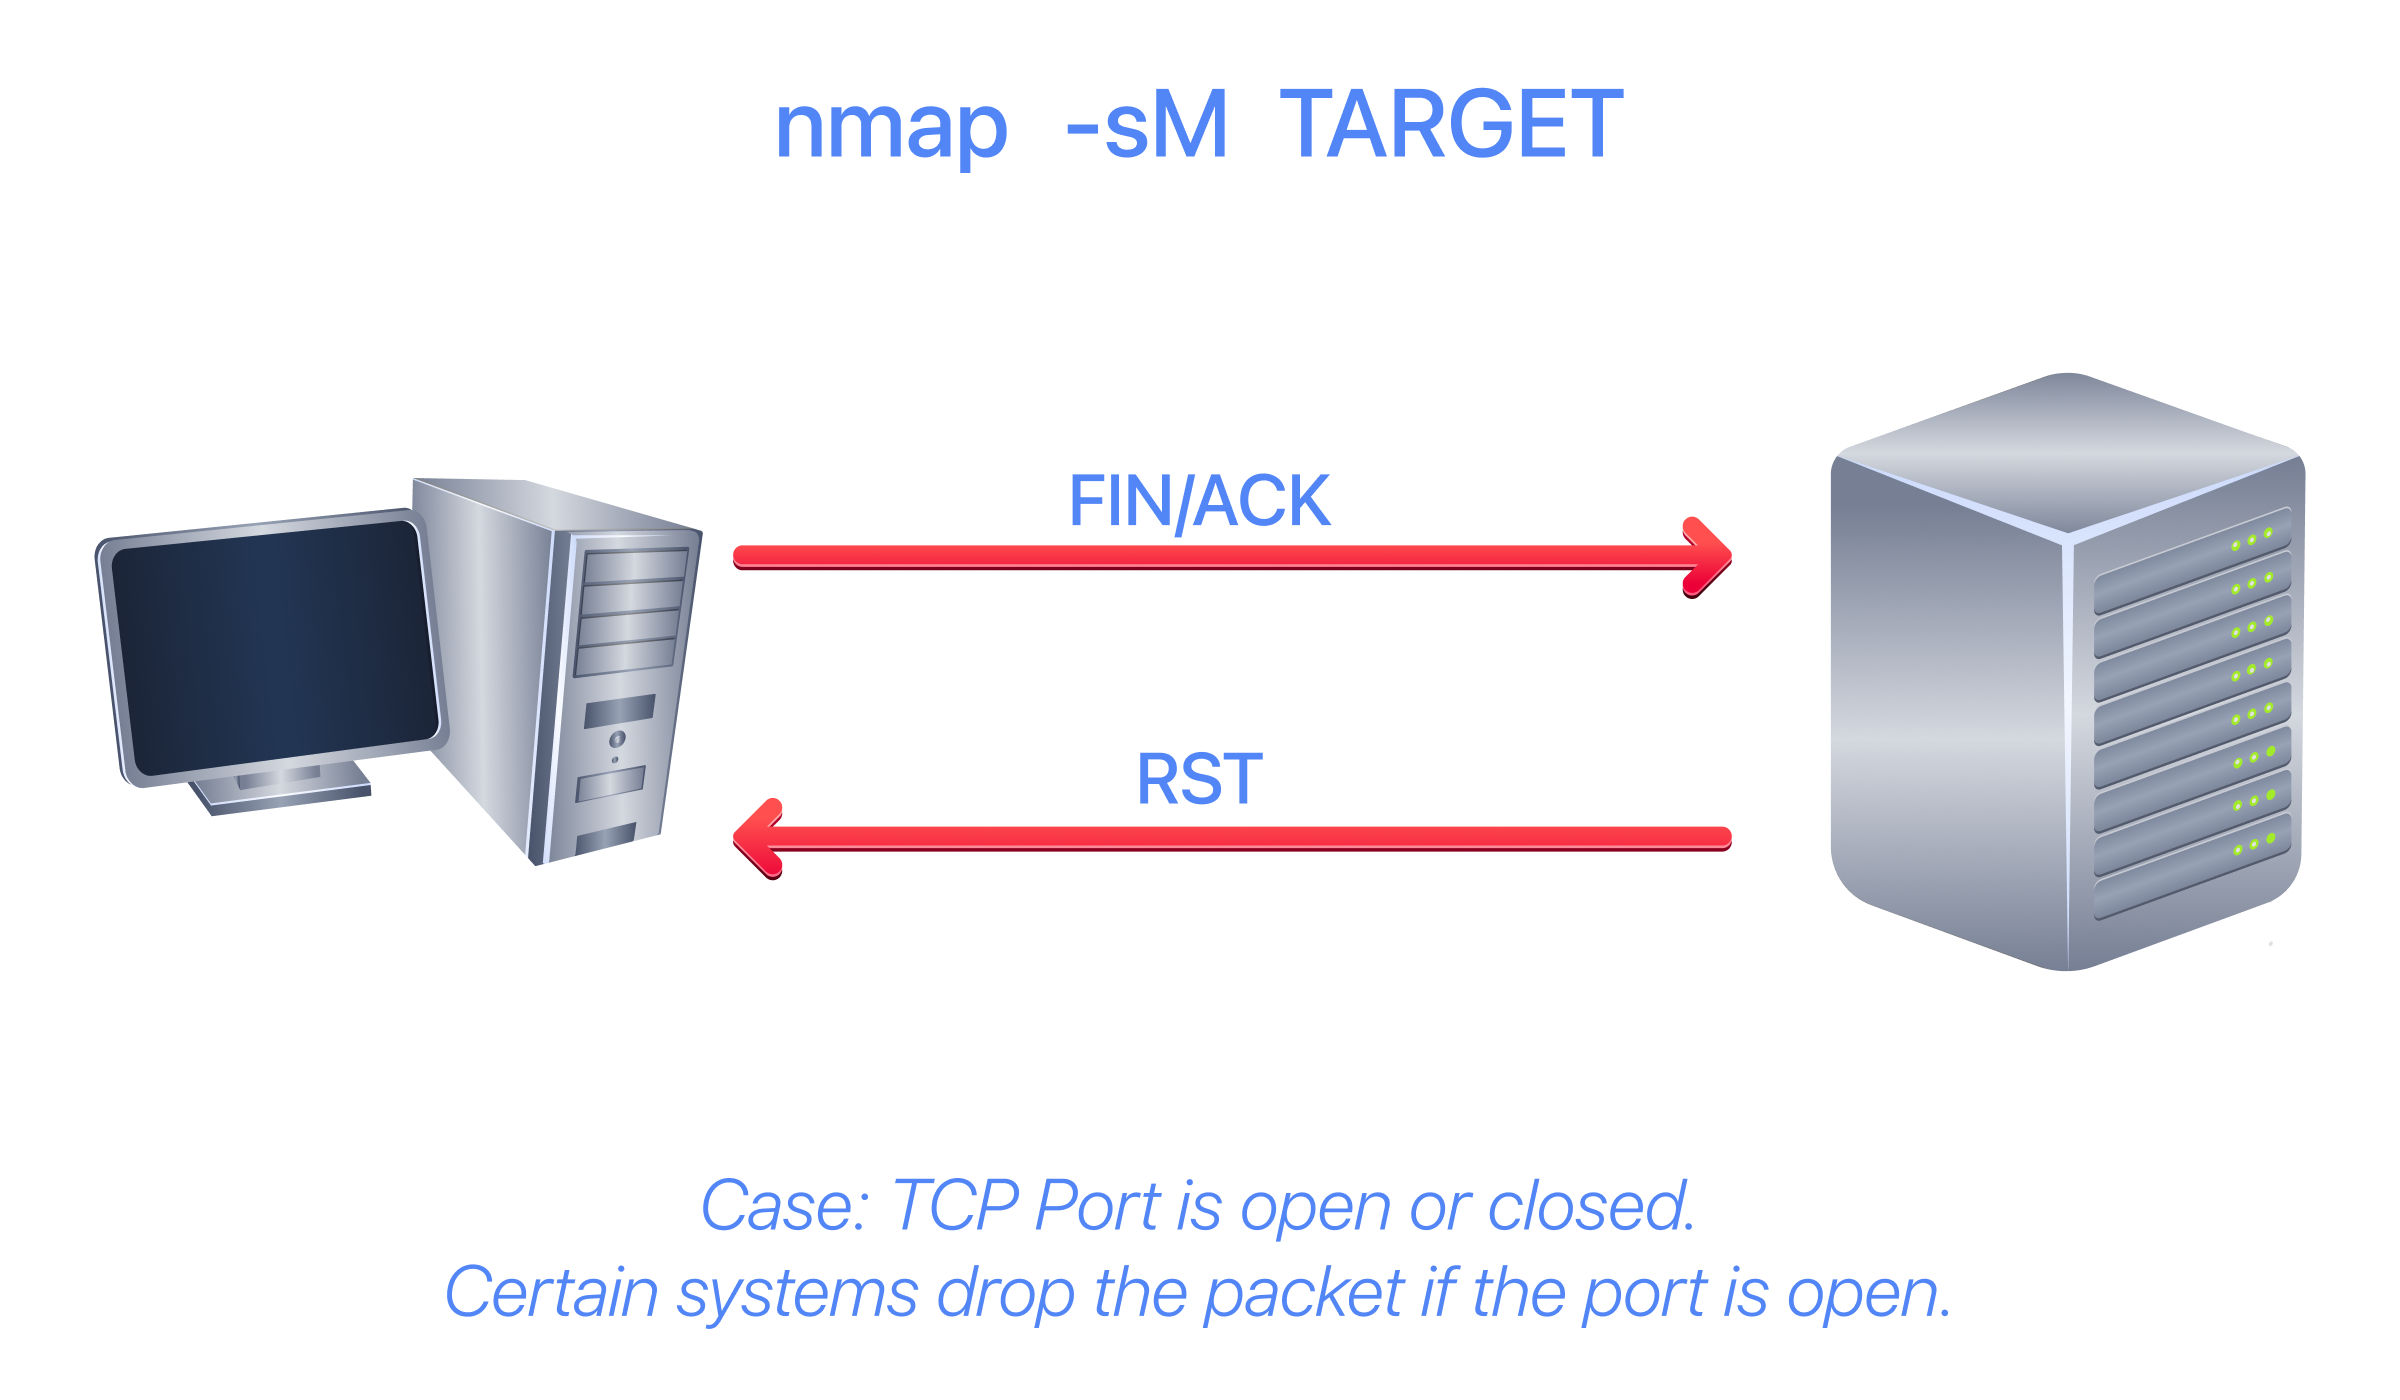
The console output below is an example of a TCP Maimon scan against a Linux server. As mentioned, because open and closed ports behave the same way, the Maimon scan could not detect any open ports on the target system.
           root@ip-10-10-166-81:~# sudo nmap -sM 10.201.89.221
sudo: unable to resolve host ip-10-10-166-81: Name or service not known
Starting Nmap 7.80 ( https://nmap.org ) at 2026-02-17 07:17 GMT
mass_dns: warning: Unable to open /etc/resolv.conf. Try using --system-dns or specify valid servers with --dns-servers
mass_dns: warning: Unable to determine any DNS servers. Reverse DNS is disabled. Try using --system-dns or specify valid servers with --dns-servers
Nmap scan report for 10.201.89.221
Host is up (0.075s latency).
All 1000 scanned ports on 10.201.89.221 are closed

Nmap done: 1 IP address (1 host up) scanned in 1.38 seconds
This type of scan is not the first scan one would pick to discover a system; however, it is important to know about it, as you don’t know when it could come in handy.
?Answer the questions below
- In the Maimon scan, how many flags are set?
TCP ACK, Window, and Custom Scan
TCP ACK Scan
Let’s start with the TCP ACK scan. As the name implies, an ACK scan will send a TCP packet with the ACK flag set. Use the -sA option to choose this scan. As shown in the figure below, the target would respond to the ACK with RST regardless of the port's state. This behaviour occurs because a TCP packet with the ACK flag set should be sent only in response to a received TCP packet to acknowledge receipt of data, unlike in our case. Hence, this scan won’t tell us whether the target port is open in a simple setup.
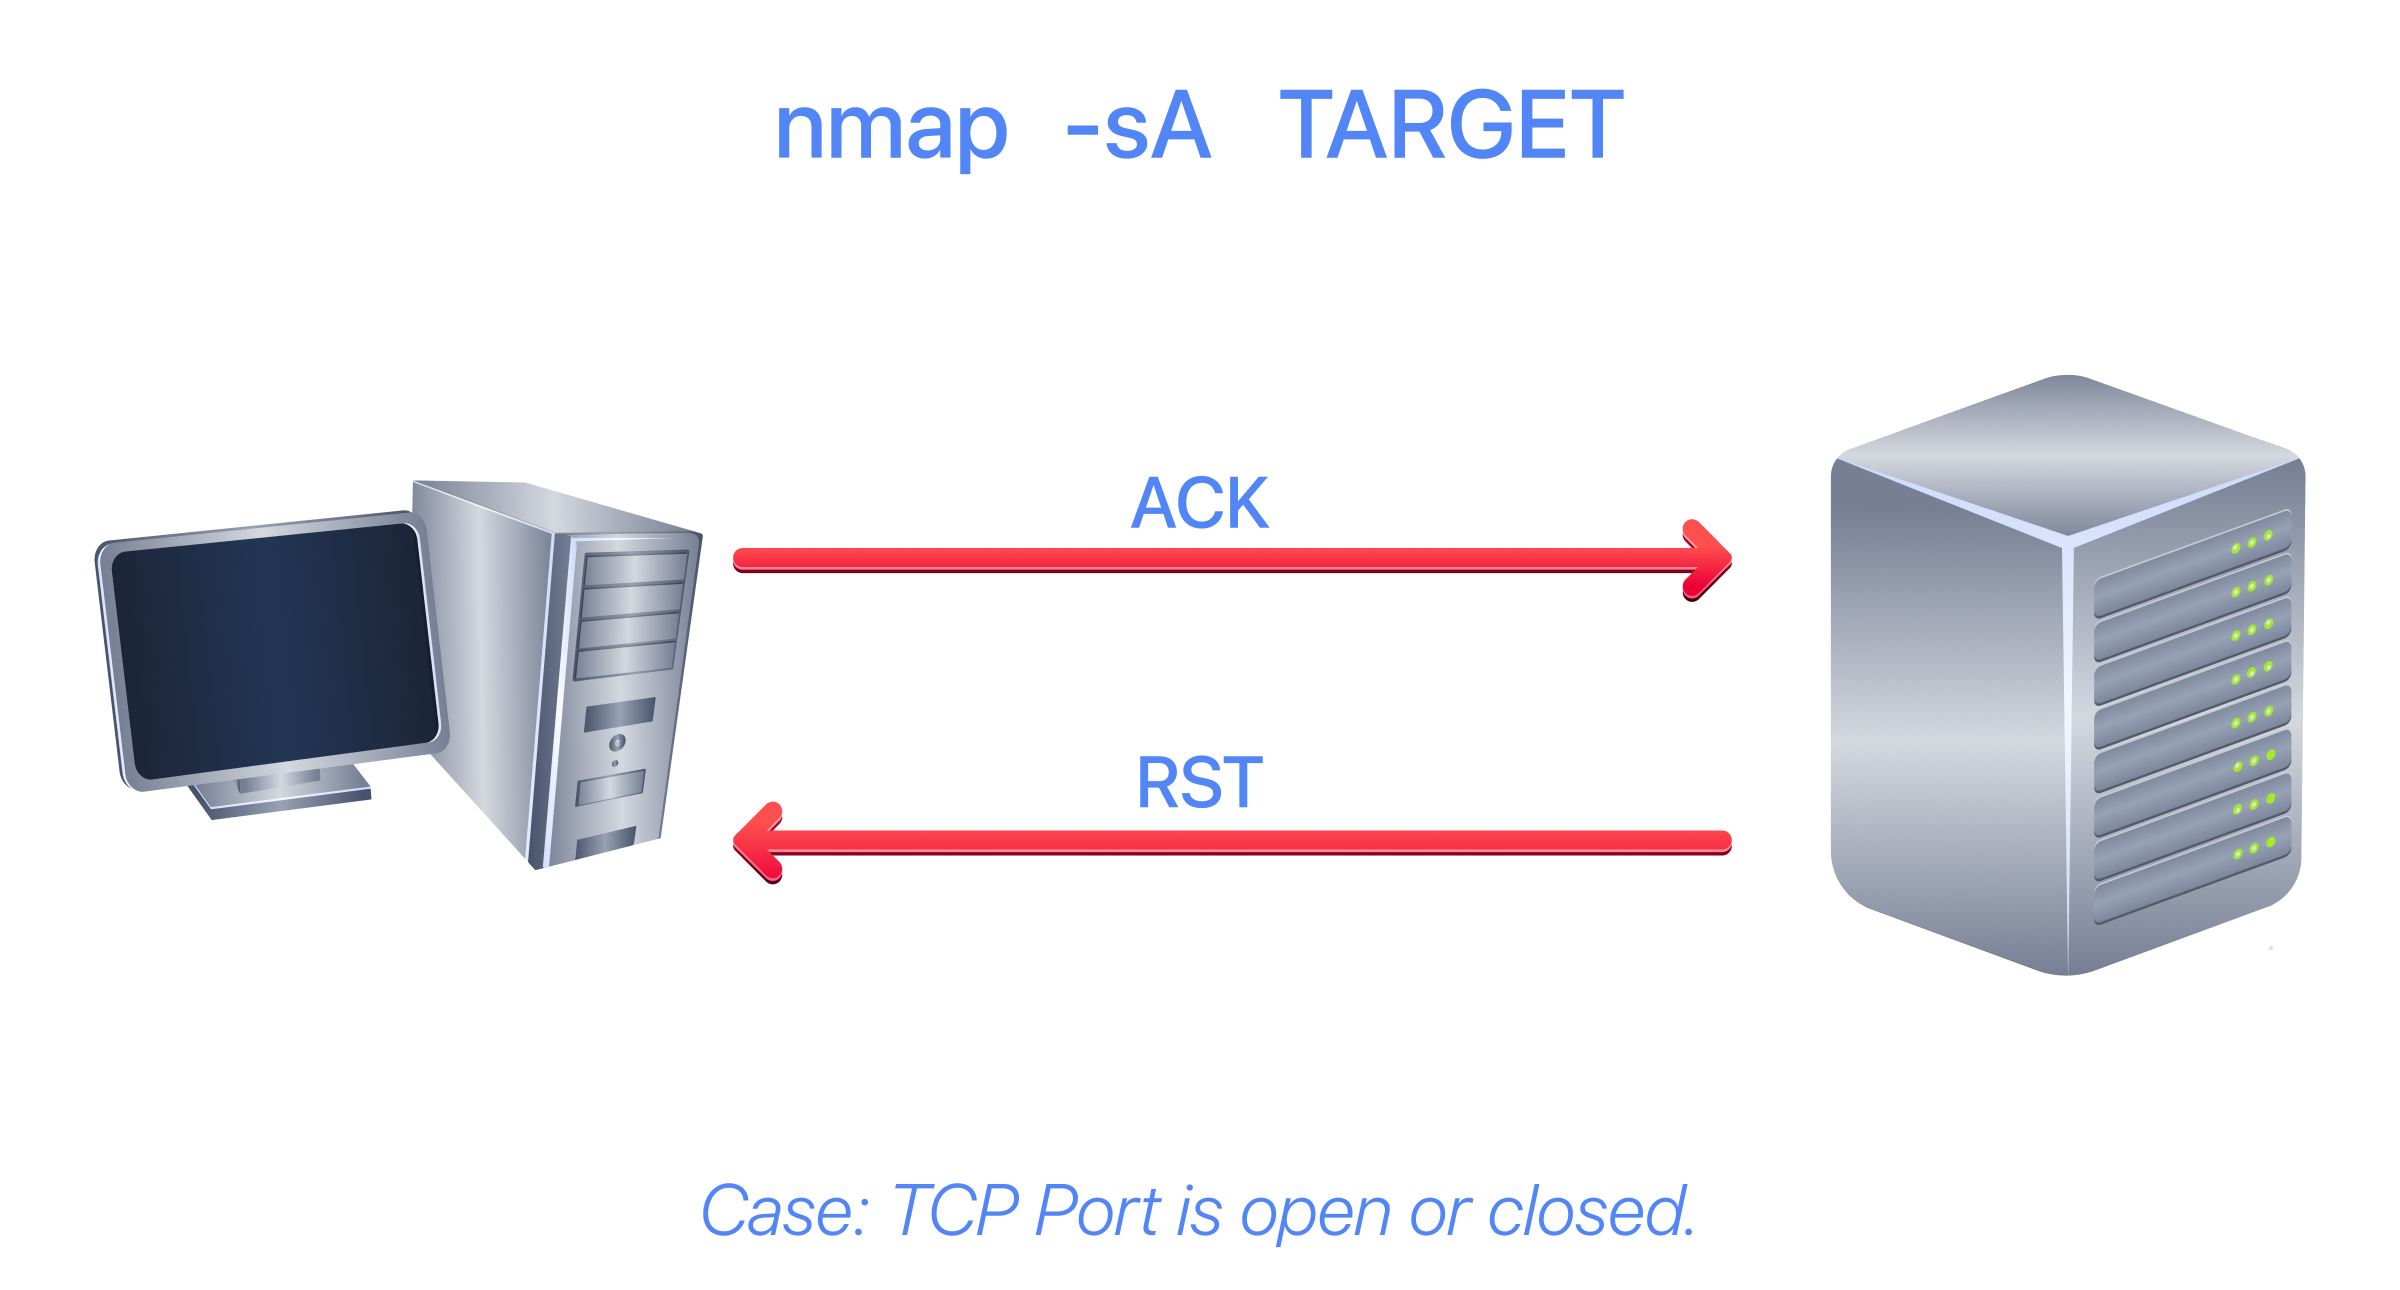
In the following example, we will scan the target VM before installing a firewall on it. As expected, we couldn’t learn which ports were open.
           root@ip-10-10-166-81:~# sudo nmap -sA MACHINE_IP
sudo: unable to resolve host ip-10-10-166-81: Name or service not known
Starting Nmap 7.80 ( https://nmap.org ) at 2026-02-17 07:20 GMT
mass_dns: warning: Unable to open /etc/resolv.conf. Try using --system-dns or specify valid servers with --dns-servers
mass_dns: warning: Unable to determine any DNS servers. Reverse DNS is disabled. Try using --system-dns or specify valid servers with --dns-servers
Nmap scan report for 10.201.89.221
Host is up (0.074s latency).
All 1000 scanned ports on 10.201.89.221 are unfiltered

Nmap done: 1 IP address (1 host up) scanned in 1.38 seconds
This kind of scan would be helpful if a firewall were in front of the target. Consequently, based on which ACK packets resulted in responses, you will learn which ports were not blocked by the firewall. In other words, this type of scan is better suited to discovering firewall rule sets and configurations.
Visit the URL http://MACHINE_IP:5000 to activate the firewall, and we will repeat the scan.
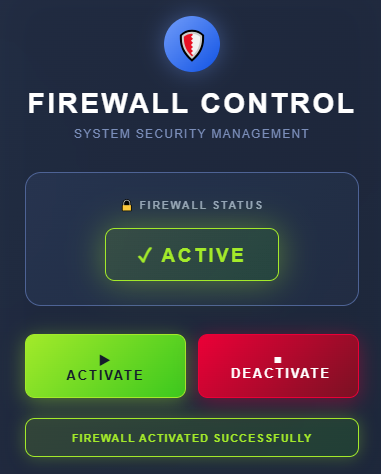
This time, we received some interesting results. As shown in the console output below, the firewall is blocking all other ports except these five.
           root@ip-10-10-166-81:~# sudo nmap -sA MACHINE_IP
sudo: unable to resolve host ip-10-10-166-81: Name or service not known
Starting Nmap 7.80 ( https://nmap.org ) at 2026-02-17 07:26 GMT
mass_dns: warning: Unable to open /etc/resolv.conf. Try using --system-dns or specify valid servers with --dns-servers
mass_dns: warning: Unable to determine any DNS servers. Reverse DNS is disabled. Try using --system-dns or specify valid servers with --dns-servers
Nmap scan report for 10.201.89.221
Host is up (0.070s latency).
Not shown: 995 filtered ports
PORT STATE SERVICE
22/tcp unfiltered ssh
25/tcp unfiltered smtp
80/tcp unfiltered http
443/tcp unfiltered https
5000/tcp unfiltered upnp

Nmap done: 1 IP address (1 host up) scanned in 5.69 seconds
Window Scan
Another similar scan is the TCP window scan. The TCP window scan is almost identical to the ACK scan; however, it examines the TCP Window field of the RST packets returned. On specific systems, this can reveal that the port is open. You can select this scan type with the option -sW. As shown in the figure below, we expect to get an RST packet in reply to our “uninvited” ACK packets, regardless of whether the port is open or closed.
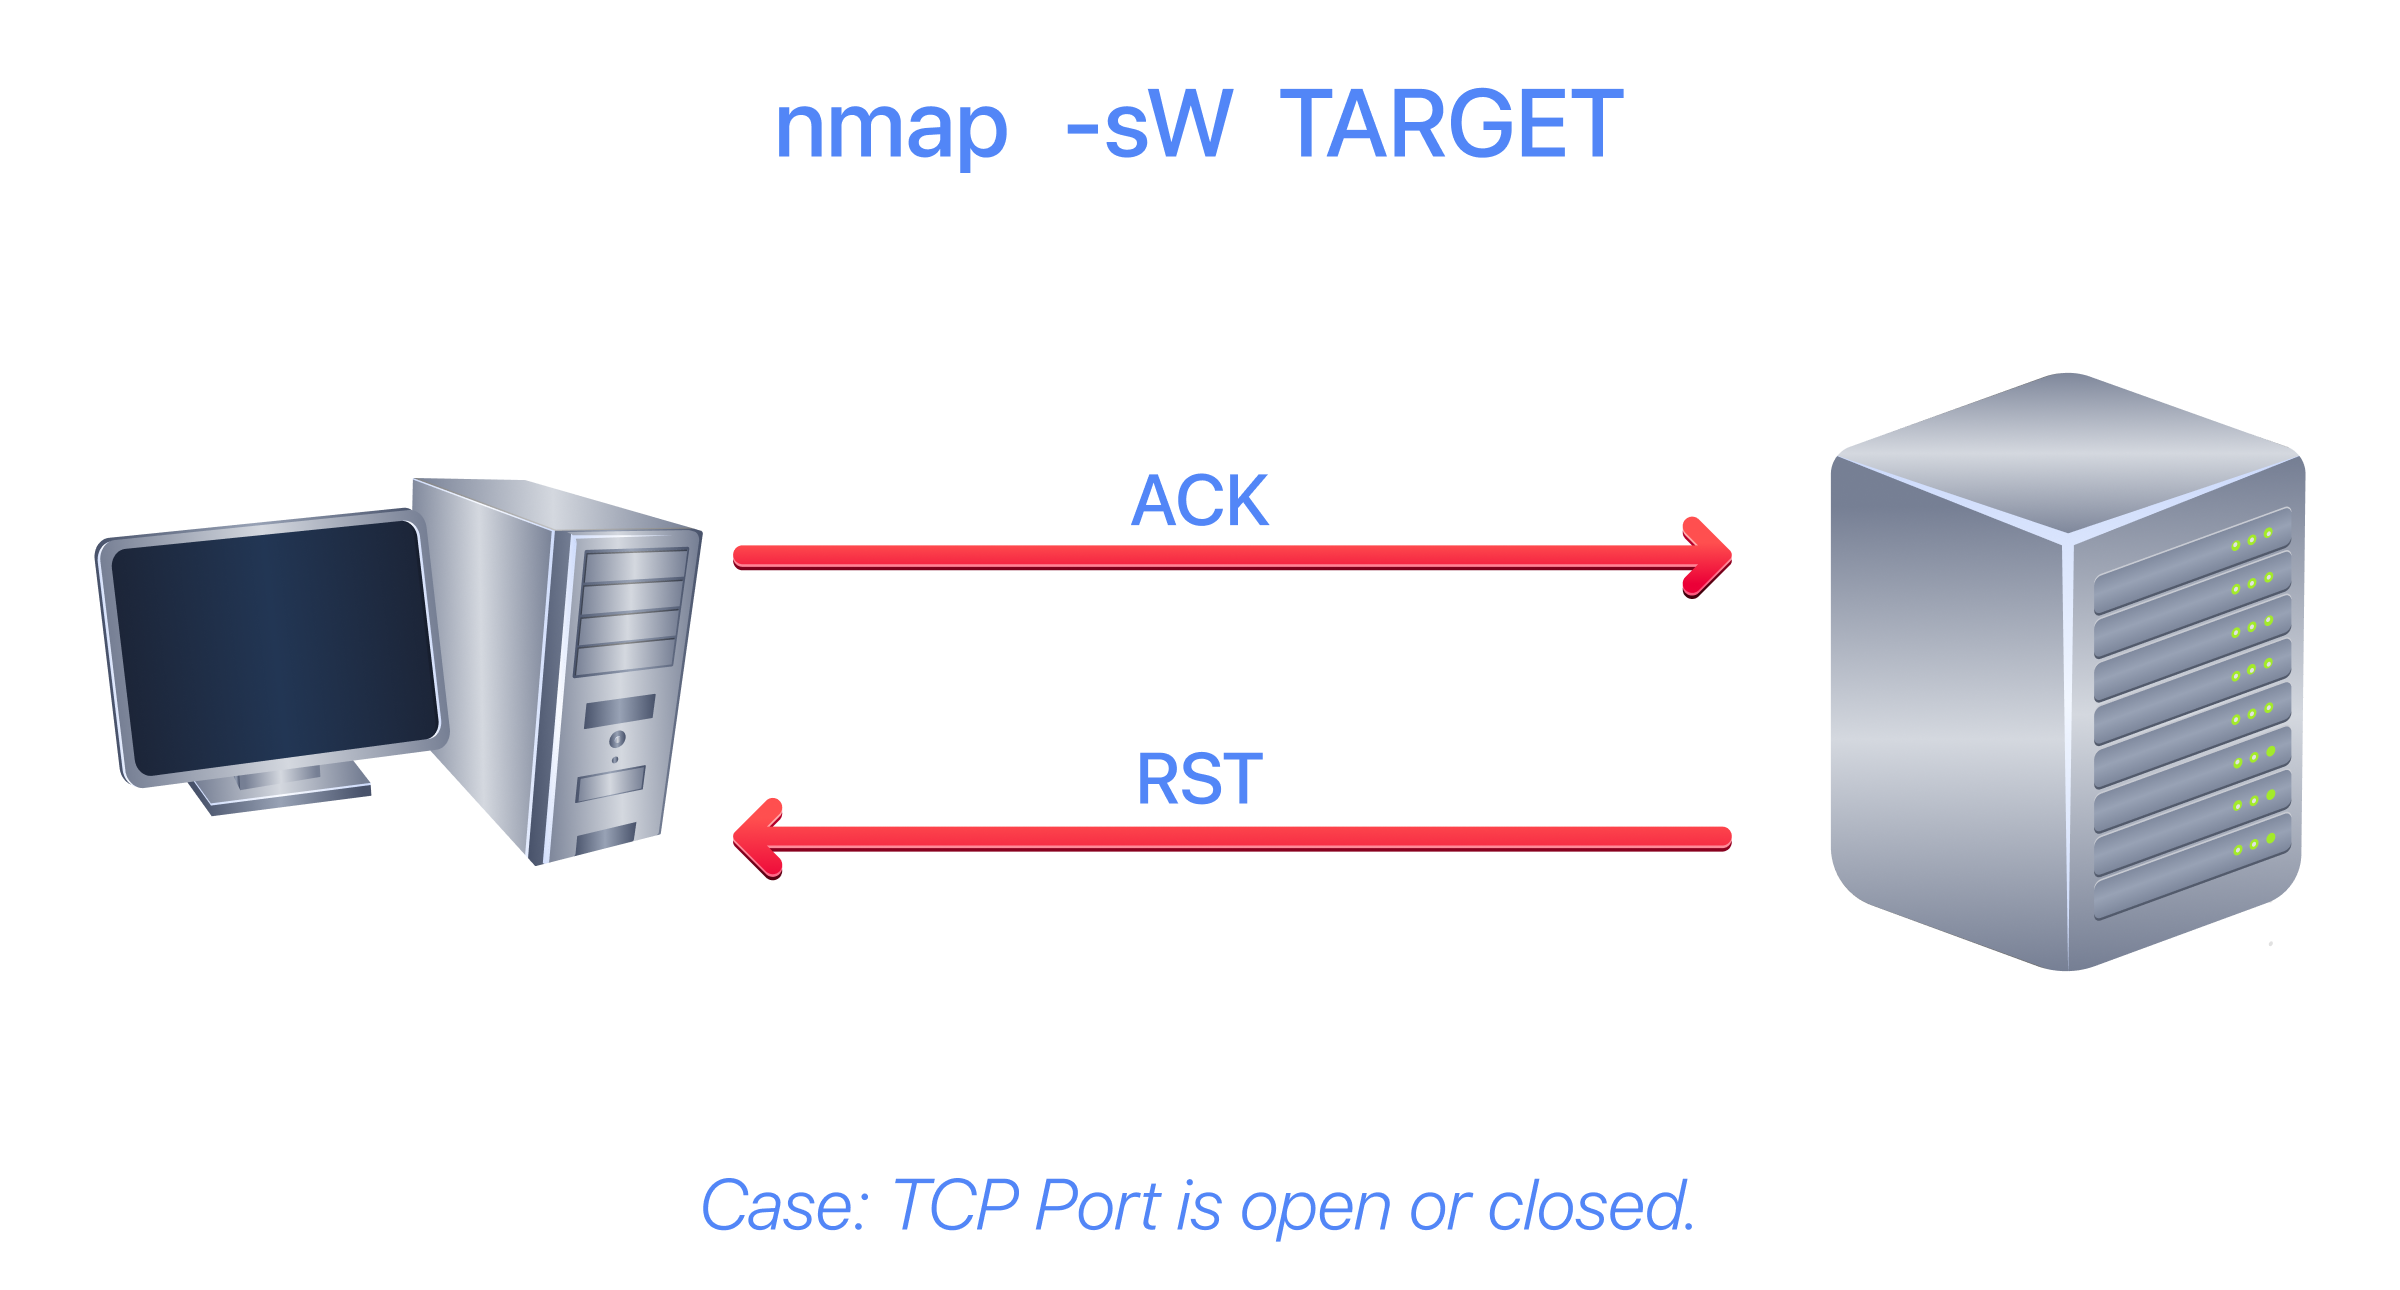
Similarly, launching a TCP window scan against a Linux system without a firewall will not yield much information. As shown in the console output below, the results of the window scan against a Linux server with no firewall didn’t provide any additional information beyond the ACK scan executed earlier.
           root@ip-10-10-166-81:~# sudo nmap -sW MACHINE_IP
sudo: unable to resolve host ip-10-10-166-81: Name or service not known
Starting Nmap 7.80 ( https://nmap.org ) at 2026-02-17 08:11 GMT
mass_dns: warning: Unable to open /etc/resolv.conf. Try using --system-dns or specify valid servers with --dns-servers
mass_dns: warning: Unable to determine any DNS servers. Reverse DNS is disabled. Try using --system-dns or specify valid servers with --dns-servers
Nmap scan report for 10.201.89.221
Host is up (0.072s latency).
All 1000 scanned ports on 10.201.89.221 are closed

Nmap done: 1 IP address (1 host up) scanned in 1.38 seconds
However, as you would expect, if we repeat our TCP window scan against a server behind a firewall, we expect to get more satisfying results. In the console output shown below, the TCP window scan identified five ports as closed. (This is in contrast with the ACK scan, which labelled the same five ports as unfiltered.) Although we know that these five ports are not closed, we realise they responded differently, indicating that the firewall does not block them.
           root@ip-10-10-166-81:~# sudo nmap -s MACHINE_IP
sudo: unable to resolve host ip-10-10-166-81: Name or service not known
Starting Nmap 7.80 ( https://nmap.org ) at 2026-02-17 08:13 GMT
mass_dns: warning: Unable to open /etc/resolv.conf. Try using --system-dns or specify valid servers with --dns-servers
mass_dns: warning: Unable to determine any DNS servers. Reverse DNS is disabled. Try using --system-dns or specify valid servers with --dns-servers
Nmap scan report for 10.201.89.221
Host is up (0.067s latency).
Not shown: 995 filtered ports
PORT STATE SERVICE
22/tcp closed ssh
25/tcp closed smtp
80/tcp closed http
443/tcp closed https
5000/tcp closed upnp

Nmap done: 1 IP address (1 host up) scanned in 5.08 seconds
Custom Scan
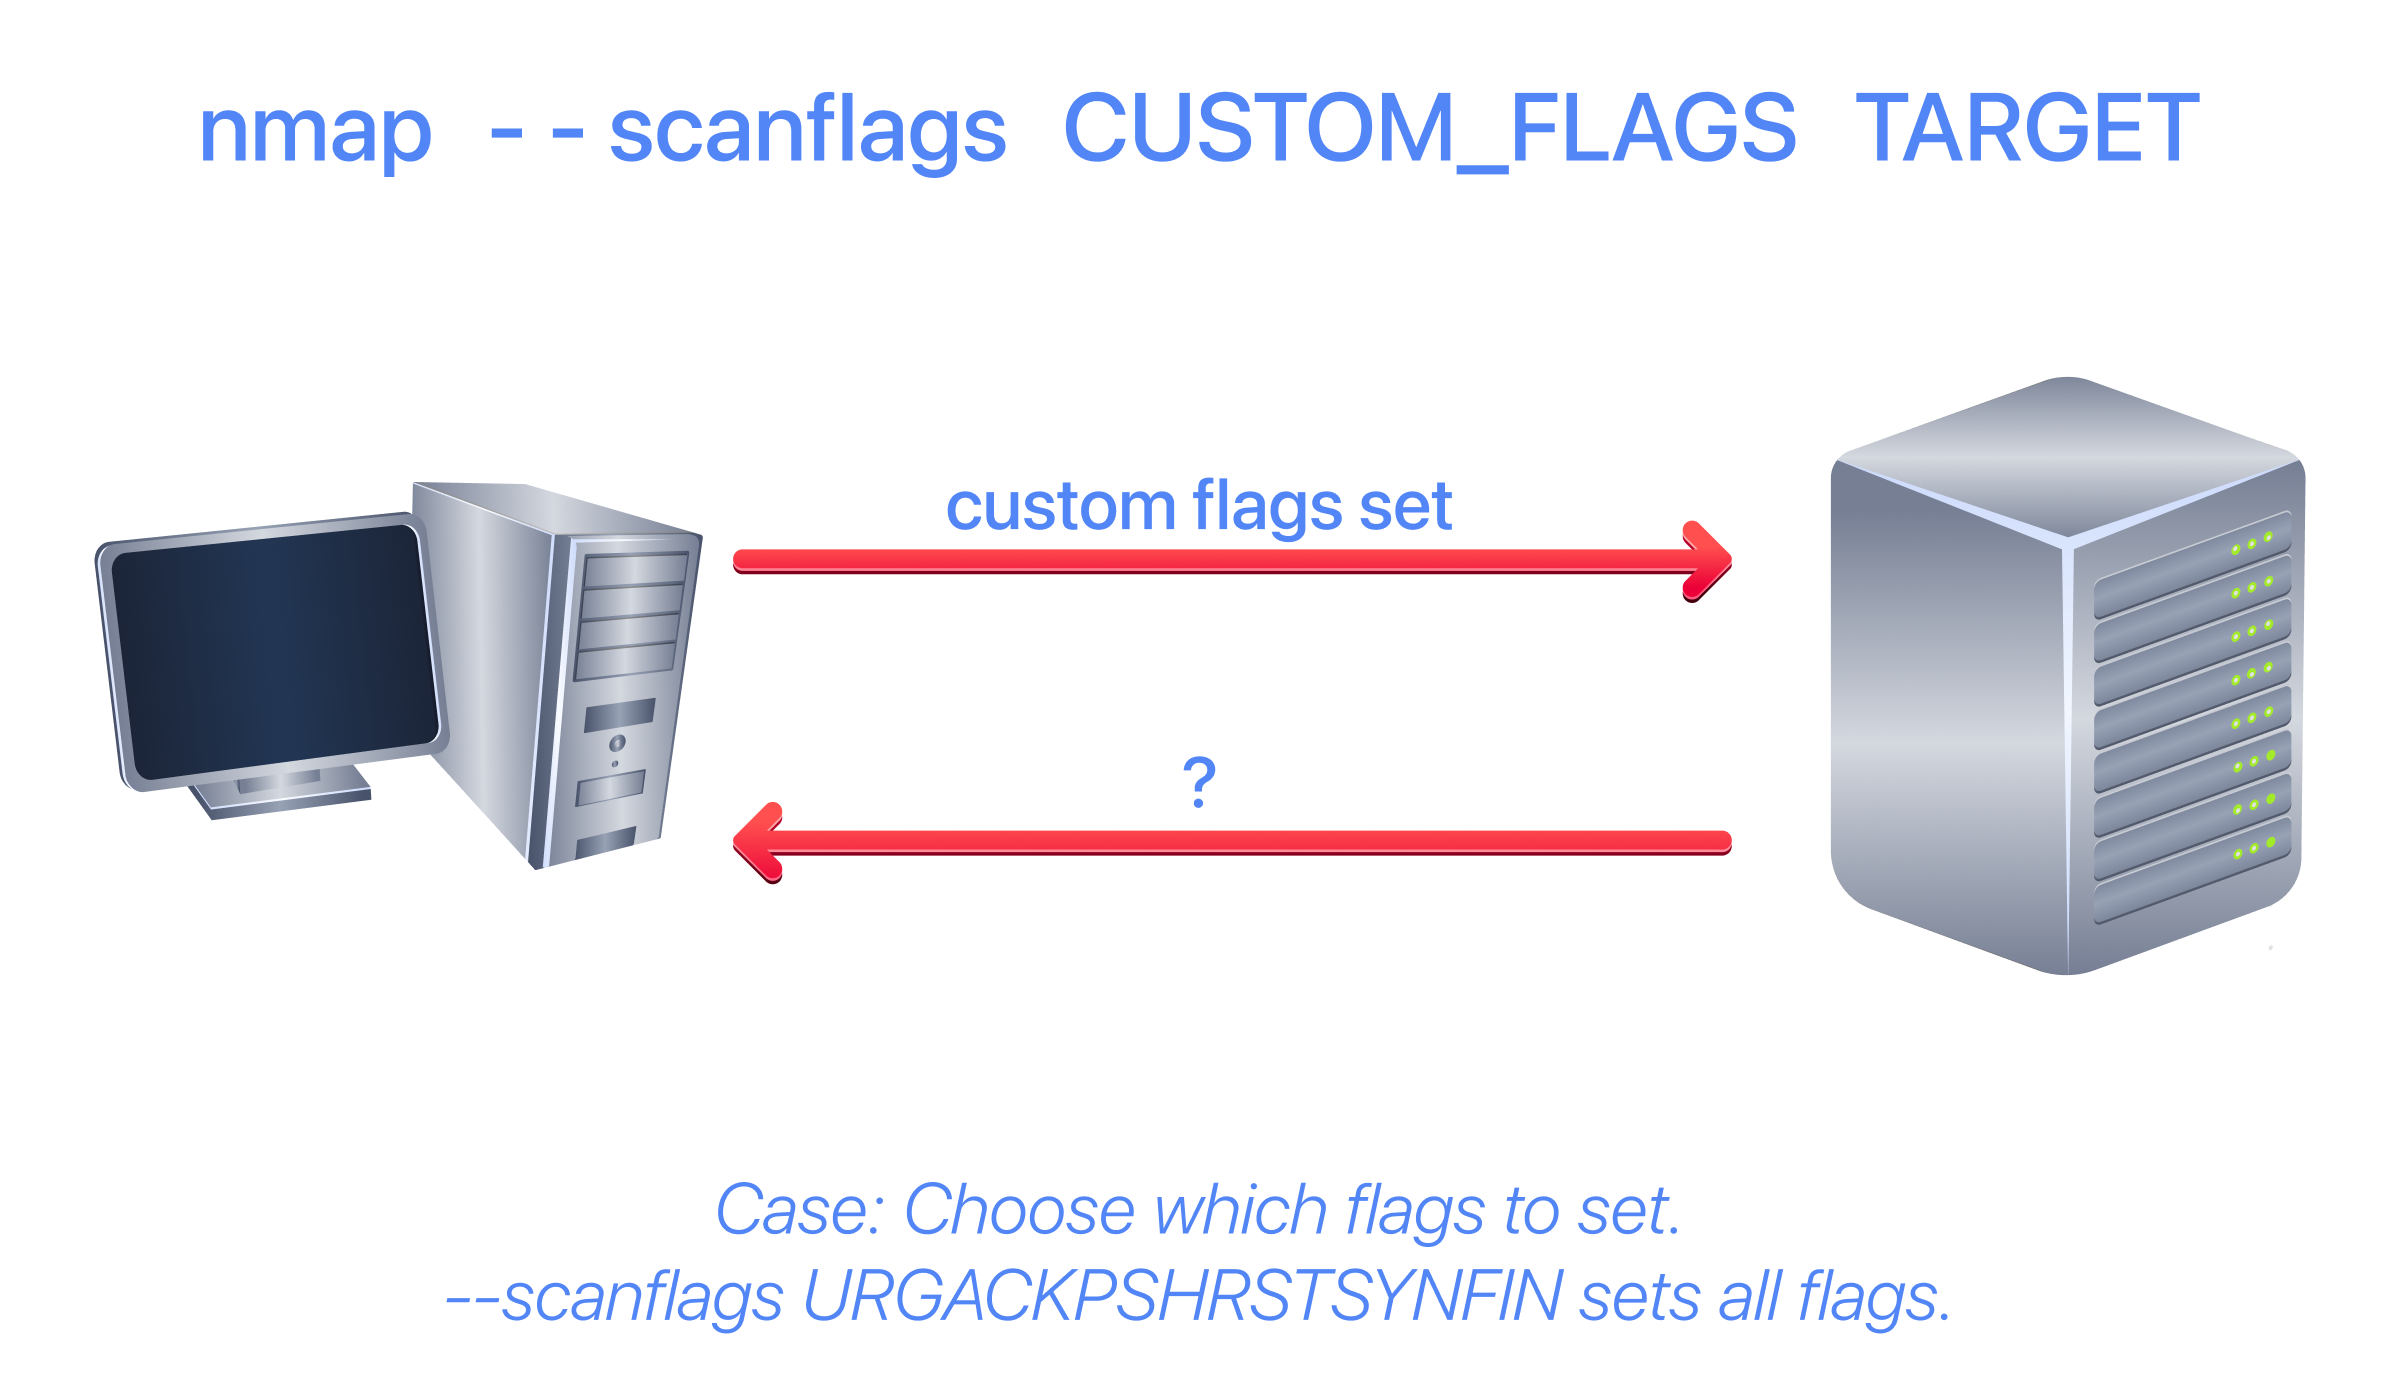
If you want to experiment with a new TCP flag combination beyond the built-in TCP scan types, you can do so using --scanflags. For instance, if you want to set SYN, RST, and FIN simultaneously, you can do so using --scanflags RSTSYNFIN. As shown in the figure below, if you develop your own custom scan, you need to understand how the different ports will behave to correctly interpret the results in different scenarios.
Finally, it is essential to note that the ACK and window scans were highly effective in helping us map the firewall rules. However, it is vital to remember that just because a firewall is not blocking a specific port, it does not necessarily mean that a service is listening on that port. For example, the firewall rules may need to be updated to reflect recent service changes. Hence, ACK and window scans are exposing the firewall rules, not the services.
?Answer the questions below
- In TCP Window scan, how many flags are set?
- You decided to experiment with a custom TCP scan that has the reset flag set. What would you add after --scanflags?
- Launch an ACK scan against the target VM with the firewall enabled. How many ports appear unfiltered?
- What is the new port number that appeared? To determine the new port you need to compare the scan results of Task 2 to the ones of this task.
- Is there any service behind the newly discovered port number? (yea/nay)
Spoofing and Decoys
In some network setups, you will be able to scan a target system using a spoofed IP address and even a spoofed MAC address. Such a scan is only beneficial when you can guarantee that you will capture the response. If you try to scan a target from some random network using a spoofed IP address, chances are you won’t have any response routed to you, and the scan results could be unreliable.
The following figure shows the attacker launching the command nmap -S SPOOFED_IP MACHINE_IP. Consequently, Nmap will craft all the packets using the provided source IP address SPOOFED_IP. The lab machine will respond to the incoming packets, sending the replies to the destination IP address SPOOFED_IP. For this scan to work and give accurate results, the attacker needs to monitor the network traffic to analyse the replies.
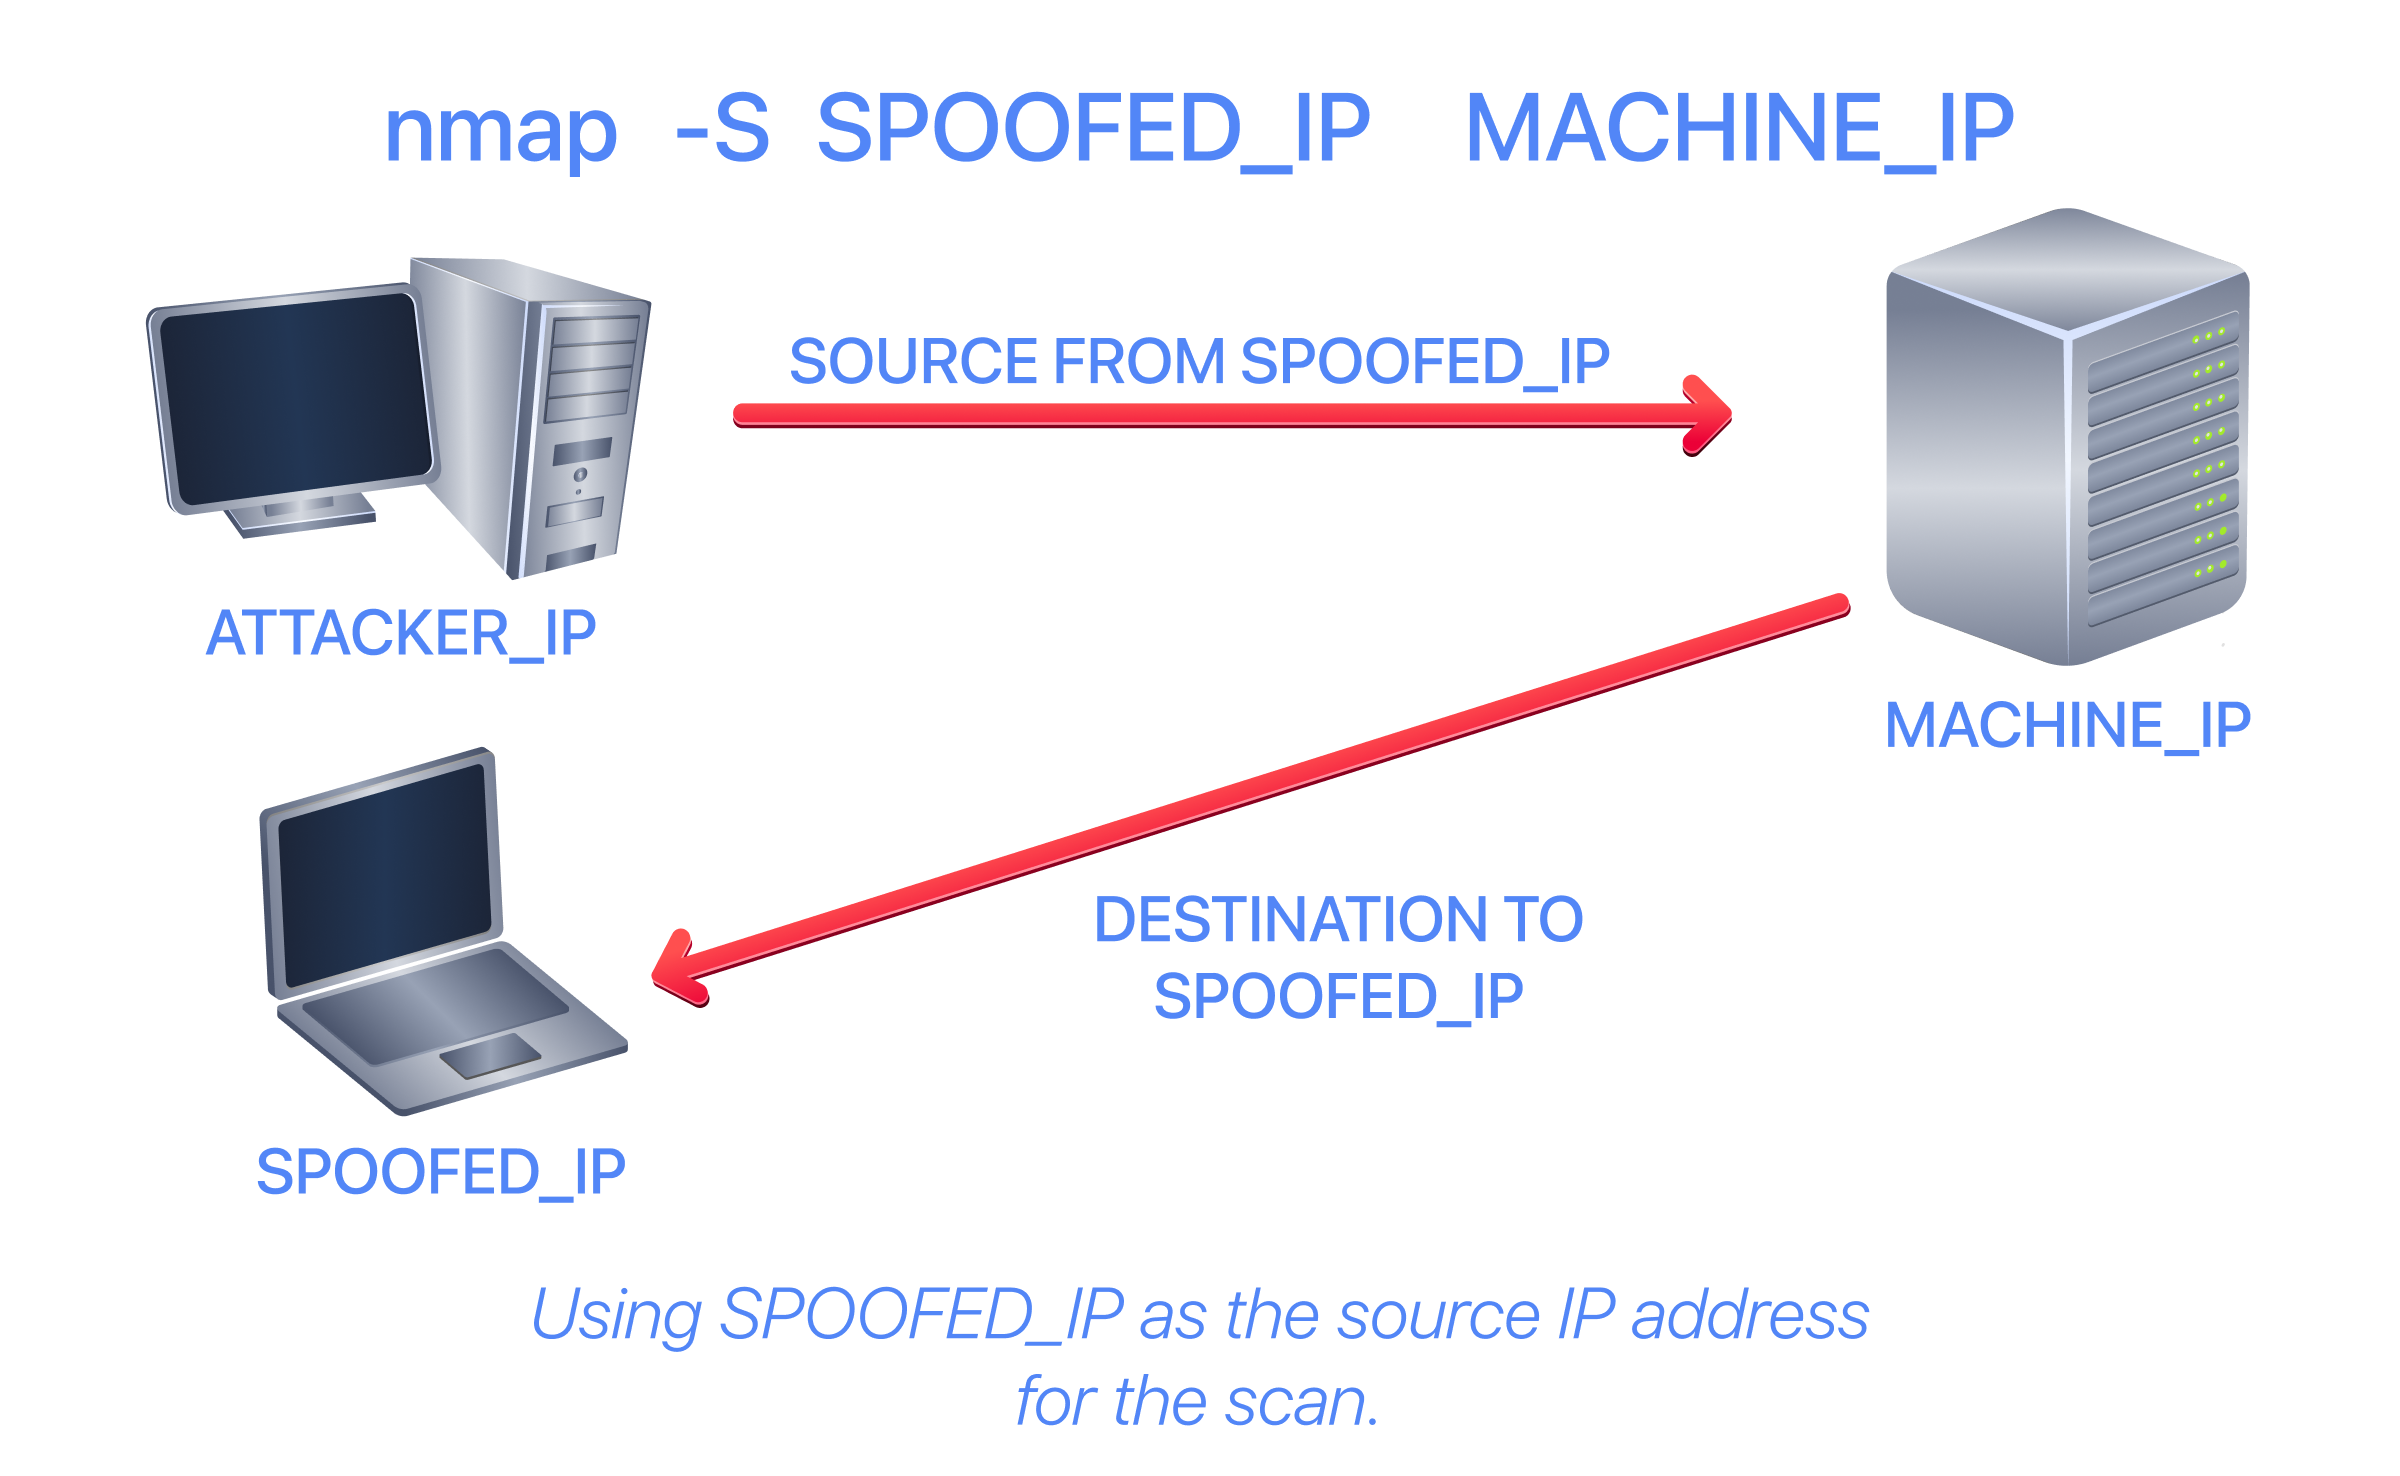
In brief, scanning with a spoofed IP address is three steps:
- The attacker sends a packet with a spoofed source IP address to the lab machine.
- The lab machine replies to the spoofed IP address as the destination.
- The attacker captures replies to identify open ports.
In general, you expect to specify the network interface using -e and to explicitly disable ping scan -Pn. Therefore, instead of nmap -S SPOOFED_IP MACHINE_IP, you will need to issue nmap -e NET_INTERFACE -Pn -S SPOOFED_IP MACHINE_IP to tell Nmap explicitly which network interface to use and not to expect to receive a ping reply. It is worth repeating that this scan will be useless if the attacker's system cannot monitor the network for responses.
When you are on the same subnet as the lab machine, you can spoof your MAC address as well. You can specify the source MAC address using --spoof-mac SPOOFED_MAC. This address spoofing is only possible if the attacker and the lab machine are on the same Ethernet (802.3) network or the same WiFi (802.11).
Spoofing only works in a minimal number of cases where certain conditions are met. Therefore, the attacker might resort to decoys to make it harder to pinpoint. The concept is simple: make the scan appear to originate from many IP addresses so that the attacker’s IP address is lost among them. As shown in the figure below, the scan of the lab machine will appear to come from 3 different sources, and consequently, the replies will go to the decoys as well.
You can launch a decoy scan by specifying a specific or random IP address after -D. For example, nmap -D 10.10.0.1,10.10.0.2,ME MACHINE_IP will make the scan of MACHINE_IP appear as coming from the IP addresses 10.10.0.1, 10.10.0.2, and then ME to indicate that your IP address should appear in the third order. Another example command would be nmap -D 10.10.0.1,10.10.0.2,RND,RND,ME MACHINE_IP, where the third and fourth source IP addresses are assigned randomly, while the fifth source is going to be the attacker’s IP address. In other words, each time you execute the latter command, you would expect two new random IP addresses to be the third and fourth decoy sources.
?Answer the questions below
- What do you need to add to the command sudo nmap MACHINE_IP to make the scan appear as if coming from the source IP address 10.10.10.11 instead of your IP address?
- What do you need to add to the command sudo nmap MACHINE_IP to make the scan appear as if coming from the source IP addresses 10.10.20.21 and 10.10.20.28 in addition to your IP address?
Fragmented Packets
Firewall
A firewall is a piece of software or hardware that either permits or blocks packets. It functions based on firewall rules, summarised as blocking all traffic with exceptions or allowing all traffic with exceptions. For instance, you might block all traffic to your server except that coming to your web server. A traditional firewall inspects at least the IP and transport layer headers. A more sophisticated firewall would also try to examine the data carried by the transport layer.
IDS
An Intrusion Detection System (IDS) inspects network packets for select behavioural patterns or specific content signatures. It raises an alert whenever a malicious rule is met. In addition to the IP and transport layer headers, an IDS would inspect the transport layer data and check whether it matches any malicious patterns. How can you make it less likely for a traditional firewall/IDS to detect your Nmap activity? It is not easy to answer this; however, depending on the type of firewall/IDS, you might benefit from dividing the packet into smaller packets.
Fragmented Packets
Nmap provides the option -f to fragment packets. Once chosen, the IP data will be divided into 8 bytes or fewer. Adding another -f (-f -f or -ff) will split the data into 16 byte-fragments instead of 8. You can change the default value by using the --mtu; however, you should always choose a multiple of 8.
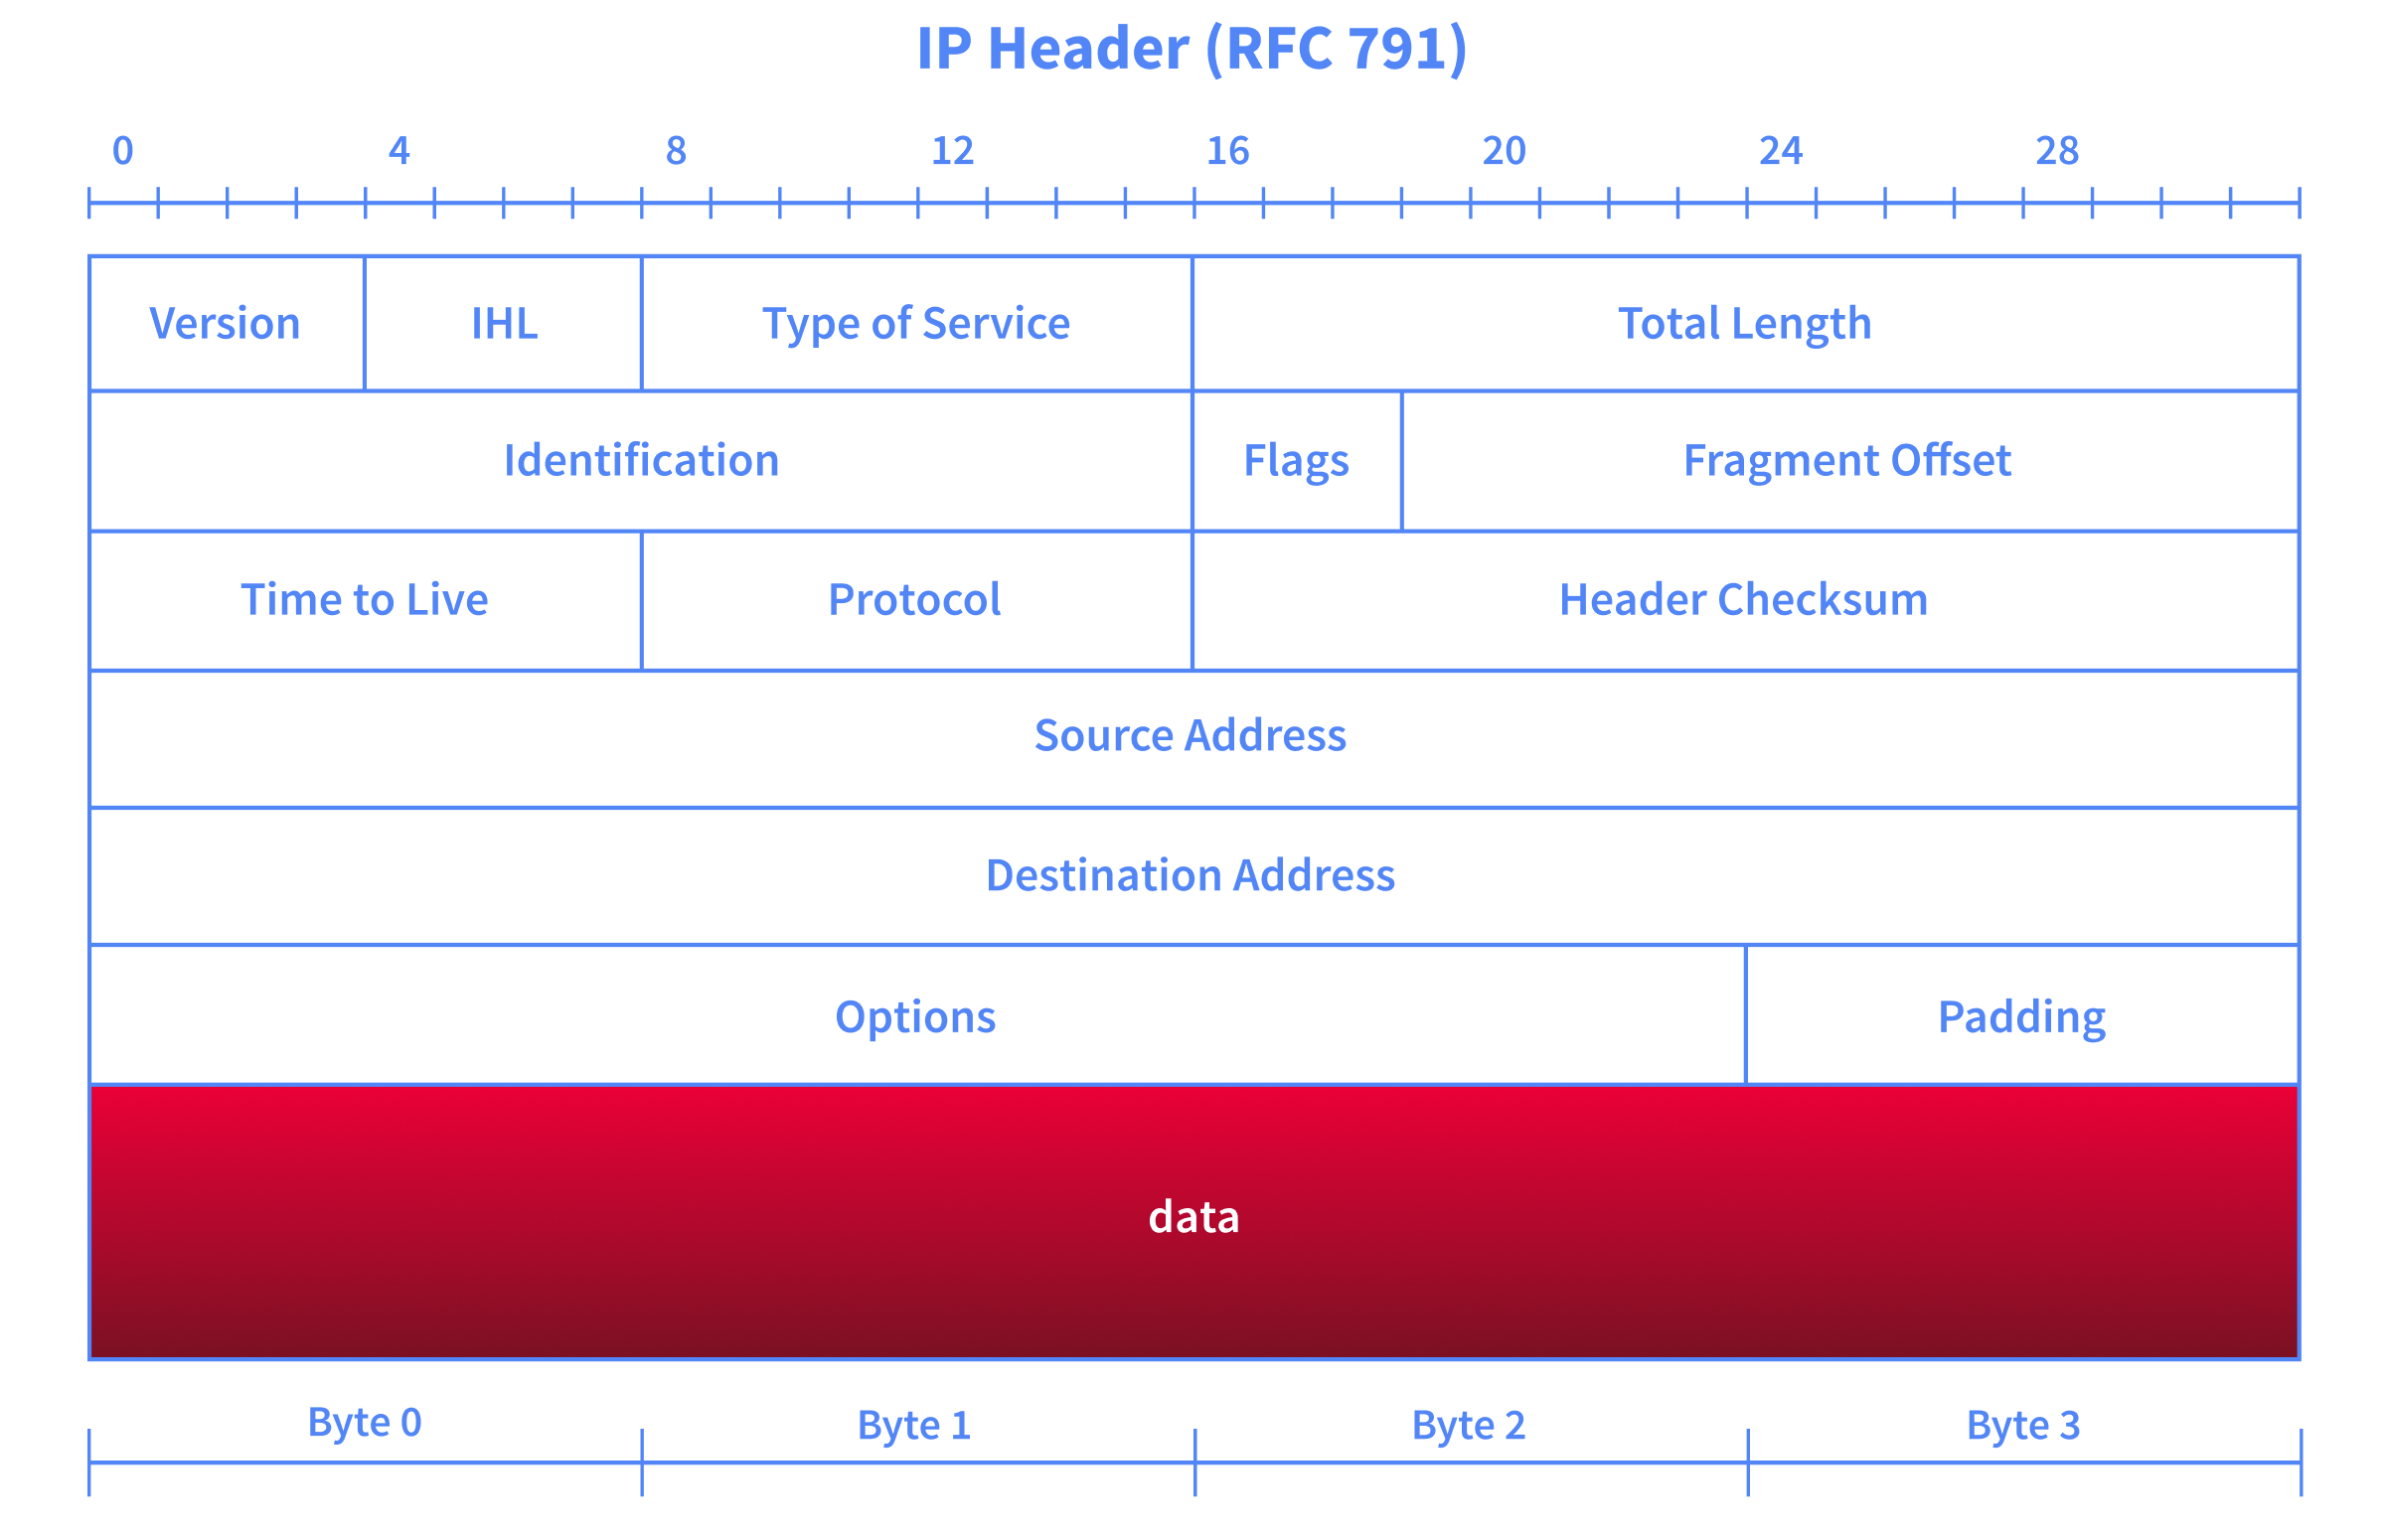
To properly understand fragmentation, we need to examine the IP header shown in the figure below. It might look complicated at first, but we notice that we know most of its fields. In particular, notice that the source address occupies 32 bits (4 bytes) on the fourth row, while the destination address occupies another 4 bytes on the fifth row. The data that we will fragment across multiple packets is highlighted in red. To aid reassembly on the recipient side, IP uses the identification (ID) and fragment offset, shown in the second row of the figure below.
In the AB, execute the command wireshark to capture the dump and enter the command sudo nmap -sS -p80 -f MACHINE_IP. As you know by now, this will use a stealth TCP SYN scan on port 80 and request that Nmap fragment IP packets.
With fragmentation requested via -f, the 24 bytes of the TCP header will be divided into multiples of 8 bytes, with the last fragment containing 8 bytes or fewer of the TCP header. Since 24 is divisible by 8, we get 3 IP fragments; each has a 20-byte IP header and an 8-byte TCP header. We can see the three fragments between the fifth and the seventh lines.
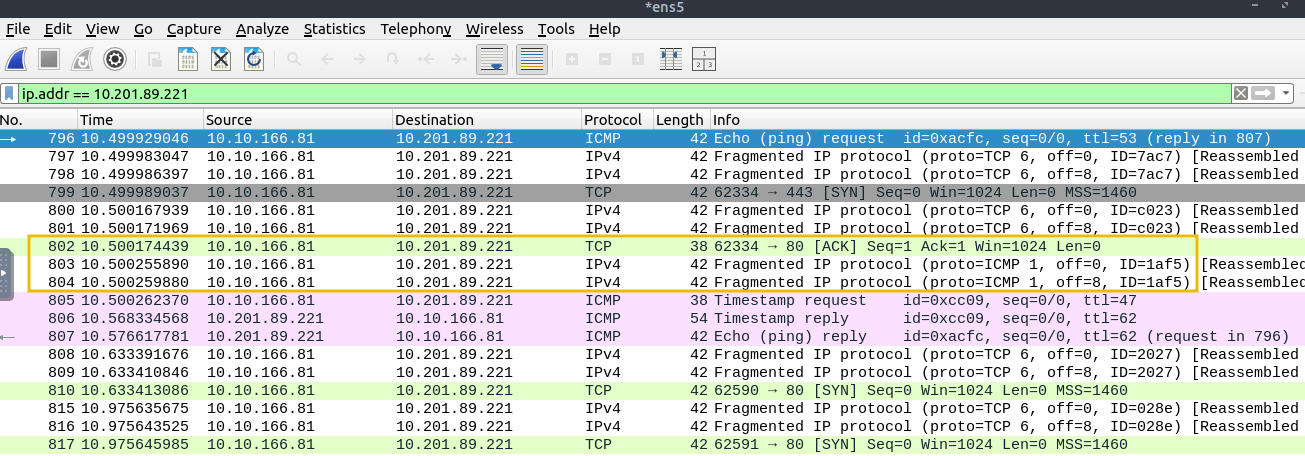
Note that if you added -ff (or -f -f), the data will be fragmented into multiples of 16. In other words, the 24 bytes of the TCP header, in this case, would be divided over two IP fragments, the first containing 16 bytes and the second containing 8 bytes of the TCP header.
On the other hand, if you prefer to increase the size of your packets to make them look innocuous, you can use the option --data-length NUM, where num specifies the number of bytes you want to append to your packets.
?Answer the questions below
- If the TCP segment has a size of 64, and the -ff option is being used, how many IP fragments will you get?
Idle/Zombie Scan
Spoofing the source IP address can be an effective way to conduct stealthy scans. However, spoofing will only work in specific network setups. It requires you to be in a position to monitor traffic. Considering these limitations, spoofing your IP address is unlikely to be useful; however, we can give it a boost with the idle scan.
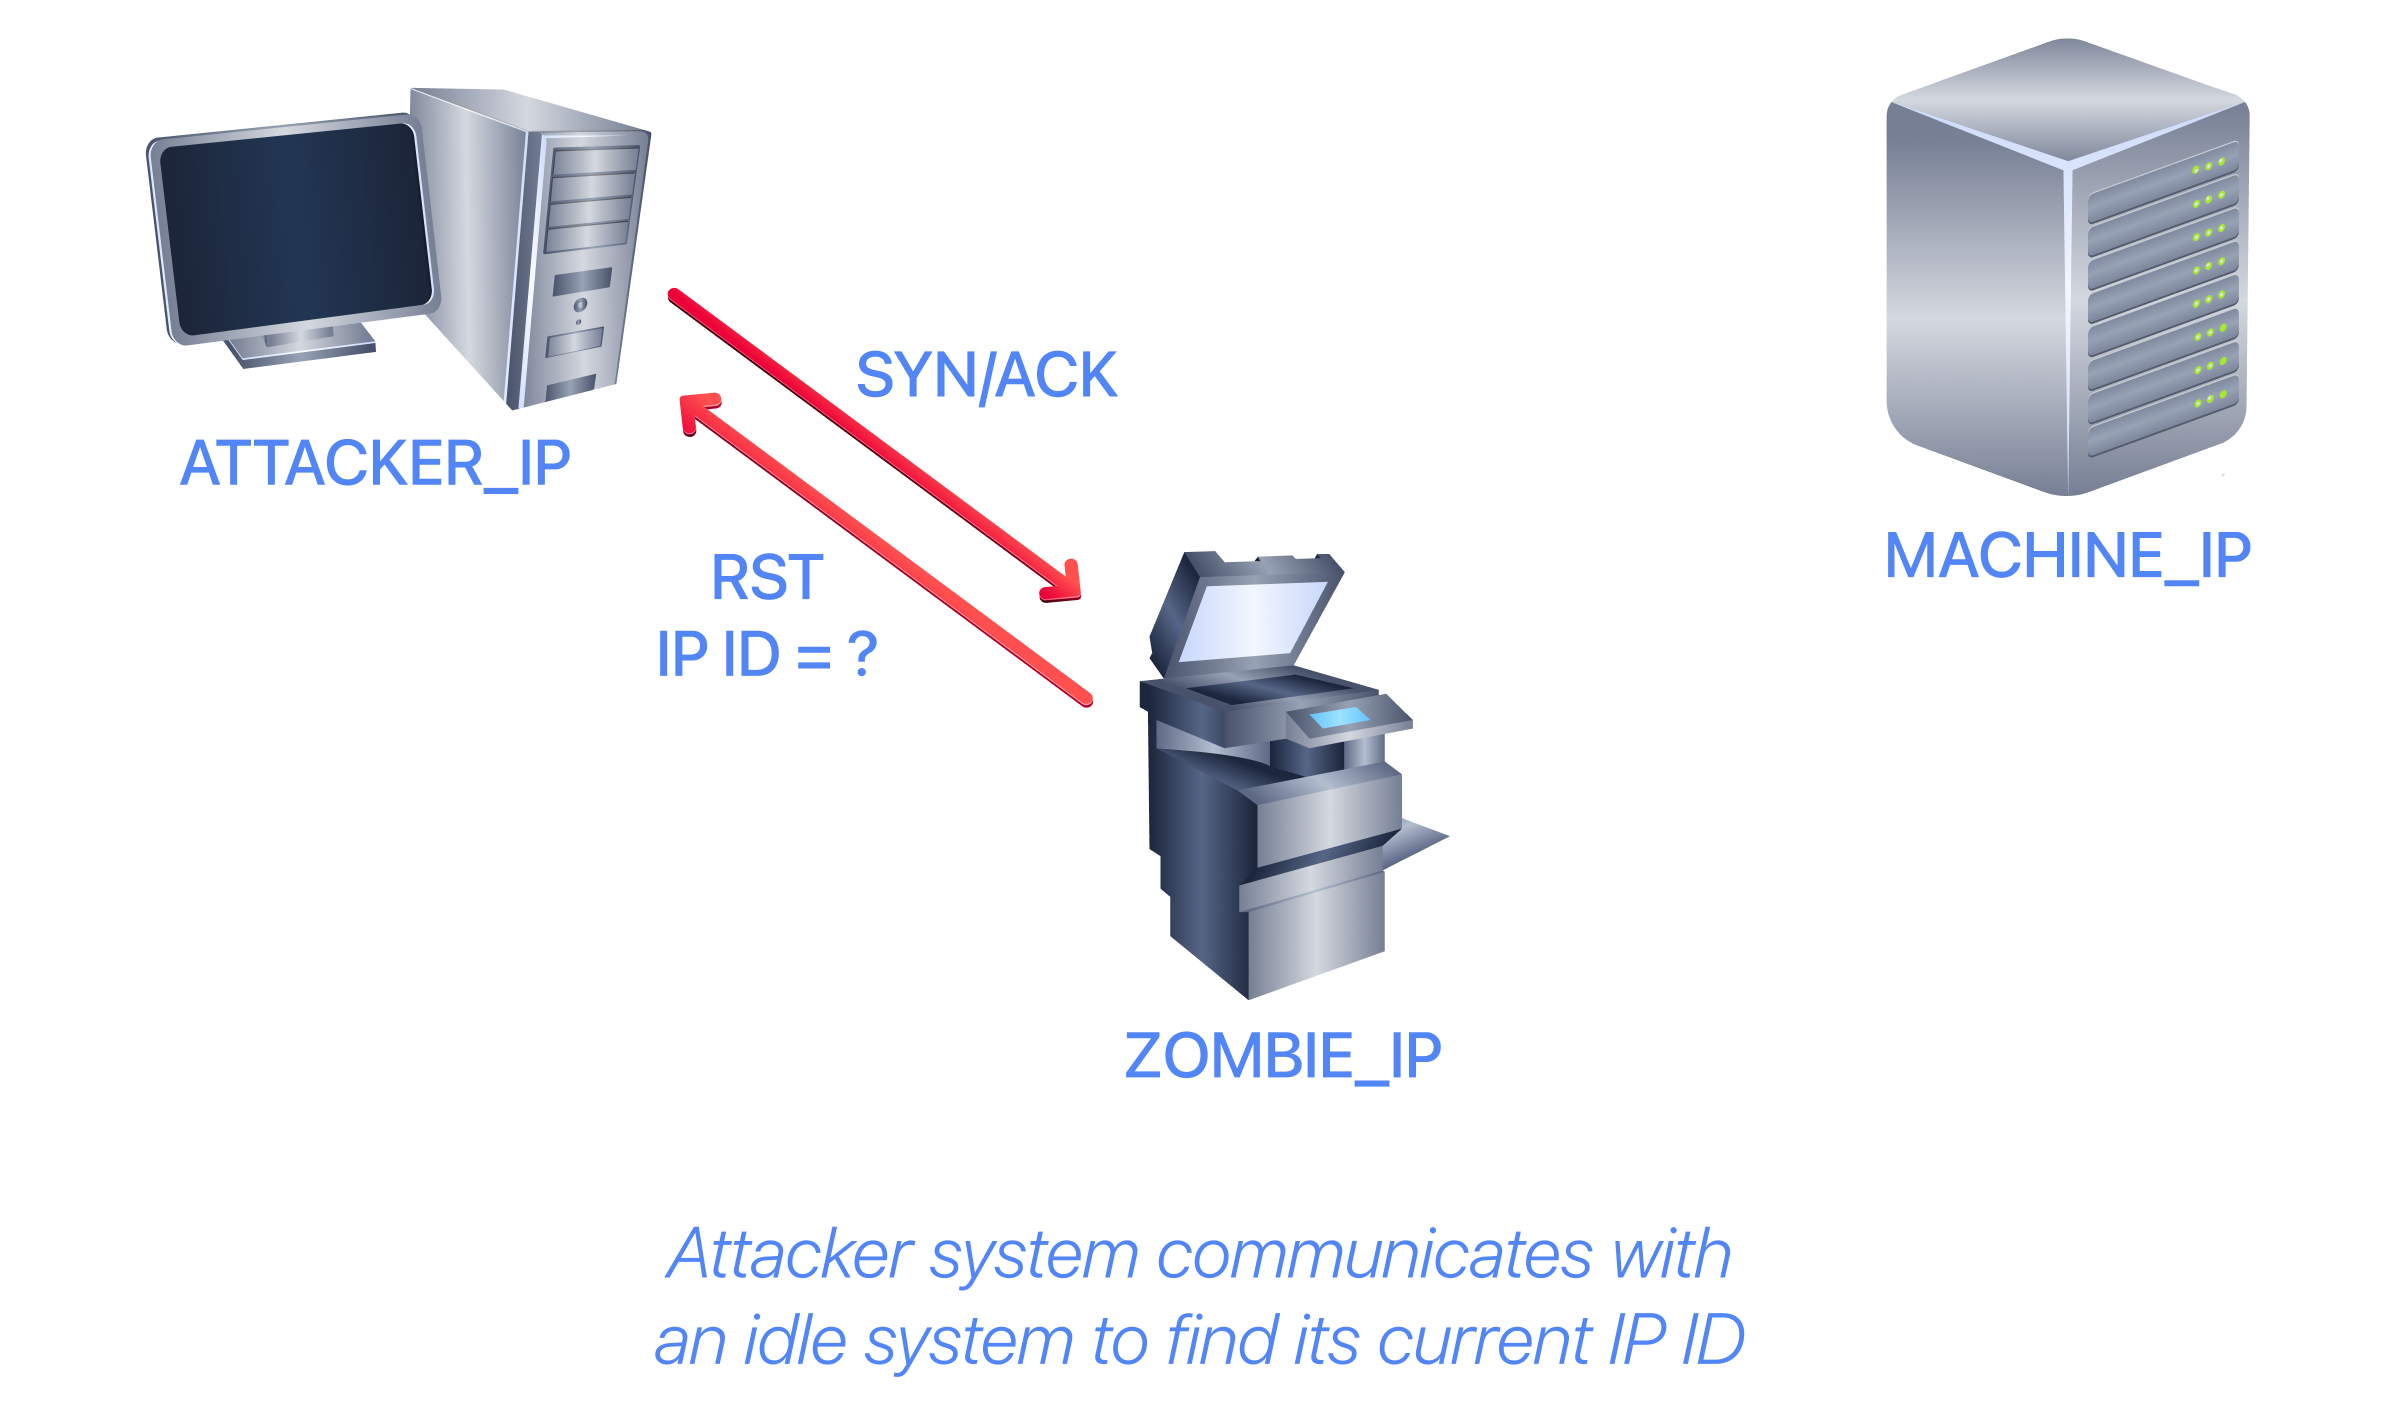
The idle scan, or zombie scan, requires an idle system connected to the network that you can communicate with. Practically, Nmap will make each probe appear to come from the idle (zombie) host, then check whether the idle (zombie) host received any response to the spoofed probe. This is accomplished by checking the IP identification (IP ID) value in the IP header. You can run an idle scan using nmap -sI ZOMBIE_IP MACHINE_IP, where ZOMBIE_IP is the IP address of the idle host (zombie).
The idle (zombie) scan requires the following three steps to discover whether a port is open:
- Trigger the idle host to respond so that you can record the current IP ID on the idle host.
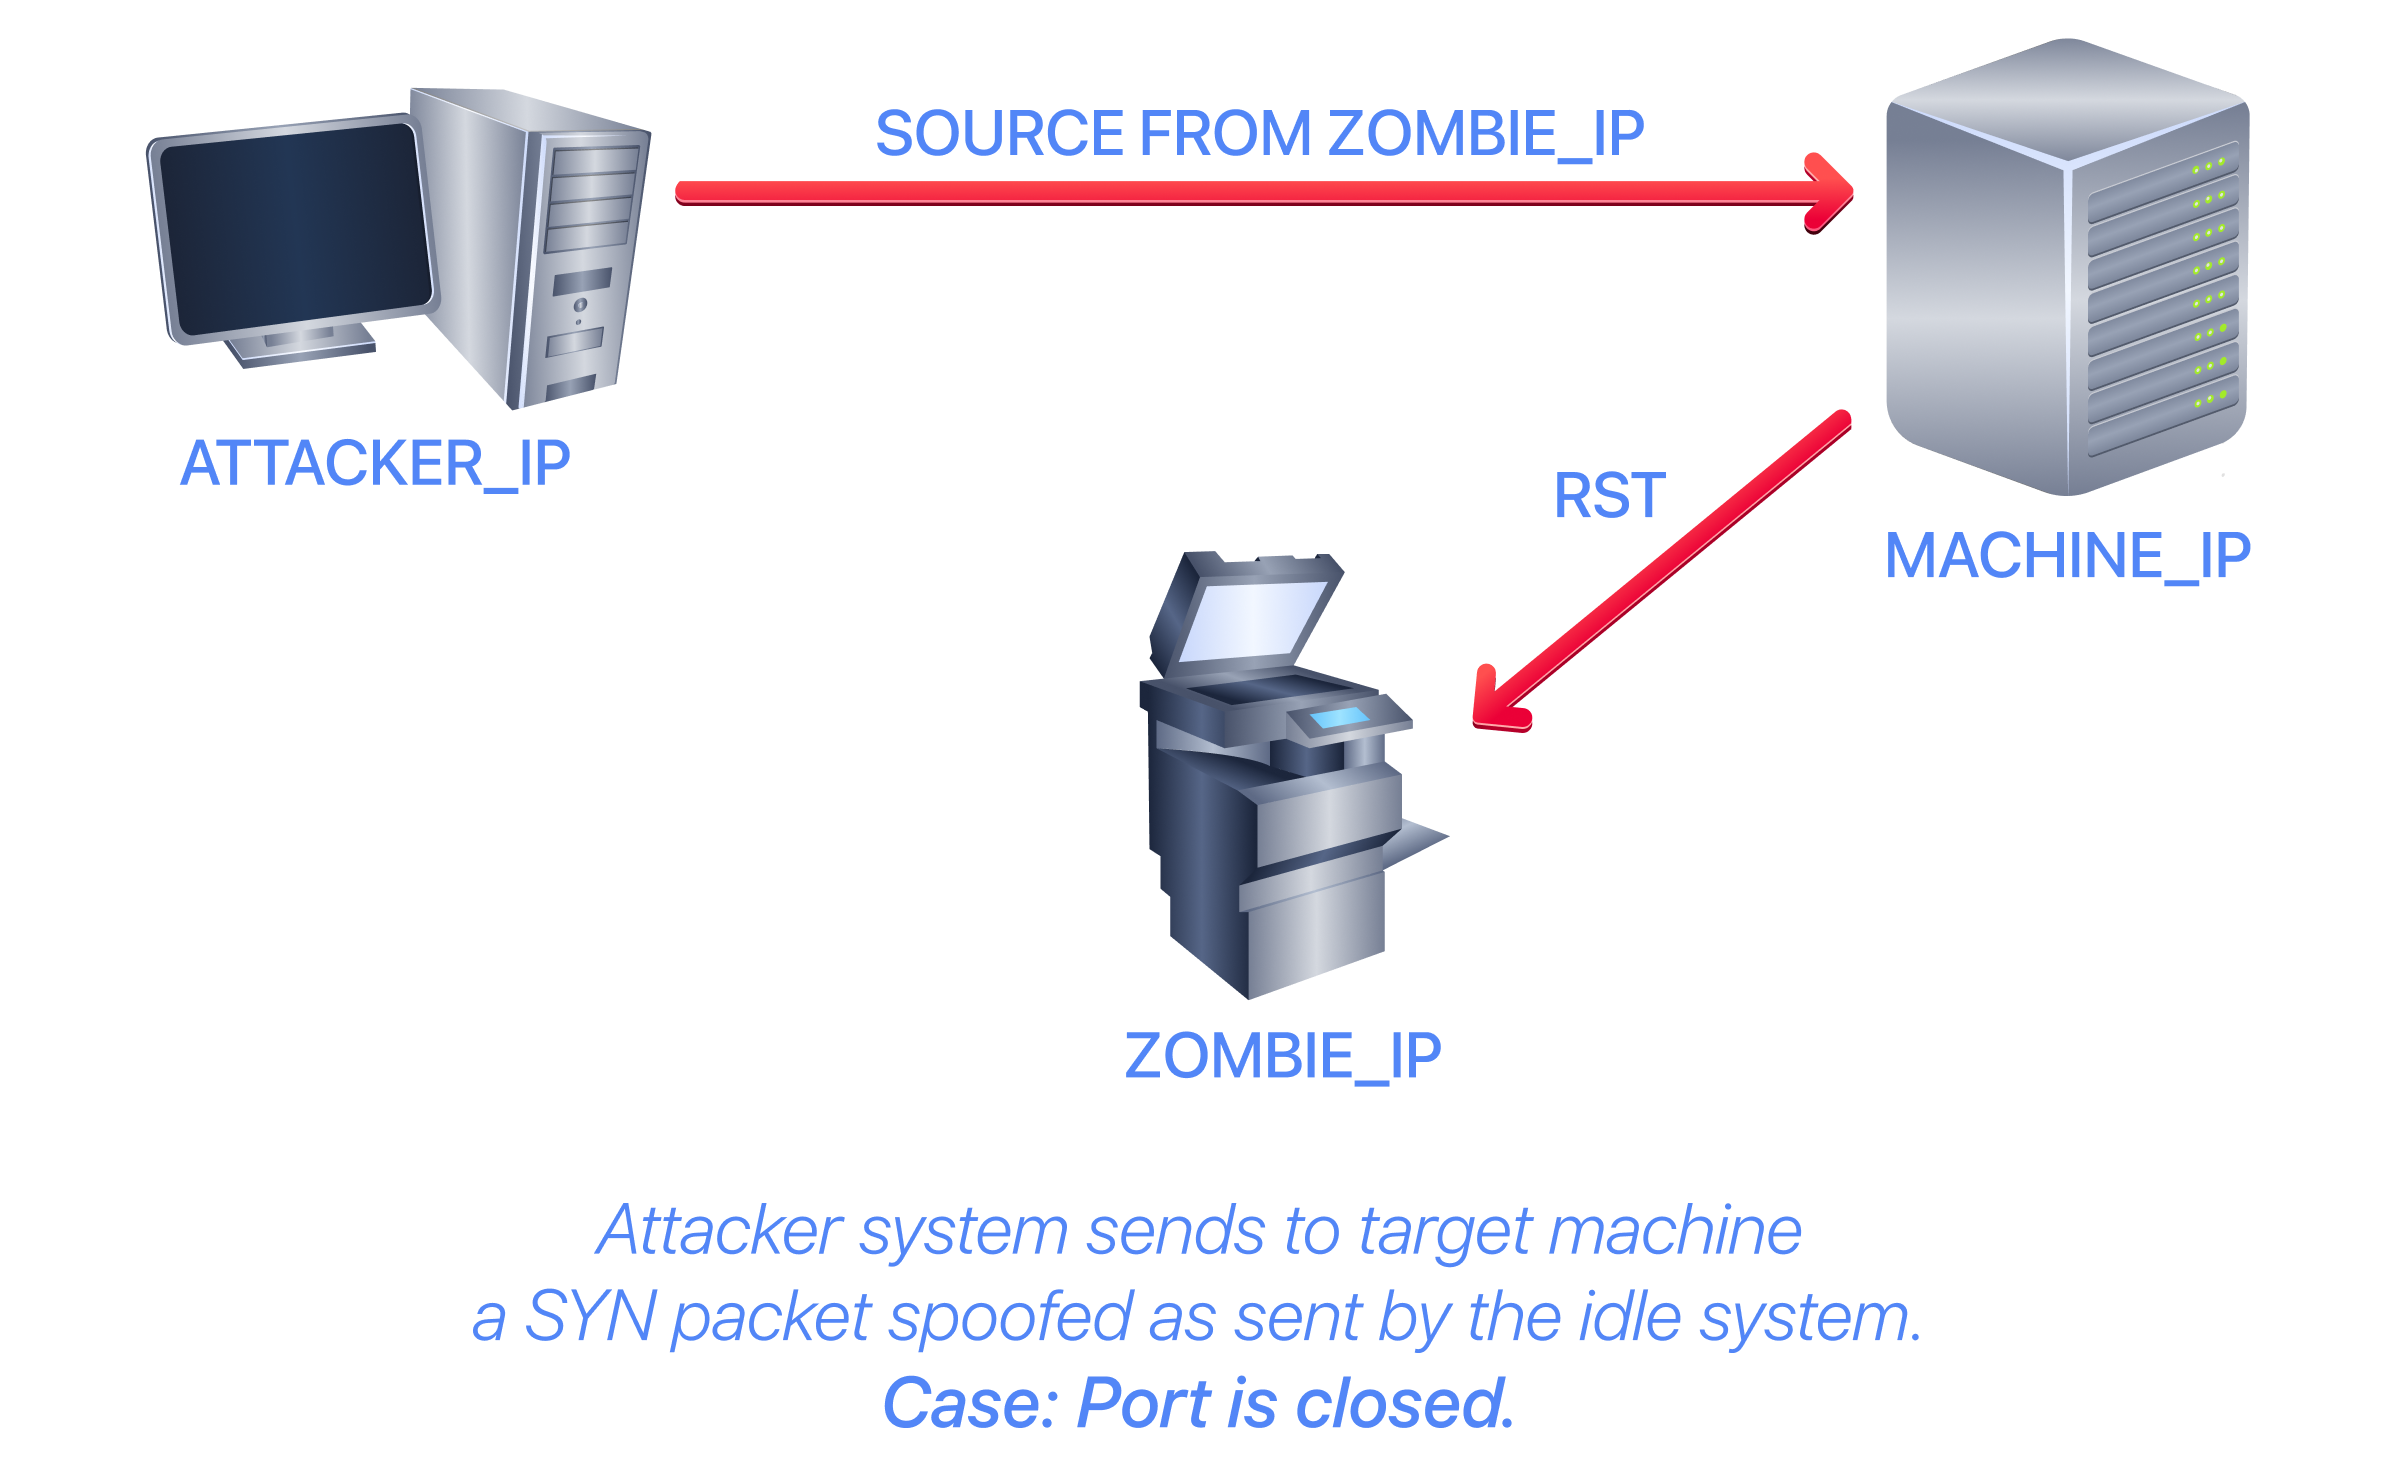
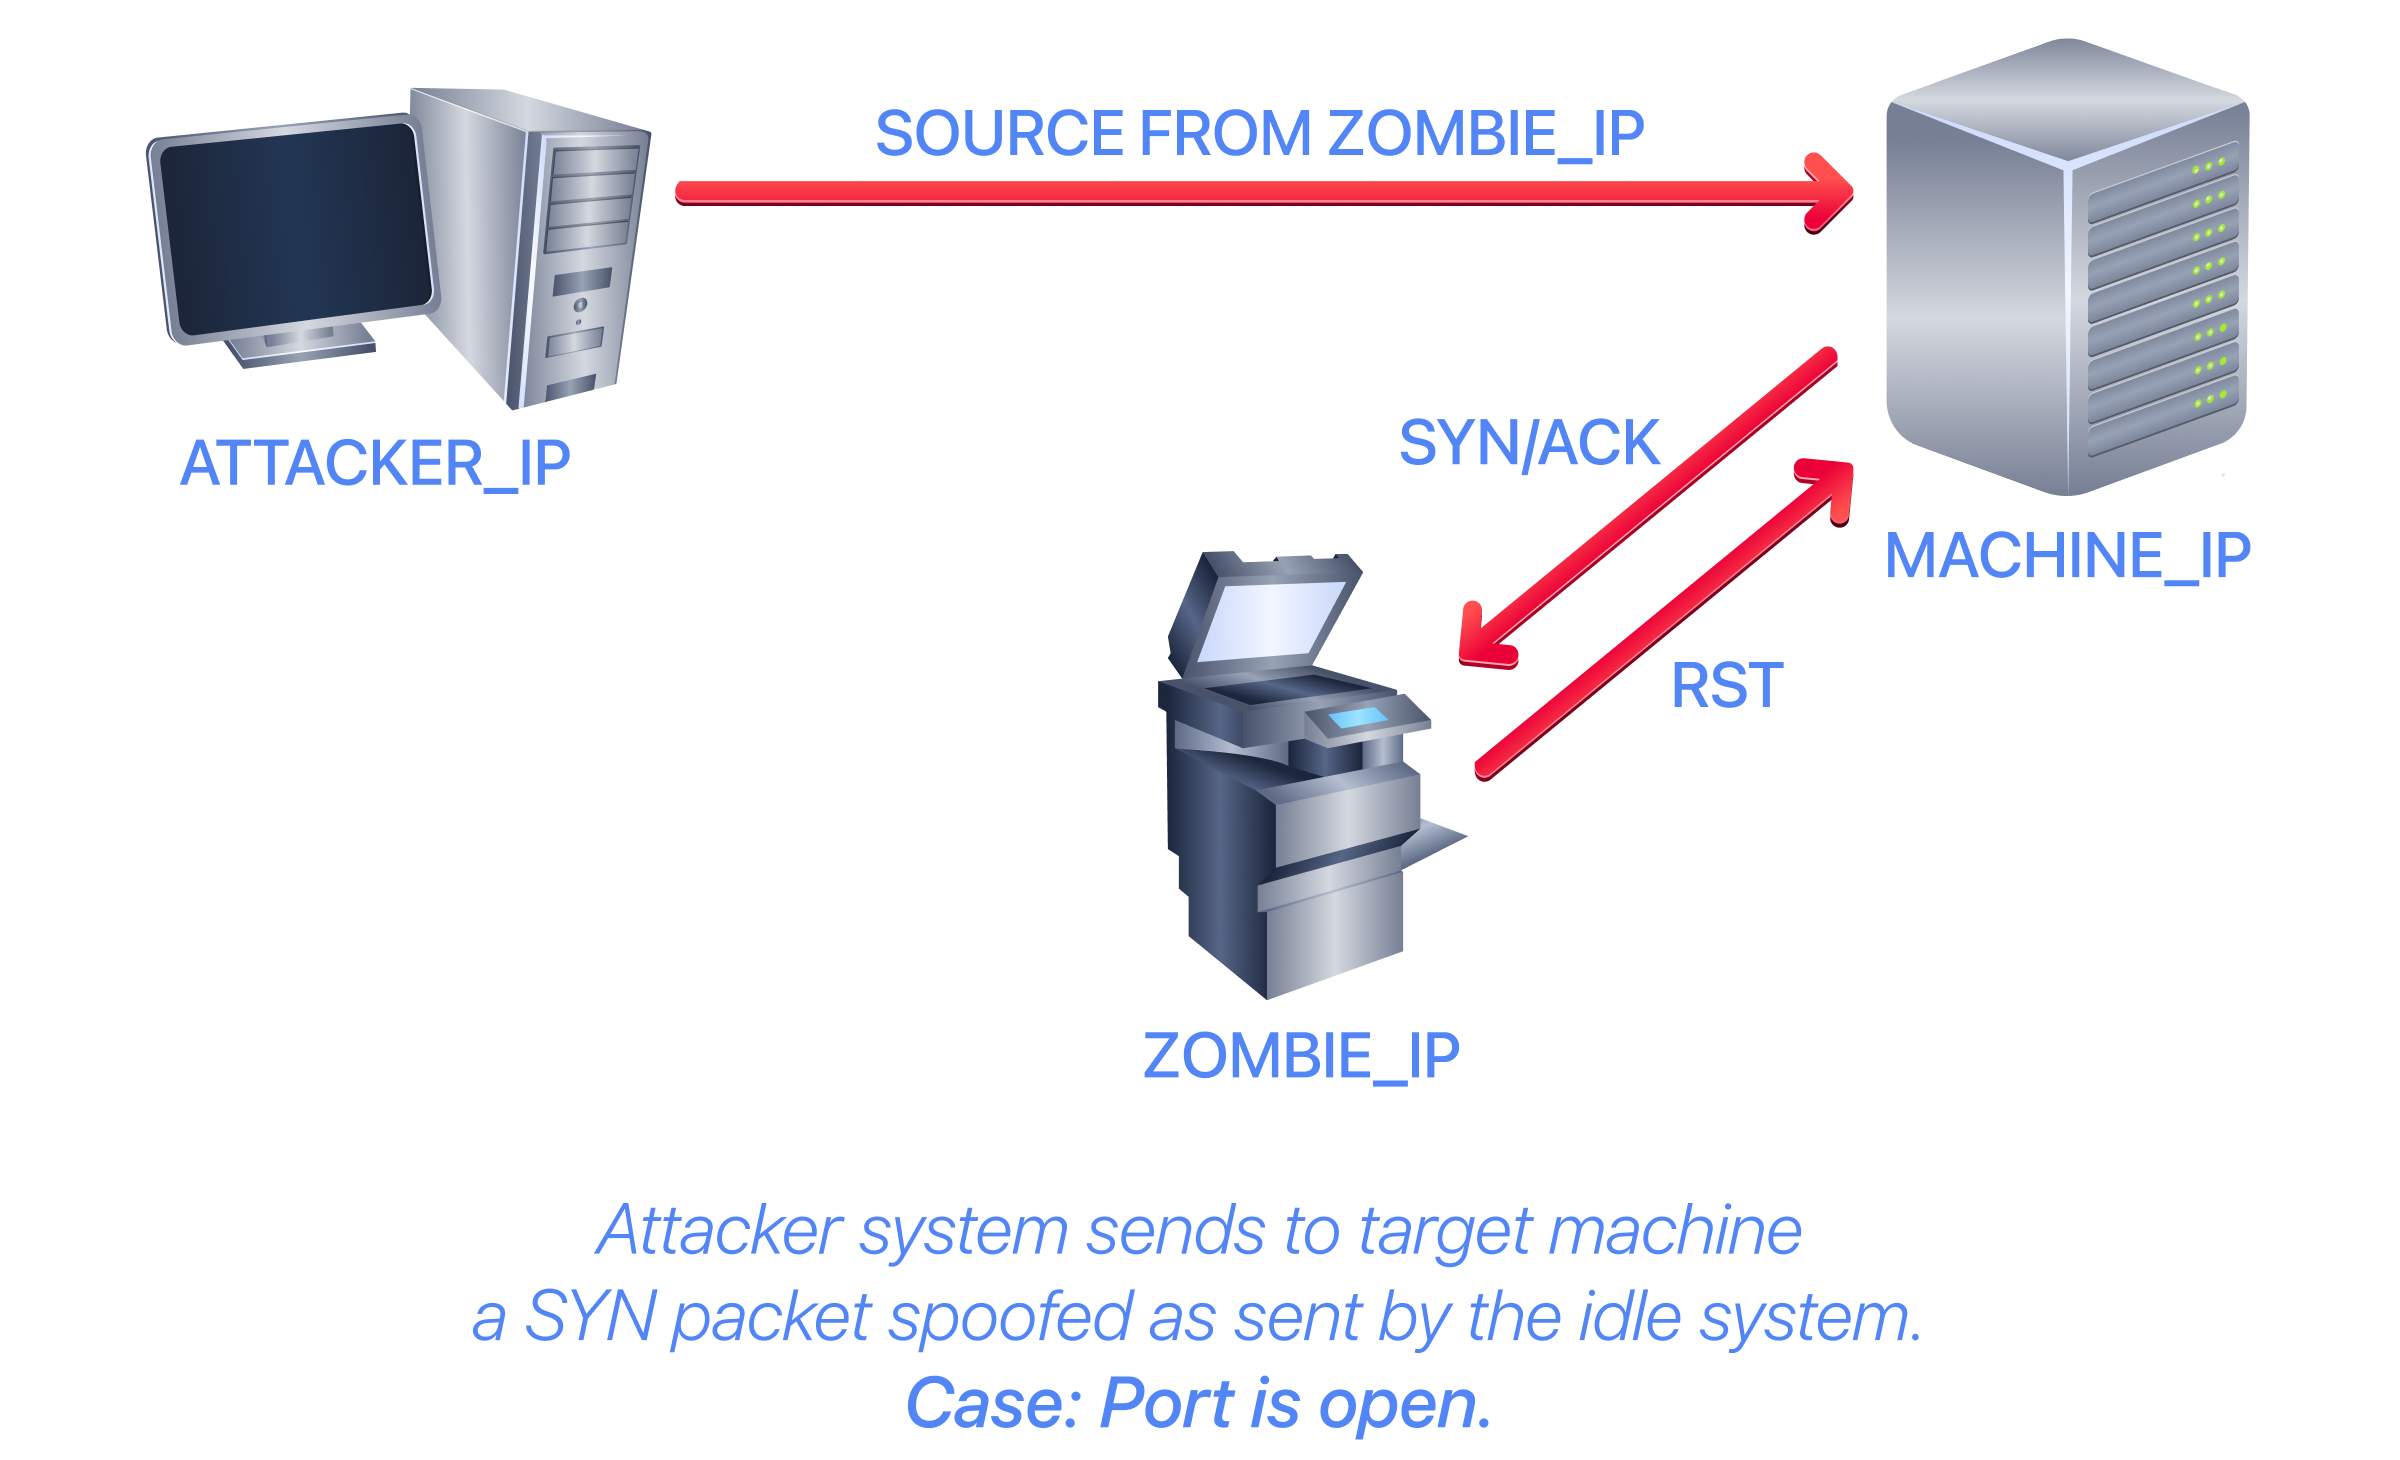
- Send a SYN packet to a TCP port on the target. The packet should be spoofed to appear to come from the idle host's IP address (zombie).
- Trigger the idle machine again to respond so that you can compare the new IP ID with the one received earlier.
Let’s explain with figures. In the figure below, we have the attacker system probing an idle machine, a multi-function printer. By sending a SYN/ACK, it responds with an RST packet containing its newly incremented IP ID.
The attacker will send a SYN packet to the TCP port they want to check on the lab machine in the next step. However, this packet will use the idle host (zombie) IP address as the source. Three scenarios would arise. In the first scenario, shown in the figure below, the TCP port is closed; therefore, the lab machine responds to the idle host with an RST packet. The idle host does not respond; hence, its IP ID is not incremented.
In the second scenario, as shown below, the TCP port is open, so the lab machine responds to the idle host (zombie) with a SYN/ACK. The idle host responds to this unexpected packet with an RST, incrementing its IP ID.
In the third scenario, the lab machine does not respond at all due to firewall rules. This lack of response will result in the same outcome as with a closed port: the idle host won’t increment the IP ID.
For the final step, the attacker sends another SYN/ACK to the idle host. The idle host responds with an RST packet, incrementing the IP ID by one again. The attacker needs to compare the IP ID of the RST packet received in the first step with the IP ID of the RST packet received in this third step. If the difference is 1, it means the port on the lab machine was closed or filtered. However, if the difference is 2, it means that the port on the target was open.
It is worth repeating that this scan is called an idle scan because selecting an idle host is essential to its accuracy. If the “idle host” is busy, all the returned IP IDs would be useless.
?Answer the questions below
- You discovered a rarely-used network printer with the IP address 10.10.5.5, and you decide to use it as a zombie in your idle scan. What argument should you add to your Nmap command?
Getting More Details
You might consider adding --reason if you want Nmap to provide more details regarding its reasoning and conclusions. Consider the two scans below to the system; however, the latter adds --reason.
           pentester@TryHackMe$ sudo nmap -sS MACHINE_IP

Starting Nmap 7.60 ( https://nmap.org ) at 2021-08-30 10:39 BST
Nmap scan report for ip-10-10-252-27.eu-west-1.compute.internal (10.10.252.27)
Host is up (0.0020s latency).
Not shown: 994 closed ports
PORT STATE SERVICE
22/tcp open ssh
25/tcp open smtp
80/tcp open http
110/tcp open pop3
111/tcp open rpcbind
143/tcp open imap
MAC Address: 02:45:BF:8A:2D:6B (Unknown)

Nmap done: 1 IP address (1 host up) scanned in 1.60 seconds
           pentester@TryHackMe$ sudo nmap -sS --reason MACHINE_IP

Starting Nmap 7.60 ( https://nmap.org ) at 2021-08-30 10:40 BST
Nmap scan report for ip-10-10-252-27.eu-west-1.compute.internal (10.10.252.27)
Host is up, received arp-response (0.0020s latency).
Not shown: 994 closed ports
Reason: 994 resets
PORT STATE SERVICE REASON
22/tcp open ssh syn-ack ttl 64
25/tcp open smtp syn-ack ttl 64
80/tcp open http syn-ack ttl 64
110/tcp open pop3 syn-ack ttl 64
111/tcp open rpcbind syn-ack ttl 64
143/tcp open imap syn-ack ttl 64
MAC Address: 02:45:BF:8A:2D:6B (Unknown)

Nmap done: 1 IP address (1 host up) scanned in 1.59 seconds
Providing the --reason flag gives us the explicit reason why Nmap concluded that the system is up or a particular port is open. In the console output above, we can see that this system is considered online because Nmap “received arp-response.” On the other hand, we know the SSH port is open because Nmap received a “syn-ack” packet.
For more detailed output, you can consider using -v for verbose output or -vv for even more verbosity.
           pentester@TryHackMe$ sudo nmap -sS -vv MACHINE_IP

Starting Nmap 7.60 ( https://nmap.org ) at 2021-08-30 10:41 BST
Initiating ARP Ping Scan at 10:41
Scanning 10.10.252.27 [1 port]
Completed ARP Ping Scan at 10:41, 0.22s elapsed (1 total hosts)
Initiating Parallel DNS resolution of 1 host. at 10:41
Completed Parallel DNS resolution of 1 host. at 10:41, 0.00s elapsed
Initiating SYN Stealth Scan at 10:41
Scanning ip-10-10-252-27.eu-west-1.compute.internal (10.10.252.27) [1000 ports]
Discovered open port 22/tcp on 10.10.252.27
Discovered open port 25/tcp on 10.10.252.27
Discovered open port 80/tcp on 10.10.252.27
Discovered open port 110/tcp on 10.10.252.27
Discovered open port 111/tcp on 10.10.252.27
Discovered open port 143/tcp on 10.10.252.27
Completed SYN Stealth Scan at 10:41, 1.25s elapsed (1000 total ports)
Nmap scan report for ip-10-10-252-27.eu-west-1.compute.internal (10.10.252.27)
Host is up, received arp-response (0.0019s latency).
Scanned at 2021-08-30 10:41:02 BST for 1s
Not shown: 994 closed ports
Reason: 994 resets
PORT STATE SERVICE REASON
22/tcp open ssh syn-ack ttl 64
25/tcp open smtp syn-ack ttl 64
80/tcp open http syn-ack ttl 64
110/tcp open pop3 syn-ack ttl 64
111/tcp open rpcbind syn-ack ttl 64
143/tcp open imap syn-ack ttl 64
MAC Address: 02:45:BF:8A:2D:6B (Unknown)

Read data files from: /usr/bin/../share/nmap
Nmap done: 1 IP address (1 host up) scanned in 1.59 seconds
Raw packets sent: 1002 (44.072KB) | Rcvd: 1002 (40.092KB)
If -vv does not satisfy your curiosity, you can use -d for debugging details or -dd for even more details. You can guarantee that using -d will create an output that extends beyond a single screen.
?Answer the questions below
- Use Nmap with nmap -sS -F --reason MACHINE_IP to scan the VM. What is the reason provided for the stated port(s) being open?
Summary
This room covered the following types of scans.
| Port Scan Type | Example Command |
|---|---|
| TCP Null Scan | sudo nmap -sN MACHINE_IP |
| TCP FIN Scan | sudo nmap -sF MACHINE_IP |
| TCP Xmas Scan | sudo nmap -sX MACHINE_IP |
| TCP Maimon Scan | sudo nmap -sM MACHINE_IP |
| TCP ACK Scan | sudo nmap -sA MACHINE_IP |
| TCP Window Scan | sudo nmap -sW MACHINE_IP |
| Custom TCP Scan | sudo nmap --scanflags URGACKPSHRSTSYNFIN MACHINE_IP |
| Spoofed Source IP | sudo nmap -S SPOOFED_IP MACHINE_IP |
| Spoofed MAC Address | --spoof-mac SPOOFED_MAC |
| Decoy Scan | nmap -D DECOY_IP,ME MACHINE_IP |
| Idle (Zombie) Scan | sudo nmap -sI ZOMBIE_IP MACHINE_IP |
| Fragment IP data into 8 bytes | -f |
| Fragment IP data into 16 bytes | -ff |
| Option | Purpose |
|---|---|
| --source-port PORT_NUM | Specify source port number |
| --data-length NUM | Append random data to reach the given length |
These scan types rely on setting TCP flags in unexpected ways to prompt ports for a reply. Null, FIN, and Xmas scans provoke a response from closed ports, while Maimon, ACK, and Window scans provoke a response from open and closed ports.
| Option | Purpose |
|---|---|
| --reason | explains how Nmap made its conclusion |
| -v | verbose |
| -vv | very verbose |
| -d | debugging |
| -dd | more details for debugging |
?Answer the questions below
- Ensure you have noted all the Nmap options explained in this room. Please join the Nmap Post Port Scans room, the last room in this Nmap series.
 Nmap Basic Port Scans
 Nmap Post Port Scans